background image

64

PC ON-SCREEN DISPLAY

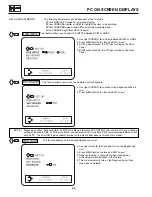
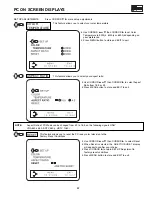
PICTURE ADJUSTMENTS

The following adjustments are independent of the TV mode:

¥Press MENU in PC mode for on-screen display.
¥Press CURSORS right (

) or (

) left to highlight the item to be adjusted.

¥Press CURSORS up (

) or down (

) to select the highlighted item.

¥Use CURSORS right (

) or (

) left to adjust.

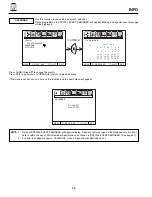
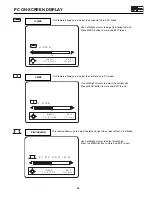
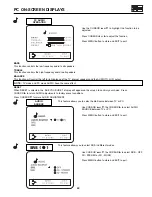
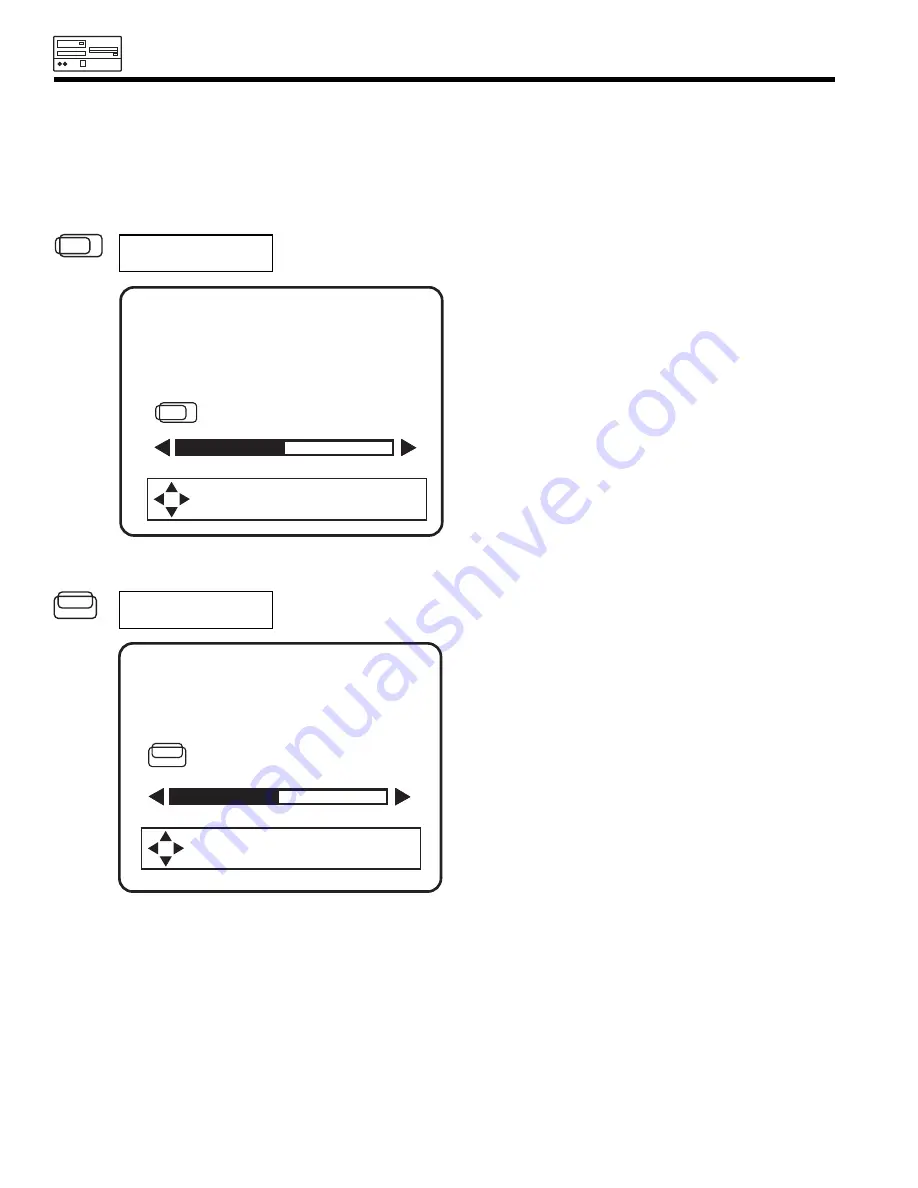
V POSITION

This feature allows you to adjust the vertical position in PC mode.

Use Left/Right cursors to adjust the vertical position. 
Press MENU button to store and EXIT to quit.

H POSITION

This feature allows you to adjust the horizontal position of the display.

Use Left/Right cursors to adjust the horizontal position. 
Press the MENU button to store and EXIT to quit.

H   P O S I T I O N

T O   S T O R E

T O   Q U I T

M E N U

E X I T

32

V   P O S I T I O N

T O   S T O R E

T O   Q U I T

M E N U

E X I T

32

Summary of Contents for 36SDX88B

Page 1: ...ustom Set Up Custom Custom Custom Custom Custom Custom CUSTOM Set Up USING THE PC READY COLOR TV AS A PC MONITOR FIRST TIME USE 6 20 THE REMOTE CONTROL 21 31 ULTRATEC ON SCREEN DISPLAY 32 59 PLUG AND PLAY TRADEMARK ACKNOWLEDGMENT REGULATORY INFORMATION USEFUL INFORMATION SERVICE HOTLINE FEATURE INFORMATION 71 79 60 70 ...

Page 2: ...IED VOLTAGE CAUTION Never remove the back cover of the PC ready color television set as this can expose you to very high voltages and other hazards If the set does not operate properly unplug the set and call your dealer or service shop CAUTION RISK OF ELECTRIC SHOCK DO NOT OPEN CAUTION TO REDUCE THE RISK OF ELECTRIC SHOCK DO NOT REMOVE COVER OR BACK NO USER SERVICEABLE PARTS INSIDE REFER SERVICIN...

Page 3: ...elevision set Wall or shelf mounting should follow the manufacturer s instructions and should use a mounting kit approved by the manufacturer 11 2 An appliance and cart combination should be moved with care Quick stops excessive force and uneven surfaces may cause the appliance and cart combination to overturn IMPORTANT SAFEGUARDS CAUTION SAFETY POINTS YOU SHOULD KNOW ABOUT Read all of these instr...

Page 4: ... part Unauthorized substitutions may result in fire electric shock or other hazards FOR SERVICING AND MODIFICATION 27 Upon completion of any service or repairs to the PC ready color television set ask the service technician to perform routine safety checks to determine that the PC ready color television is in safe operating condition 16 1 If an outside antenna is connected to the PC ready color te...

Page 5: ...C Ready Color Television Receivers Such PATTERN BURNS constitute misuse and are NOT COVERED by your HITACHI Factory Warranty This PC ready color television receiver was intended mainly for the private viewing of programs broadcast by TV stations cable companies and programs from other video sources Public viewing may require prior authorization from the broadcaster or owner of the video program ...

Page 6: ...UTION PC ready color television stand model SP351B or SP364B is designed for use only with a 36 inch or smaller PC ready color television set Use of a smaller stand a non Hitachi recommended stand or a generic stand may result in instability causing possible injury CUSTOM HITACHI PC READY COLOR TELEVISION STAND Excellent for VCR and videotape storage Special features include curved smoke glass doo...

Page 7: ...ng period of time for instance when you go on vacation unplug the PC ready color television from the wall outlet 2 Do not subject the remote control to shocks such as dropping it on the floor etc Precision parts may be damaged 3 Do not allow the remote control to become wet and avoid placing it in areas of high humidity Do not leave it on or near a heater Excess heat or moisture may cause the unit...

Page 8: ... PC ready color TV and about 6 to 9 feet from the screen During daylight hours reflections from outside light may appear on the screen If so drapes or screens can be used to reduce the reflection or the PC ready color TV can be located in a different section of the room If the PC ready color TV s audio output will be connected to a Hi Fi system s external speakers the best audio performance will b...

Page 9: ...olor television s rear jack panel and front control panel F Type 75 Ohm Coaxial Antenna Connector For connecting RF signals antenna or cable TV to the antenna jack on the television S Video Super Video Connector This connector is used on camcorders VCRs and laser disc players with an S Video feature in place of the standard video cable to produce a high quality picture Mouse Connector Cable Provid...

Page 10: ...UHF To UHF Antenna To outdoor VHF Antenna Rear of TV set To outdoor VHF or UHF Antenna connect VHF Adaptor ANTENNA CONNECTIONS These sets are equipped with one VHF UHF antenna terminal The VHF UHF terminal can be used for normal TV cable TV CATV a TV game etc HOOKUP CABLES AND CONNECTORS NOTE Optional adapter for Apple Macintosh computers See page xx If the optional AESP model G301 U Macintosh to ...

Page 11: ...n operations D I G I T I T A L MENU EXIT INPUT VOL CH POWER Input Button Volume Buttons Channel Buttons Power Button CURSOR MENU EXIT OPEN DOOR PiPC SVGA S VIDEO VIDEO L MONO R AUDIO INPUT 3 Input 3 S Video Infrared Sensor PiPC SVGA Menu Exit Input Vol CH Power OPEN DOOR PC RGB Input 2 PC RGB INPUT 2 LED PC MOUSE INFRARED SENSOR INPUT 3 ...

Page 12: ...ate the FAMILY FAVORITES channel function FRONT INPUT JACKS for VIDEO 3 Use these audio video jacks for a quick hook up from a camcorder or VCR to instantly view your favorite show or new recording Press the Input button until VIDEO 3 appears in the top right corner of the PC ready color TV screen PC RGB INPUT 2 Use this 15 pin D Sub input for a quick hook up from your PC connection RGB2 S VIDEO 3...

Page 13: ...rovide fixed audio and video signals which are used for recording There is NO MONITOR OUT when using COMPONENT VIDEO Audio to Hi Fi These jacks provide variable audio output to a separate stereo amplifier With this connection the audio to the stereo can be controlled by the PC ready color television s main volume Use these jacks for the SURROUND Left and Right channels see page 16 and 20 PC Contro...

Page 14: ...ay be used at a time Connect only 1 component to each input jack DO NOT connect standard VIDEO or S VIDEO to Input 2 when using Y CBCR Y PBPR input COMPONENT Y CBCR Y PBPR connections are provided for high performance components such as DVD players Use these connections in place of the standard video connection if your device has this feature When using the Y CBCR Y PBPR input jacks connect your c...

Page 15: ...VIDEO R AUDIO MONO L VIDEO B R Y P P OUTPUT L R Y P C R R P C B B S VIDEO ANT IN VCR 1 Optional see tips on page 14 V L R S VIDEO Laserdisc player VCR camcorder etc L R INPUT Stereo System Amplifier INPUT V L R VCR 2 2 Way signal splitter 2 Way signal splitter Outside antenna or cable TV coaxial cable INPUT 2 L and R Optional see tips on page 14 DVD Player Laserdisc player etc HDTV SET TOP BOX OR ...

Page 16: ...nect the system as shown below NOTE To prevent damage to the speaker and distorted sound set the volume control of the audio amplifier lower and adjust the sound using the remote control of the PC ready color TV set REAR OF PC READY COLOR TV SET CONNECTING EXTERNAL AUDIO AMPLIFIER AUDIO TO ...

Page 17: ...o view the input source see page 24 INPUT MODE SELECTION ORDER Example 12 VIDEO VIDEO S IN Antenna Input Input Input PC NOTE When the PC ready color TV is set to VIDEO and a video signal is not received from VIDEO INPUT JACK on the jack panel of the PC ready color TV i e VCR laserdisc player etc is not connected or the video device is OFF the screen will be gray blue CONNECTING MONAURAL AUDIO VCR ...

Page 18: ...m from the VCR or laserdisc player The mode VIDEO disappears automatically after approximately eight seconds 5 Press the INPUT button to return to the previous channel NOTE Completely insert the cable connection when connecting to rear panel jacks The picture that is played back will be abnormal if the cable connection is loose If you have an S VHS VCR you can use the S INPUT cable in place of the...

Page 19: ...AUDIO OUT R of the Laserdisc or DVD player or SET TOP BOX to the INPUT 2 AUDIO R jack 5 Connect the cable from the AUDIO OUT L of the Laserdisc or DVD player or SET TOP BOX to the INPUT 2 AUDIO L jack 6 Press the INPUT button until VIDEO 2 appears to view the program from the Laserdisc or DVD player or SET TOP BOX The mode VIDEO 2 disappears automatically after approximately eight seconds 7 Press ...

Page 20: ...TION FEATURE OPTIONAL CONNECTION EFFECT TV MODE Receive mono and stereo sound OFF SRS G REQUIRED CONNECTION FEATURE OPTIONAL CONNECTION EFFECT TV VIDEO PC MODE ON Sound is natural and crisp from just two speakers REQUIRED CONNECTION FEATURE OPTIONAL CONNECTION EFFECT VIDEO PC MODE OFF At stereo input Exciting and realistic 3D sound experience Receive mono and stereo sound 3D STEREO At mono input S...

Page 21: ...21 HOW TO USE THE REMOTE TO CONTROL YOUR TV A detailed explanation of the circled numbers follows on page 22 to 24 ...

Page 22: ...its of the channel Channel selection may also be performed by pressing CH up or down You may also use these buttons for channel scanning Press and hold the CH up or down buttons and the PC ready color TV will start quickly scanning through the channels Release the CH up or down buttons when the PC ready color TV scans to the channel you wish to watch and the PC ready color TV will tune to that cha...

Page 23: ...o selected current channel antenna source audio broadcast time time out and sleep timer When a Video Input is connected to Video 1 When an S Video Input is connected to Video 3 NOTE You can also use the RECALL button to quickly clear many of the other On Screen Displays PC RGB1 VIDEO S IN 3 Y CBCR When a PC Input is connected to PC RGB 1 When a COMPONENT Y CBCR Input is connected to Video 2 Audio ...

Page 24: ... to the timer up to a maximum of three hours Once set use RECALL when you want to view time remaining If the SLEEP button is pressed while the timer is set it will reset to the original condition LIGHT Button When you are in a dark room press the light button on the side of the remote to light up the buttons shown in The light will stay on for about 8 seconds if the light button is not pressed aga...

Page 25: ... UHF PC RGB INPUT 1 VGA SVGA AUDIO OUT MOUSE PORT 0 9 8 7 4 5 6 1 2 3 MENU SLEEP INPUT CLU 433FC F AV CH EXIT CH VOL HELP POSITION TV CABLE VCR POWER CURSOR CONTROL TV VCR REC STOP PAUSE PIPC SIZE H H V V F AV CH RECALL C S LST CH MUTE L I G H T MULTIMEDIA PC INPUT 2 L and R Outside antenna or cable TV coaxial cable Y P C R R P C B B R AUDIO MONO L VIDEO R AUDIO MONO L VIDEO S VIDEO Y C C B R OUTP...

Page 26: ... seconds and then use the CURSOR buttons Press CURSOR to select Audio Input source to TV or PC mode F AV CH EXIT F AV CH AFTER EIGHT SECONDS NOTE PinPC works correctly when receiving the following signal timings horizontal and vertical position of PinPC may not work correctly with other timings NOTE Component input with High Definition 1080 I and Standard Definition 480P Digital signals do not sho...

Page 27: ...27 USING THE REMOTE TO CONTROL YOUR VCR FUNCTIONS A detailed explanation of the circled number follows on page 28 ...

Page 28: ...on to switch to the VCR precoded mode 4 While holding down the VCR button on the remote enter the two digit preset code that matches your VCR as shown on page 31 The remote will turn off your VCR when the correct two digit preset code is entered When this occurs the remote control is programmed for your VCR If the VCR does not turn off after five seconds try a different two digit preset code 5 The...

Page 29: ...29 USING THE REMOTE TO CONTROL CABLE SATELLITE BOX FUNCTION A detailed explanation of the circled numbers follows on page 30 ...

Page 30: ... satellite box cannot be operated after performing the above procedures your cable satellite box code has not been precoded into the remote 2 In the unlikely event that your cable satellite box cannot be operated after performing the above procedures please consult your cable satellite box operating guide 3 The remote control will remember the codes you have programmed in until the batteries are r...

Page 31: ...tec 30 Pulsar 14 Quarter 17 Quartz 17 Quasar 22 Radio Shack 00 23 Radix 23 Randex 23 RCA 02 03 04 35 41 47 Realistic 00 17 18 19 20 22 23 32 45 Ricoh 21 Runco 14 Samsung 16 45 Sanky 14 19 Sansui 01 26 Sanyo 17 18 32 45 Scott 15 16 33 34 37 42 Sears 02 04 17 18 20 22 23 32 46 Sharp 19 Shintom 30 Shogun 45 Singer 30 Sony 07 09 21 22 STS 02 Sylvania 00 15 22 29 31 Symphonic 00 Tatung 01 Teac 00 01 Te...

Page 32: ...ent features on your HITACHI PC ready color TV 2 Press the CURSOR buttons to highlight and select different features 3 Press EXIT on the remote control to quickly exit from a menu 4 Press HELP on the remote control when a menu is displayed and text will appear giving a description of that menu CURSOR CONTROL NOTE Please see page 21 through 24 for details on remote control operation SET UP Custom V...

Page 33: ...CKGROUND Select from three types of backgrounds CONTRAST Adjust contrast BRIGHTNESS Adjust brightness COLOR Adjust color TINT Adjust tint SHARPNESS Adjust sharpness RESET Set VIDEO settings to factory preset condition ADVANCED Improve picture performance SETTINGS BASS Adjust bass TREBLE Adjust treble BALANCE Adjust balance RESET Set AUDIO settings to factory preset ADVANCED Improve sound performan...

Page 34: ...IT TO QUIT MENU LANGUAGE SIGNAL SOURCE AUTO CHANNEL SET CHANNEL MEMORY CHANNEL LIST CLOCK SET TO QUIT CURSOR CURSOR Set Up Custom Video Audio Theater Info Set Up Custom Set Up Custom I Set Up Custom Set Up Custom Set Up Custom Set Up Custom Set Up EXIT Set Up Custom Video Audio Theater Info Set Up Custom Set Up Custom I Set Up Custom Set Up Custom Set Up Custom Set Up Custom Set Up Set Up Custom V...

Page 35: ... Set Up Custom Set Up Custom Set Up Custom Set Up Custom Set Up Set Up Custom Set Up Custom Set Up Set Up Set Up Set Up Set Up MENU TO MENU BAR TO QUIT EXIT Set Up Custom Set Up Custom Set Up Custom Set Up Custom Set Up Custom Set Up Custom Set Up Custom Set Up Set Up Custom Set Up Custom Set Up Set Up Set Up Set Up Set Up MENU TO MENU BAR TO QUIT EXIT Set Up Custom Set Up Custom Set Up Custom Set...

Page 36: ...p Custom Set Up Custom Set Up Custom Set Up Custom Set Up MENU TO MENU BAR TO QUIT EXIT Set Up Custom Video Audio Theater Info Set Up Custom Set Up Custom I Set Up Custom Set Up Custom Set Up Custom Set Up Custom Set Up Set Up Custom Video Audio Theater Info Set Up Custom Set Up Custom I Set Up Custom Set Up Custom Set Up Custom Set Up Custom Set Up Set Up Custom Video Audio Theater Info Set Up Cu...

Page 37: ...t Up Custom I Set Up Custom Set Up Custom Set Up Custom Set Up Custom Set Up Set Up Custom Video Audio Theater Info Set Up Custom Set Up Custom I Set Up Custom Set Up Custom Set Up Custom Set Up Custom Set Up MENU TO MENU BAR TO QUIT EXIT Set Up Custom Video Audio Theater Info Set Up Custom Set Up Custom I Set Up Custom Set Up Custom Set Up Custom Set Up Custom Set Up Set Up Custom Video Audio The...

Page 38: ... Custom Set Up Set Up Custom Video Audio Theater Info Set Up Custom Set Up Custom I Set Up Custom Set Up Custom Set Up Custom Set Up Custom Set Up MENU TO MENU BAR TO QUIT EXIT Set Up Custom Video Audio Theater Info Set Up Custom Set Up Custom I Set Up Custom Set Up Custom Set Up Custom Set Up Custom Set Up Set Up Custom Video Audio Theater Info Set Up Custom Set Up Custom I Set Up Custom Set Up C...

Page 39: ... EXIT to quit menu or CURSOR to return to previous menu when the CURSOR is in the first position CLOCK SET MENU TO MENU BAR TO QUIT EXIT CURSOR CURSOR CLOCK SET AM JAN 01 1998 CLOCK SET 12 00 PM MAR 12 1998 MENU TO MENU BAR TO QUIT EXIT MENU TO MENU BAR TO QUIT EXIT TO SET TIME TO SET TIME MENU LANGUAGE SIGNAL SOURCE AUTO CHANNEL SET CHANNEL MEMORY CHANNEL LIST CLOCK SET FAV CH FAV CH CUSTOM VIDEO...

Page 40: ...he screen to confirm your choice CHANNEL ID CURSOR MENU Set Up Custom Video Audio Theater Info Set Up Set Up I Set Up Set Up Set Up Set Up Video Audio Theater Info I Custom MENU TO MENU BAR TO QUIT EXIT Set Up Custom Video Audio Theater Info Set Up Set Up I Set Up Set Up Set Up Set Up Video Audio Theater Info I Custom MENU TO MENU BAR TO QUIT EXIT Set Up Custom Video Audio Theater Info Set Up Set ...

Page 41: ...NNEL ID is set for the channel at the top of each column it will be displayed above that column FAMILY FAVORITES MENU FAV CH FAV CH Set Up Custom Video Audio Theater Info Set Up Set Up I Set Up Set Up Set Up Set Up Video Audio Theater Info I Custom MENU TO MENU BAR TO QUIT EXIT Set Up Custom Video Audio Theater Info Set Up Set Up I Set Up Set Up Set Up Set Up Video Audio Theater Info I Custom MENU...

Page 42: ...light a favorite channel and the PC ready color TV will automatically tune to that channel Press EXIT to remove FAMILY FAVORITES OSD from the screen NOTE After all of your favorite channels are registered the CURSOR buttons can be used for quick access to the FAVORITE CHANNELS menu FAMILY FAVORITES OPERATION CURSOR MENU MENU TO SURF TO QUIT EXIT MENU TO SURF TO QUIT EXIT FAV CH FAV CH FAMILY FAVOR...

Page 43: ... on you can set the BEGIN and END times and the PC ready color TV cannot be viewed during that time period Set clock first Use CURSOR or to highlight ONCE PC ready color TV will time out one time only DAILY PC ready color TV will time out every day WEEKLY PC ready color TV will time out one time a week or OFF to disable this function and then press cursor to select your choice CHILD LOCK Set Up Cu...

Page 44: ...D ONCE DAILY WEEKLY OFF CHILD LOCK CHANGE SECRET CODE CHANNEL 03 VIDEO LOCK QUICK LOCK TV TIME OUT Press CURSOR or to select the time to begin Press CURSOR to select hour minutes and AM PM Press CURSOR or to set the time to begin Press CURSOR then CURSOR to select time to end Press CURSORS or to set time to end Press CURSOR to exit time end Press CURSORS or to select once daily or weekly To change...

Page 45: ... 2 If no remote control button is pressed after ON Timer is activated the PC ready color TV will automatically turn off after three hours CAUTION Do not use your PC color ready TV as a deterrent when away from home by using the ON and OFF TIMERS For safety the PC color ready TV should be turned off when you are away from home 4 EVENT PROG CUSTOM CUSTOM Set Up Custom Video Audio Theater Info Set Up...

Page 46: ...evious menu AUTO LINK NOTE 1 Once the PC ready color TV has been turned on using the AUTO LINK feature it must be reset before AUTO LINK is used again To do this turn your VCR laserdisc or DVD player OFF This feature is now reset and will turn on your PC ready color TV as described above 2 When using REMOTE mode any remote control button will substitute for your video input device play button Howe...

Page 47: ...or CURSOR to return to previous menu Select CLEAR and no background is visible select GRAY and a gray background is visible no picture can be seen behind menu screen select SHADED and a light background is visible MENU BACKGROUND Set Up Custom Video Audio Theater Info Set Up Set Up I Set Up Set Up Set Up Set Up Video Audio Theater Info I Custom MENU TO MENU BAR TO QUIT EXIT CURSOR Set Up Custom Vi...

Page 48: ...hey appear natural It may be necessary to adjust TINT to obtain optimum picture quality when using the COMPONENT Y PBPR Y CBCR Input 2 jacks Use this function to adjust overall picture brightness Use this function to adjust the amount of fine detail in the picture When RESET is selected the ARE YOU SURE display will appear on the screen to confirm your choice Press CURSOR to return VIDEO adjustmen...

Page 49: ...natural flesh tones while preserving fidelity of background colors COLOR TEMPERATURE Use this function adjust the white balance hue of the picture to your own color preference Set this to WARM for hotter colors with more red or set to COOL for less intense colors with more blue ADVANCED SETTINGS NOTE It may be necessary to set AUTO COLOR ON to obtain optimum picture quality when using the COMPONEN...

Page 50: ...hanges to 4 3 aspect ratio SDTV and NTSC signals are normally 4 3 aspect ratio H POSITION This function allows you to adjust the Horizontal Position on DTV mode This is convenient when using SET TOP BOX ADVANCED SETTINGS Set Up Custom Video Audio Theater Info Set Up Set Up I Set Up Set Up Set Up Set Up Video Audio Theater Info I MENU TO MENU BAR TO QUIT EXIT CURSOR CURSOR Set Up Custom Video Audio...

Page 51: ... function will control the left to right balance of the TV internal speakers and the AUDIO TO HI FI output When RESET is selected the ARE YOU SURE display will appear on the screen to confirm your choice Press CURSOR to return AUDIO adjustments to factory preset conditions AUDIO BASS BALANCE RESET TREBLE Set Up Custom Video Audio Theater Info Set Up Set Up I Set Up Set Up Set Up Set Up Audio Theat...

Page 52: ...rs from a separate stereo system AUTO NOISE CANCEL This function eliminates the noise in between stations If a channel is tuned and is noisy this function will automatically eliminate the audio for that channel and set to blue screen LOUDNESS This function will improve the quality of both low and high frequency sounds when listening at low volume levels 31 NEWS 10 00 PM 31 NEWS 10 00 PM STEREO SEL...

Page 53: ...E RESET Ch Level ADVANCED 100 SETTINGS 100 VOLUME 100 CORRECTIONS 100 BASS TREBLE BALANCE RESET Ch Level ADVANCED 03 80 SETTINGS 100 VOLUME 100 CORRECTIONS 100 Press CURSOR or to highlight one of the four volume corrections then CURSOR to select Press CHANNEL or and number buttons to select a channel Press CURSOR or to adjust volume level in 5 increments Press EXIT to quit menu or CURSOR to return...

Page 54: ...t Up MENU TO MENU BAR TO QUIT EXIT Set Up Theater Set Up Set Up Set Up Set Up Set Up MENU TO MENU BAR TO QUIT EXIT MENU TO MENU BAR TO QUIT EXIT Set Up Theater Set Up Set Up Set Up Set Up Set Up FAV CH FAV CH VIDEO AUDIO THEATER INFO SET UP CUSTOM SRS OFF BBE ON SRS OFF BBE ON SRS OFF BBE ON VIDEO AUDIO THEATER INFO SET UP CUSTOM VIDEO AUDIO THEATER INFO SET UP CUSTOM TV MODE NOTE TV Mode This mod...

Page 55: ...Set Up Set Up Set Up Set Up Set Up FAV CH FAV CH SRS OFF BBE 3D STEREO 3D MONO SRS OFF BBE 3D STEREO 3D MONO SRS OFF BBE 3D STEREO 3D MONO VIDEO AUDIO THEATER INFO SET UP CUSTOM VIDEO AUDIO THEATER INFO SET UP CUSTOM VIDEO AUDIO THEATER INFO SET UP CUSTOM USE CURSOR or then CURSOR to set SRS OFF 3D STEREO or 3D MONO Press EXIT to quit menu or CURSOR to return to previous menu NOTE VIDEO MODE This ...

Page 56: ...gnize the unique tonal colors of each sound as though the sound was being produced live NOTE BBE functions the same manner on TV mode and on VIDEO mode NOTE The mark BBE and the BBE symbol are trademarks of BBE Sound Inc Manufactured under liscense from BBE Sound Inc US pat 4 638 258 4 482 866 and 5 510 752 CURSOR Set Up Theater Set Up Set Up Set Up Set Up Set Up MENU TO MENU BAR TO QUIT EXIT Set ...

Page 57: ...l event message can be a maximum of 20 characters 3 When the RECALL button is pressed a special icon appears on the right bottom side of the screen and indicates a SPECIAL EVENT REMINDER message Press the RECALL button again to display the SPECIAL EVENT REMINDER message SPECIAL EVENT REMINDER INFO This function allows your PC ready color TV to assist you with your busy day to day schedule Set Up I...

Page 58: ...to CALENDAR when a Special Event Reminder is set CALENDAR If the clock is not set you can not use this function and the next screen will appear Set Up Info Set Up Set Up I Set Up Set Up Set Up I MENU TO MENU BAR TO QUIT EXIT CURSOR MENU TO MENU BAR TO QUIT EXIT Set Up Info Set Up Set Up I Set Up Set Up Set Up I SPECIAL EVENT REMINDER CALENDAR AUTO HELP J A N 1 9 9 8 S M T W T F S 1 2 3 4 5 6 7 8 9...

Page 59: ...turn this function ON and OFF by pressing the HELP button on the remote control MENU TO MENU BAR TO QUIT EXIT Set Up Info Set Up Set Up I Set Up Set Up Set Up I CURSOR MENU TO MENU BAR TO QUIT EXIT SPECIAL EVENT REMINDER CALENDAR AUTO HELP ON OFF SPECIAL EVENT REMINDER CALENDAR AUTO HELP ON OFF CURSOR FAV CH VIDEO AUDIO THEATER INFO SET UP CUSTOM INFO INSTANT HELP DESCRIPTION OF THE DISPLAYED MENU...

Page 60: ...PC display setting is wrong the monitor will display Please set PC for 640 x 480 60Hz 640 x 480 72Hz 800 x 600 60Hz display 2 This monitor uses PS 2 format for the mouse interface On some PC s the mouse control may not work in the following situations Disconnecting and reconnecting mouse cable while PC ready color TV and PC power is turned on Turning on the PC power before turning on the PC ready ...

Page 61: ...page 62 0 9 8 7 4 5 6 1 2 3 MENU SLEEP INPUT CLU 433FC F AV CH EXIT CH VOL HELP POSITION TV CABLE VCR POWER CURSOR CONTROL TV VCR REC STOP PAUSE PIPC SIZE H H V V F AV CH RECALL C S LST CH MUTE L I G H T FRONT PANEL CONTROLS MENU EXIT INPUT VOL CH POWER CURSOR MENU EXIT PiPC SVGA Menu Exit Input Vol CH Power ...

Page 62: ...to display PC vertical position adjustment bar Press cursor left right to adjust PC vertical position H SIZE Button Press to display PC horizontal size adjustment bar Press cursor left right to adjust PC horizontal size V SIZE Button Press to display PC vertical size adjustment bar Press cursor left right to adjust PC vertical size LAST CHANNEL LST CH Button Press to perform mouse right button dra...

Page 63: ... OPERATION 1 Connect the 6 pin din cable provided to the PC and monitor as shown on page 60 2 Turn the TV PC monitor power on 3 Press the input button on the front panel or on the remote control until you select PC mode 4 Turn the PC power on 5 After the PC has completed booting use the cursor buttons on the PC ready color TV front panel or on the remote control to move the mouse cursor up down le...

Page 64: ...djust V POSITION This feature allows you to adjust the vertical position in PC mode Use Left Right cursors to adjust the vertical position Press MENU button to store and EXIT to quit H POSITION This feature allows you to adjust the horizontal position of the display Use Left Right cursors to adjust the horizontal position Press the MENU button to store and EXIT to quit H P O S I T I O N T O S T O ...

Page 65: ...incushion in PC Mode Use Left Right cursors to adjust the horizontal size Press MENU button to store and EXIT to quit Use Left Right cursors to adjust the vertical size Press MENU button to store and EXIT to quit H SIZE This feature allows you to adjust the horizontal size in PC Mode T O S T O R E T O Q U I T M E N U E X I T 32 H S I Z E V S I Z E T O S T O R E T O Q U I T M E N U E X I T 32 T O S...

Page 66: ...ce you change setting of Keyboard USE of PC Set Up Menu you better restart PC to refresh PS 2 communication between your set and PC The Mini DIN 6 pin keyboard terminal on the Rear Panel does not work on this model This feature allows you to manually Degauss your set Use right cursor to check and turn on the Degaussing Coil Press MENU button to store and EXIT to quit Degauss function is convenient...

Page 67: ...r then CURSOR to select Reset When Reset is selected the ARE YOU SURE display will appear to confirm your choice Press CURSOR to return SET UP Adjustment to factory preset conditions Press MENU button to store and EXIT to quit This feature allows you to select your color temperature This feature allows you to select your aspect ratio This feature allows you to reset the PC ready color television t...

Page 68: ...This feature allows you to adjust brightness in PC Mode Use Left Right cursors to adjust contrast Press MENU button to store and EXIT to quit NOTE See TV contrast feature for additional information regarding contrast Use Left Right cursors to adjust brightness Press MENU button to store and EXIT to quit ...

Page 69: ... the ARE YOU SURE display will appear on the screen to confirm your choice Press CURSOR to return AUDIO adjustments to factory preset conditions Press CURSOR for more AUDIO ADJUSTMENT PC AUDIO OPERATION AUDIO SOURCE This feature allows you to select Audio Source between TV or PC Use CURSOR or the CURSOR to select AUDIO SOURCE between TV or PC Press MENU button to store and EXIT to quit Use CURSOR ...

Page 70: ...re allows you to adjust the tilt position of the display Use or CURSORS to adjust the horizontal position Press MENU button to store and EXIT to quit TILT NOTE Tilt control works only on PC mode it does not work on TV mode If you change tilt setting on PC mode the tilt data on TV mode will change as well Please change mode back to PC mode then adjust tilt control if you want to adjust it on TV mod...

Page 71: ...GMENT VGA is a registered trademark of International Business Machines Corporation Apple and Macintosh are registered trademarks of Apple Computer Inc VESA is a trademark of a nonprofit organization Video Electronics Standard Association This Class B digital apparatus meets all requirements of the Canadian Interference Causing Equipment Regulations This Class B digital apparatus complies with Cana...

Page 72: ...erienced radio television technician for help Modifications The FCC requires the user to be notified that any changes or modifications made to this device that are not expressly approved by Hitachi Home Electronics America Inc may void the user s authority to operate the equipment Cables Connections to this device must be made with shielded cables with metallic RFI EMI connector hoods to maintain ...

Page 73: ...f time for instance when you go on vacation DO NOT Do not clean your screen or cabinet with strong cleaners polishes or chemically treated cloth Do not place rubber or vinyl products or cellophane tape on your set Do not touch the screen too often Do not subject the remote control to shocks such as dropping it on the floor etc Physical damage to the precision parts may result Avoid placing the rem...

Page 74: ...antenna may improve reception Ghosting may also be caused by defects in the antenna system such as unshielded leads or connecting several sets to the same antenna without using multiple antenna couplers SNOW If your receiver is located in the fringe area of a television station where the signal is weak your picture may be marred by the appearance of small dots When the signal is extremely weak it ...

Page 75: ... C K T H E S E I T E M S A N D T R Y T H E S E A D J U S T M E N T S No picture no sound Sound OK picture poor Picture OK sound poor Picture blurred Lines or streaks in picture Poor reception on some channels No color Poor color B e s u r e e x t e r n a l c o n n e c t i o n i s c o r r e c t B e s u r e p o w e r c o r d i s p l u g g e d i n B e s u r e P C r e a d y c o l o r T V i s s w i t c...

Page 76: ...esh Rate 60Hz and 70Hz Screen Size and Placement Adjustments PS 2 Mouse Output PC Audio Input Jacks Plug Play This monitor is VESA DDC2B compliant when used with a computer compliant with VESA DDC Display Data Channel See page 68 Screen Size 36V 36 inches measured diagonally TYPE VGA1 PS2 1 VGA2 PS2 2 SVGA PS2 3 MODE HORIZONTAL FREQUENCY VERTICAL FREQUENCY SYNC TYPE SYNC POLARITY H V 640x480 640x4...

Page 77: ...rdance with the terms of the limited warranty as stated on your warranty card or operating guide Should you have any questions regarding warranty service operation or technical assistance please contact For TVs purchased in Canada only please contact one of the Hitachi offices below should you have any questions regarding service operation or technical assistance MONTREAL 9425 Trans Canada Saint L...

Page 78: ...dynamic Sound Retrieval System that works whether the signal you receive is stereo or surround encoded Its genius is that it creates a three dimensional sound image from only the front speakers by retrieving the spatial information from recordings The effect is similar to that of a live performance BBE HIGH DEFINITION SOUND BBE professional systems are used in broadcasting television and recording...

Page 79: ...79 NOTES DEMAND MOI ASK ME ...

Page 80: ...QR27362 ...

Reviews: