background image

GB  

 - 14 -

SELECT

CHANNEL LIST                                                             

1. BBC ONE
2. BBC TWO
3. ITV 8
4. Channel 4
5. BBC THREE
6. Teletext
7. BBC FOUR
8. Sky Travel
9. UKHistory
10. RTL

Select             

Function              Select Channel                  Watch               More

1                        BBC ONE

OK

i

Delete             Edit Name             Lock          Favourites

Move        

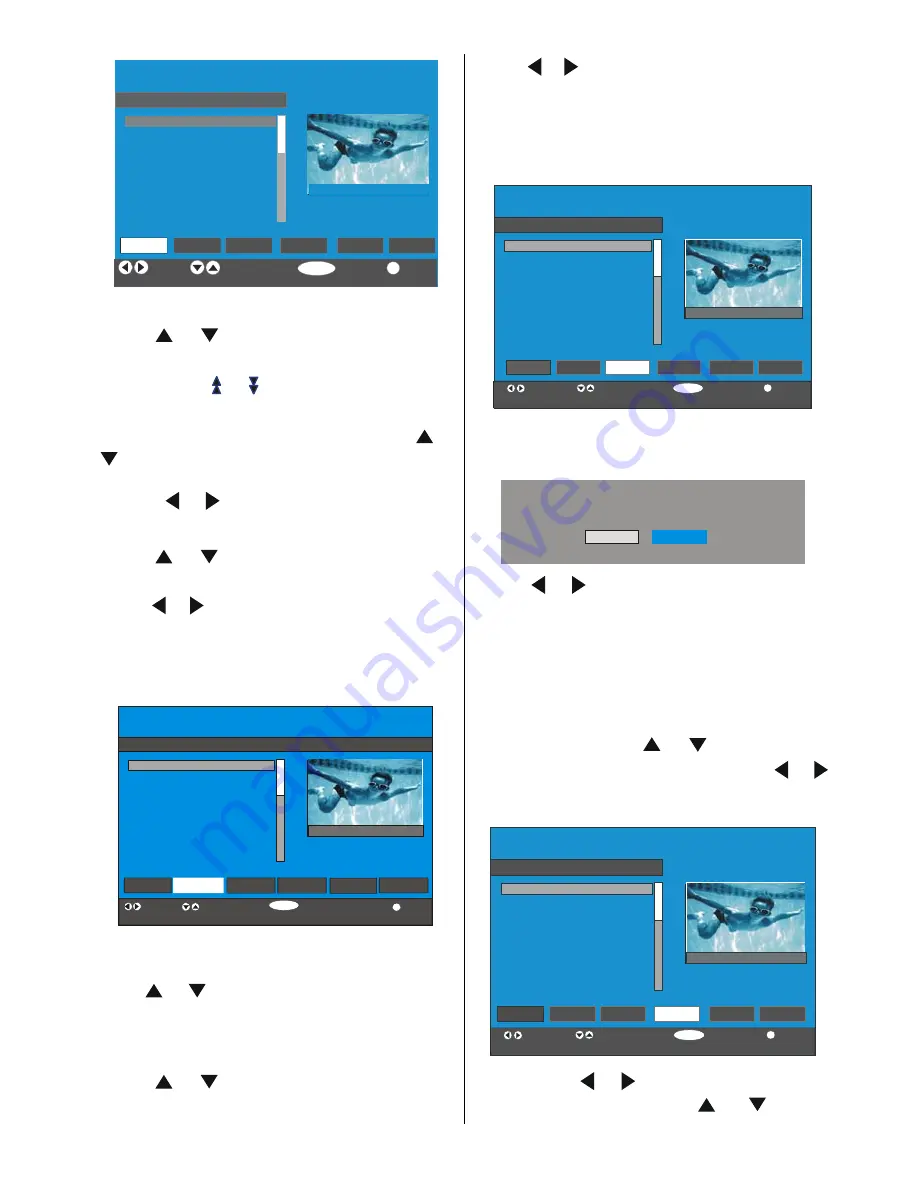
Navigating the whole channel list

• Press 

or

keys for selecting the previous or

next channel.

• You can press 

 or 

 buttons to move page up or

page down.

• To watch a specific channel, highlight it using

or

buttons and then press “SELECT” button, while

the 

“Select”

 item on Channel List menu is highlighted

via using 

or

buttons.

Moving the channels in the channel list

• Press 

or

buttons to select the channel that

will be moved.

• Press 

or

 buttons to select the ‘’

Move

’’ item on

Channel List menu.

“Move” is written next to “OK” item to indicate that
press “SELECT” to move the highlighted channel to
the desired position on the channel list.

SELECT

i

OK

CHANNEL LIST                                                             

1. BBC ONE
2. BBC TWO
3. ITV 8
4. Channel 4
5. BBC THREE
6. Teletext
7. BBC FOUR
8. Sky Travel
9. UKHistory
10. RTL

Function         Select Channel             Move                              More

1                        BBC ONE

Select 

Delete          Edit Name         Lock           Favourites

           Move               

•  Press “SELECT” button, the selected channel be-
comes highlighted.

•  Use 

or

buttons to select the new position of

the channel and press “SELECT” button to place the
channel  to the selected position and return the menu.

Deleting the channels in the channel list

• Press 

or

buttons to select the channel that

will be deleted.

• Press 

or

 buttons to select the ‘’

Delete

’’ item on

Channel List menu.

As seen on Channel List menu, “Delete” is written
next  to 

“OK”

 item at the bottom of the screen to

indicate that press “SELECT” button to delete the high-
lighted channel in the channel list.

SELECT

i

OK

CHANNEL LIST                                                             

1. BBC ONE
2. BBC TWO
3. ITV 8
4. Channel 4
5. BBC THREE
6. Teletext
7. BBC FOUR
8. Sky Travel
9. UKHistory
10. RTL

Function            Select Channel                  Delete               More

1                        BBC ONE

Select             

Delete 

            Edit Name             Lock          Favourites

Move        

Press “SELECT’’ button to delete the highlighted chan-
nel in the channel list. Then the message below ap-
pears on the screen.

The selected service will be permanently deleted, and 
favourite list will be turned off. Are you sure?

Yes 

No

• Press 

or

 buttons to highlight the desired op-

tion.

• If “SELECT’’ button is pressed while “Yes” is high-
lighted, the highlighted channel is deleted.

• Selecting “No” cancels the delete operation.

Renaming channels

To rename a specific channel, the channel must be

highlighted via pressing 

or

buttons and then

highlight the 

“Edit Name”

 item by pressing 

 or 

buttons. Press “SELECT” button to activate rename
feature.

SELECT

i

OK

CHANNEL LIST                                                             

1. BBC ONE
2. BBC TWO
3. ITV 8
4. Channel 4
5. BBC THREE
6. Teletext
7. BBC FOUR
8. Sky Travel
9. UKHistory
10. RTL

Function            Select Channel                 Edit Name         More

1                        BBC ONE

Select             

Delete             

            Lock          Favourites

Edit Name 

Move        

Now  pressing 

 or 

buttons moves to the previ-

ous/next character. Pressing 

 or 

 buttons

Summary of Contents for 32LD8D20E A

Page 1: ... D F I Instructions for use Bedienungsanleitung Notice d utilisation Istruzioni per l uso Digital LCD olo r Television C u Televisione a Colori LCD Digitale Digitales LCD Farb TV Gerät Télévision Couleur LCD Digital ...

Page 2: ...and Peripheral Connections 6 Remote Control Buttons 7 Preparation 10 Before Switching On Your TV 10 Power Connection 10 Connections To The Aerial Input Socket 10 Inserting Batteries In The Remote Control Handset 10 Handling the Remote Control 10 Operating Range for the Remote Control 10 Switching The TV ON OFF 11 Navigating the Menu System 11 Initial Settings 11 Everyday Operation 12 Information B...

Page 3: ...mera And Camcorder 29 To Connect To AV Input 29 To Connect To S VHS Input 29 Connect The Decoder To The Video Recorder 29 Connecting Headphones optional 29 Connecting Subwoofer 29 Audio Lineout 29 Tips 29 Care Of The Screen 29 Poor Picture 29 No Picture 29 Sound 29 Remote Control 29 Appendix A PC Input Typical Display Modes 30 Appendix B Aerial Connection 30 Appendix C Connect Peripheral Equipment...

Page 4: ...es DON T leave equipment switched on when it is unattended unless it is specifically stated that it is designed for unattended operation or has a stand by mode Switch off using the switch on the equipment and make sure your family know how to do this Special arrangements may need to be made for infirm or handicapped people DON T use equipment such as personal stereos or radios so that you are dist...

Page 5: ...nufacturer or have the same speci fications as the original one Unauthorised substitutions may result in fire electrical shock or other hazards 9 Servicing Please refer all servicing to qualified personnel Do not remove the cover yourself as this may result in an electric shock WARNING When the device is not in use for a long time disconnect from power Instructions for waste disposal Packaging and...

Page 6: ... Playback AV in and S VHS in are available It has VGA connector for external devices such as computer It has an HDMI connector for Digital Video andAudio This connection is also designed to accept High Definition signals AVL Automatic Volume Limiting When no valid signal is detected after 5 minutes the TV switches itself automatically to stand by mode PLL Frequency Search PC Input Plug Play for Wi...

Page 7: ...lly the picture may blend if the two peripherals are used at the same time Likewise because SVHS C and SCART II R are connected parallelly the picture may blend if the two peripherals are used at the same time Thus these two are not to be used at the same time P CH VOLUME STAND BY PC VGA Input PC RGB PCAudio Input RF Antenna TV DTV Component Video Inputs YPbPr Component Audio Inputs s SCART 1 EXT ...

Page 8: ...l TV Mode AV External Source PP Personal preference Cursor Up Cursor Right OK SELECT Store Freeze Cursor Down M Menu Cursor Left I II Mono Stereo Dual I II INFO Info P Programme Down Mute V Volume Down P P Previous Programme WIDE Image size Expand No function Mix Teletext Time RED Fast Text DTV Channel List TV Sound Menu GREEN Fast Text DTV Subtitle ON OFF TV Picture Menu 1 2 3 4 5 6 8 9 7 0 I II ...

Page 9: ...n the right directions and replace the battery cover Note Remove the battery from remote control hand set when it is not to be used for a long period Other wise it can be damaged due to any leakage of battery Handling the Remote Control It could cause corrosion or battery leakage and may result in physical injury and or property damage in cluding fire Never mix used and new batteries in the device...

Page 10: ...s the first time that IDTV has been used there are no channels stored in the memory When the TV is turned on for the first time the menu for the language selection appears on the screen The message Welcome please select your lan guage is written in all language options sequen tially in the menu on the screen By pressing or buttons highlight the language you want to set and press SELECT button In t...

Page 11: ... when you enter the EPGmenu Use or buttons to change the channel Also press or buttons to make page up down scroll for the channels And press SELECT button to watch the highlighted channel After Automatic Search process is completed the following message asking for analogue channel search appears on the screen TV switches to the analogue TV mode Country Language Auto Program English Ok Cancel PLEA...

Page 12: ...rd of a day By pressing GREEN RED buttons you can change the schedule time If you press INFO button you can see the detailed help information easily And by pressing INFO button again you can exit Help menu Displaying The Subtitles With Digital terrestrial broadcasting DVB T some programmes are broadcast with subtitles Subtitles can be displayed when watching these programmes Whenever GREEN button ...

Page 13: ...annels in the channel list Press or buttons to select the channel that will be deleted Press or buttons to select the Delete item on Channel List menu As seen on Channel List menu Delete is written next to OK item at the bottom of the screen to indicate that press SELECT button to delete the high lighted channel in the channel list SELECT i OK CHANNEL LIST 1 BBC ONE 2 BBC TWO 3 ITV 8 4 Channel 4 5...

Page 14: ...enu you enable only the channels in the selected list Configuration menu is entered from the Main Menu SELECT i OK CHANNEL LIST 1 BBC ONE 2 BBC TWO 3 ITV 8 4 Channel 4 5 BBC THREE 6 Teletext 7 BBC FOUR 8 Sky Travel 9 UKHistory Select List Select Channel Add Remove More List 1 List 2 List 3 List 4 List 5 How ToAdd A Channel To A Favourite List By pressing buttons highlight the chan nel that you wan...

Page 15: ... or No via using or buttons and press SELECT button to select If Yes is selected Automatic Search is started Selecting No cancels Automatic Search After search is completed for digital channels a mes sage asking search for analogue channels appears on the screen Yes Do you want to search for analogue channels No Highlight Yes and press SELECT button to searh for analogue channels The following men...

Page 16: ...on appears on the screen at first By using or buttons select the desired language option and press SELECT button to activate After the language is selected a message asking for automatic search start appears on the screen Do you want to start automatic search Yes No Highlight Yes item by pressing or buttons and press SELECT buttonto start installation Aftersearch is completed for digital channels ...

Page 17: ...Language Digital terrestrial television channels can broadcast simultaneous sountracks in more than one language This function selects which language soundtrack you will hear when switching to a channel broadcasting with the multiple soundtracks Use or buttons to cycle through the language options Whenever YELLOW button is pressed Audio Lan guage selection OSD will be displayed on the screen Subti...

Page 18: ...cted as the Time Zone Set ting Time Zone could be altered By pressing or buttons select Time Zone Use or buttons to change the Time Zone be tween GMT 12 or GMT 12 Current Time on the top of the menu list will then change according to the se lected Time Zone Receiver Upgrade The IDTV can be upgraded via the configuration menu entered from the main menu Configuration Favourite Mode Channel List Lang...

Page 19: ...s you can use this item The digital TV Setup menu screen is accessed from the Main Menu Press the M button to display the Main Menu and use or buttons to highlight TV Setup Press SELECT button to display TV Setup menu screen Main Menu Channel List Installation Configuration Timers TV Setup Common Interface Detailed information for all menu items is in Analogue TV Menu System section Common Interfa...

Page 20: ... clearly Picture Zoom By pressing a b button select Picture Zoom Use _ buttons to change picture zoom to Auto 16 9 4 3 Panaromic 14 9 Zoom Cinema Sub title or Zoom Reset By pressing a b button select Reset Press or OK button to reset the picture modes to factory default settings Store By pressing a b button select Store Press or OK button to store the adjustments Stored will be displayed on the sc...

Page 21: ...er can be set to On or Off Dynamic Bass is not available if Subwoofer is set to On Set Subwoofer to On when you connect an external subwoofer to the set Store By pressing a b button select Store Press or OK button to store the adjustments Stored will be displayed on the screen Features Menu FEATURE Sleep Timer Child Lock Language Ext 2 Out PC Audio In Sleep Timer By pressing a b select Sleep Timer...

Page 22: ...NSTALL Program Table Program Band Channel Colour System Program Table By pressing a b button select Program Table Press to display Program Table P02 C 04 P03 C 05 P04 BBC 1 P05 CH 4 P06 BBC 2 P07 C 04 P08 C 07 P09 C 12 P10 C 15 P11 S 18 P12 S 29 P13 S 31 P14 S 33 P15 S 34 P16 S 35 P17 S 36 P18 S 37 P19 S 40 P20 C 21 Name Delete Insert APS P01 BBC 1 Program Table By moving the cursor in four direct...

Page 23: ...t buttons on the re mote control There are 100 program storage between 0 and 99 Band Band can be selected either C or S by press button Channel Channel can be changed by button or Digit Buttons Colour System By pressing a b button select Colour System Press button to change the colour system to PAL SECAM PAL60 orAUTO If Sound System is set to I SECAM is not available for the Colour System Note In ...

Page 24: ...ny connections Set your PC s resolution correctly before connect ing to the TV See the table on Appendix page Use 15 pin display cable to connect a PC to the LCD TV Note PC menu will not be active for TV sets without a PCinput Menu System in PC mode Sound Menu Feature Menu The items in these menus are described at Sound Feature Menu explained in Menu System PC Picture Menu By pressing a bbutton se...

Page 25: ... can switch your TV to AV modes except being in teletext Pressing this button consecutively will switch the TV in one of the optional AV modes TV DTV EXT1 EXT2 EXT2 S FAV S VIDEO HDMI YPBPR or PC Personal Preference By pressing PP button you may change Picture Mode settings ZoomModes Zoom mode can be changed by pressing the WIDE button You can change the screen size according to the picture aspect...

Page 26: ...nd easily Press the corresponding coloured button to access the page Special Teletext Functions To Display a page of text The view text services press To return normal viewing press again Programmes cannot be changed until text is cancelled To select a page press the number buttons or pro gram buttons P P To select index page press button To select superimposed over the programme on the screen pre...

Page 27: ...tures from devices such as a High Defi nition Satellite Receiver or DVD Player These devices must be connected via the HDMI socket or Compo nent Socket These sockets can accept either 720p or 1080i signals Note When it is desired to watch HDMI source with a DVI to HDMI cable in order to enable audio Audio Input which is located at the left side of the antenna input is to be used to get DVI device ...

Page 28: ...l speakers to your TV use the Headphone Line Out of the TV Additionally turn Line out setting on in the Sound Menu Note While watching PC or YPbPr sources Lineout selection could only be the current source Tips Care Of The Screen Clean the screen with a slightly damp soft cloth Do not use abrasive solvents as they may damage the TV screen coating layer Poor Picture Have you selected the correct TV...

Page 29: ...isplay Modes The display has a maximum resolution of 1360 x 768 frequency range of 56 75 Hz The following table is an illustration of some of the typical video display modes Mode Horizontal Vertical Hor kHz Ver Hz 1 640 480 31 5 60 2 640 480 37 9 72 3 640 480 37 5 75 4 800 600 35 2 56 5 800 600 37 9 60 6 800 600 48 1 72 7 800 600 46 9 75 8 1024 768 48 4 60 9 1024 768 56 5 70 10 1024 768 60 75 11 1...

Page 30: ...e source equipment X Not Available O Available Source Available O O O O O O O O O O 480I 60Hz O 480P 60Hz O 576I 50Hz O 576P 50Hz O 720P 50Hz O 720P 60Hz O 1080I 50Hz O 1080I 60Hz O O O O O 480I 60Hz O 480P 60Hz O 576I 60Hz O 576P 60Hz O 720P 60Hz O 720P 50Hz O 1080I 50Hz O 1080I 50Hz O 1080P 50Hz X 1080P 60Hz X 1080P 24 HZ X RGB 50 RGB 60 EXT 2 SCART 2 HDMI FAV PAL 50 60 NTSC 60 S Video PAL 50 60...

Page 31: ...x Resolutions 1360 x 768 max Formats 4 3 16 9 INPUT CONNECTIONS PC D SUB 15 VGA VIDEO TV TUNER IEC 75 Ohms input resistance SCART1 CVBS RGB SCART2 CVBS S CVBS 1 x RCA Y C S Video MiniDIN YPbPr 3 x RCA HDMI x 1 Multimedia Interface AUDIO SCART1 Audio L R SCART2 Audio L R Y C or CVBS Audio Phono L R YPbPr Audio Phono L R PC 3 5mm Jack Stereo Headphones 3 5mm Jack Stereo OUTPUT CONNECTIONS Line Out A...

Page 32: ...site sync S input connector pin specifications Pin Input signal 1 Y 2 Y GND 3 C 4 C GND Frame GND HDMI connector pin specifications Pin Input signal Pin Input signal 1 TMDS Data2 11 TMDS Clock Shield 2 TMDS Data2 Shield 12 TMDS Clock 3 TMDS Data 2 13 CEC 4 TMDS Data 1 14 Reserved N C on device 5 TMDS Data1 Shield 15 SCL 6 TMDS Data1 16 SDA 7 TMDS Data0 17 DDC CED Ground 8 TMDS Data0 Shield 18 5V P...

Page 33: ...ed or modified by any person other than an Hitachi authorised engineer iii The product serial number has not been removed or altered This guarantee does not apply to product acquired second hand or for commercial or communal use This guarantee does not cover the replacement of exhausted batteries the adjustment of user controls or aerial alignment Any parts replaced under this guarantee shall beco...

Page 34: ... your TV or connect the aerial through a VCR Aerial RF Socket Aerial RF Socket wall socket wall socket Aerial RF Lead Aerial RF Lead Optional Scart Lead TV to VCR Aerial RF Socket VCR RF connector lead VCR to TV It is recommended that a scart lead should be fitted between your TV and VCR to enhance your picture and sound quality Scart leads are essential if you have a stereo TV and VCR and wish to...

Page 35: ...or lead Device to TV wall socket Aerial RF Lead Aerial RF Socket High Definition Your LCD Television is capable of displaying High Definition pictures from devices such as a High Definition Satellite Receiver or DVD Device These devices must be connected via the HDMI socket or Component Socket These sockets can accept either 720p or 1080i signals Switch to these sources from the Source Menu Also 1...

Page 36: ...itched on the set will be in standby Press the channel up down P and the indicator on the front of the set will illuminate red P or numeric buttons 1 2 3 to operate insert plug European plug and switch on insert plug UK plug Programme Up Volume Up Volume Down Programme Down To select a programme number To enter the main menu Also used for navigation in menus Power Cord Input Power on off button Pl...

Page 37: ... details please refer to the section of the instruction book Install Menu Country Language UK Ok Cancel PLEASE CHECK ANTENNA CABLE AUTO PROGRAMMING SYSTEM TXT Language UK P 03 C 04 63 75 MHz 6 63 75 MHz Cancel APS is running First time installation Choose Country Set country and continue installation OK UK Do you want to start automatic search Yes No MENU Codec 4 3 Codec 16 9 Searching UHF channel...

Page 38: ...om customerservice italy hitachi eu com france consommateur hitachi eu com Digital Media Group Cité Internationale HITACHI EUROPE LTD CZECH REPUBLIC Kodanska 46 101 00 Praha 10 Tel 234 064 514 Fax 234 064 513 Email info hitachi be dmg eeu hitachi eu com HITACHI EUROPE S A GREECE HITACHI EUROPE S A HITACHI EUROPE AB SWEDEN NORWAY 364 Kifissias Ave 1 Delfon Str 152 33 Chalandri Athens Email Gran Via...

Reviews: