background image

HOW TO USE THE REMOTE TO CONTROL YOUR TV 

16 

turned on.  

2 SLEEP Button 

Press this button to display the SLEEP TIMER in the lower left corner of the screen. Every subsequent press of 
this button will add 15 minutes to the timer, up to a maximum of three hours. 

3 MENU, CURSOR Buttons 

All On-Screen Display features can be set or adjusted by using these buttons. 
The MENU button will start the On-Screen Display. 
The CURSOR buttons will highlight functions or adjust and set different features. Pressing the cursor button will 
also give you access to the FAMILY FAVORITES CHANNELS On-Screen Display. 

4 CHANNEL SELECTOR Buttons 

Enter two or three numbers to select channels. Enter 0 first for channels 1 to 9 . For channels 100 and above, 
press the "1" button and wait four two seconds before pressing the last two digits of the channel. 

Channel selection may also be performed by pressing CH up (

) or down (

). 

You may also use these buttons for channel scanning. Press and hold the CH up (

) or down (

) buttons and 

the TV will quickly scanning through the channels. Release the CH (

) or down(

) buttons when the TV scans 

to the channel you wish to watch and the TV will tune to that channel. 

NOTE:

 The TV may not receive some channels if you are not in the correct SIGNAL SOURCE mode. (See page 

35.) 

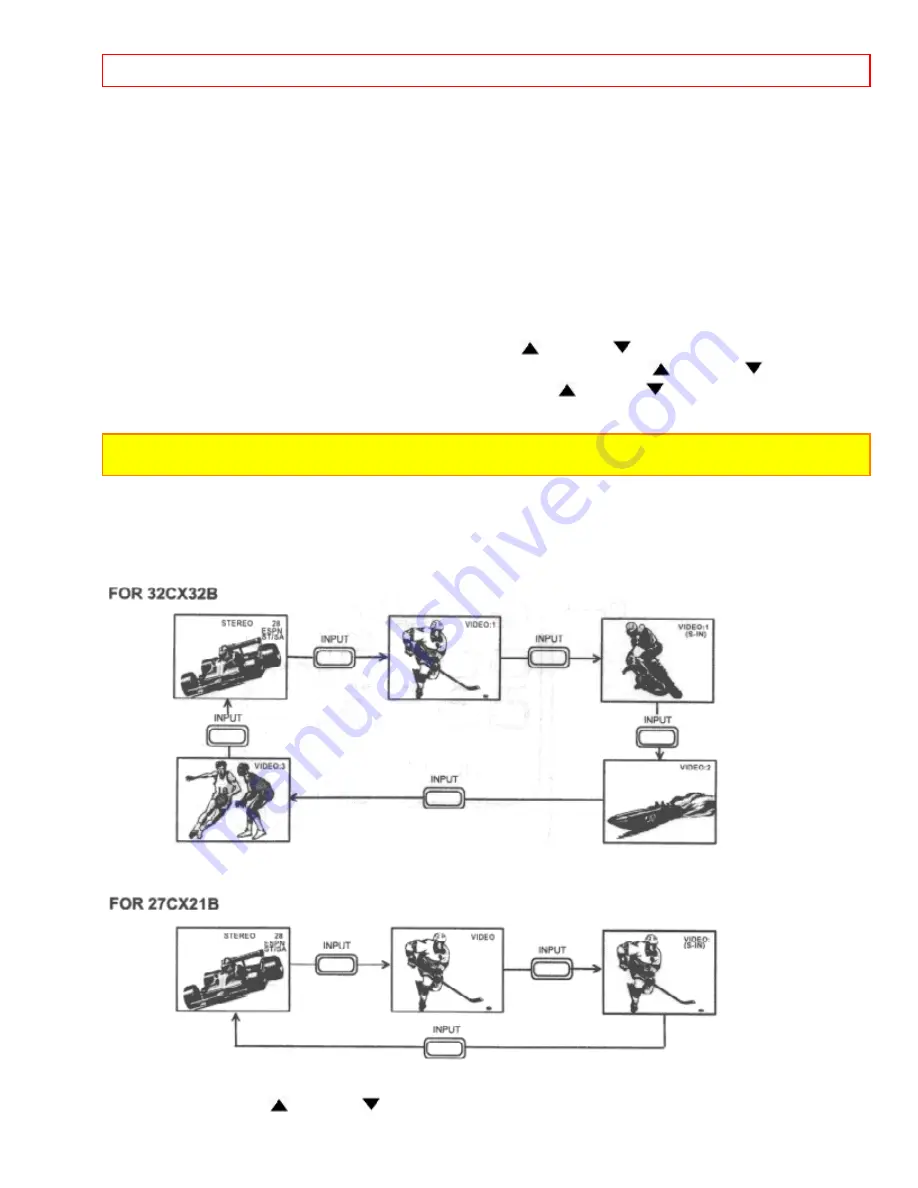
5 INPUT Button 

The INPUT button will select between the antenna signal and the video input jacks each time the button is 
pressed. (See picture below and page 27.) 

FOR 32CX32B 


FOR 27CX21B 


6, 7 VOLUME, MUTE Buttons 

Press the VOLUME up (

) or down (

) button until you obtain the desired sound level. 

Summary of Contents for 27CX21B

Page 1: ...IMPORTANT SAFEGUARDS 1 SOLID STATE COLOR TV OPERATING GUIDE 27CX21B 32CX32B ...

Page 2: ...R FUNCTIONS 18 USING THE REMOTE TO CONTROL CABLE SATELLITE BOX FUNCTIONS 18 CABLE SATELLITE AND VCR CODES 19 VCR BRAND CODES 19 CABLE BOX BRAND CODES 20 COLOR GRAPHIC GUIDE 20 SETUP 22 CUSTOMIZE 25 VIDEO 29 AUDIO 29 AUDIO FOR MODEL 32CX32B 32 INFO CENTER 33 USEFUL INFO 34 NOTES 36 IMPORTANT SAFEGUARDS Follow all warnings and instructions marked on this television receiver CAUTION TO REDUCE THE RIS...

Page 3: ... POINTS YOU SHOULD KNOW ABOUT YOUR HITACHI TELEVISION RECEIVER CAUTION Read all of these instructions Save these instructions for later use Follow all warnings and instructions marked on the television receiver Our reputation has been built on the quality performance and ease of service of HITACHI television receivers Safety is also foremost in our minds in the design of these units To help you op...

Page 4: ...et has been dropped or the cabinet has been damaged unplug this television set from the wall outlet and refer servicing to qualified service personnel 8 If liquid has been spilled into this television set unplug it from the wall outlet and refer service to qualified service personnel 9 Do not subject your television set to impact of any kind Be particularly careful not to damage the picture tube s...

Page 5: ...l Never block the bottom ventilation slots of the set by placing it on a bed sofa rug etc Never place the set near or over a radiator or heat register Never place the set in a built in enclosure unless proper ventilation provided PROTECTION AND LOCATION OF YOUR SET 16 1 If an outside antenna is connected to the television set be sure the antenna system is protected against voltage surges and built...

Page 6: ... operating instructions unplug this set television set from the wall outlet and refer servicing to qualified service personnel Adjust only those controls that are covered in the operating instructions as improper adjustment of other controls may result in damage and will often require extensive work by a qualified technician to restore the television set to normal operation 21 If your television s...

Page 7: ...Receivers Such PATTERN BURNS constitute misuse and are NOT COVERED by your HITACHI Factory Warranty When using the Picture in Picture function the sub picture should not be left permanently in one corner of the screen or a PATTERN BURN may develop over a long period of time This color television receiver was intended mainly for the private viewing of programs broadcast by TV stations cable compani...

Page 8: ...elevision stand model SP217B is designed for use only with a 27 inch or smaller television set Use with larger equipment may result in instability causing possible injury REMOTE CONTROL BATTERY INSTALLATION AND REPLACEMENT 1 Open the battery cover of the remote control by pushing the notched part of the cover with your fingers 2 Insert two new AA size batteries in the remote When replacing old bat...

Page 9: ...cover of the set To avoid cabinet warping cabinet color changes and increased chance of set failure do not place the TV where temperatures can become excessively hot for example in direct sunlight or near a heating appliance etc VIEWING To view the television screen at its best test various locations in the room The drawings below show several suggestion The best picture is seen by sitting directl...

Page 10: ... audio This connector is used on camcorders VCRs cables which connect to inputs and and laser disc players with an S Video feature outputs located on the Television s rear in place of the standard video cable to produce a jack panel and front control panel high quality picture ANTENNA CONNECTIONS These sets are equipped with one VHF UHF antenna terminal The VHF UHF terminal can be used for normal ...

Page 11: ... the top right corner of the screen 2 VOLUME Level Press these buttons for your desired sound level The volume level will be displayed on the TV screen 3 CHANNEL Selector Press these buttons until the desired channel appears in the top right corner of the TV screen 4 POWER Button Press this button to turn the TV on or off NOTE Your HITACHI TV will appear to be turned OFF if there is no video input...

Page 12: ...le audio output to a separate stereo system amplifier With this connection the audio to the stereo can be controlled by the television s remote control Use these jacks for the SURROUND Left and Right channels see pages 18 and 21 4 S Video Input 1 provides S Video Super Video jacks for connecting equipment with S Video output capability TIPS ON REAR PANEL CONNECTIONS The S Video connection is provi...

Page 13: ...However you may need to modify them to accommodate your particular assortment of components and features For best performance video and audio cables should be made from coaxial shielded wire Before Operating External Video Source The input mode is changed every time the INPUT button is pressed as shown below Connect external source to the INPUT terminal then press the INPUT button as necessary to ...

Page 14: ...e INPUT button to view the program from the VCR or laserdisc player The mode VIDEO disappears automatically after approximately eight seconds 5 Press the INPUT button to return to the previous channel Stereo VCR or Video Disc Player Connection Illustration NOTE Completely insert the connection cord plugs when connecting to rear panel jacks The picture that played back will be abnormal if the conne...

Page 15: ...t the remote sensor of the TV and press the TV button The remote will now control your TV To operate your VCR point the remote at the remote sensor of the VCR and press the VCR button The remote will now control your VCR To operate your cable satellite box point the remote at the remote sensor of the cable satellite box and press the CABLE button The remote will now control your cable satellite bo...

Page 16: ...0 first for channels 1 to 9 For channels 100 and above press the 1 button and wait four two seconds before pressing the last two digits of the channel Channel selection may also be performed by pressing CH up or down You may also use these buttons for channel scanning Press and hold the CH up or down buttons and the TV will quickly scanning through the channels Release the CH or down buttons when ...

Page 17: ...between the last two channels viewed Good for watching two sporting events etc 9 EXIT RECALL COMMERCIAL SKIP CS Button Press this button when no menu is displayed when you want to check the channel being received or if it has stereo ST or second audio SAP You can also check the time CHANNEL ID and if the SLEEP TIME has been set When in MENU mode this button will exit all On Screen Displays Press t...

Page 18: ...ing the above procedures your VCR code has not been precoded into the remote 2 In the unlikely event that your VCR cannot be operated after performing the above procedures please consult your VCR operating guide 3 The remote control will remember the codes you have programmed in until the batteries are removed from the remote control After replacing the batteries repeat the entire programming proc...

Page 19: ...llite box does not have a power function the remote will issue the CHANNEL UP function 1 CABLE Button This button allows the remote to control your cable satellite box by setting it to CABLE SATELLITE mode 2 PRECODED CABLE SATELLITE BOX Buttons These buttons transmit the chosen precoded CATV and satellite codes 3 TV VCR Button When the remote is in CABLE SATELLITE mode this is the A B button 4 LST...

Page 20: ...fferent features on your HITACHI TV 2 Press the CURSOR buttons to highlight and select different features 3 Press EXIT on the remote control to quickly exit from a menu 4 Press HELP on the remote control when a menu is displayed and text will appear giving a description of that menu AUTO DEMONSTRATION This feature will demonstrate how to use and set up your HITACHI television To perform this featu...

Page 21: ...ONTRAST Adjust contrast BRIGHTNESS Adjust brightness COLOR Adjust color TINT Adjust tint SHARPNESS Adjust sharpness COLOR TEMP Select warm red tones or cool blue tones RESET Set VIDEO to factory preset condition BASS Adjust bass TREBLE Adjust treble BALANCE Adjust balance RESET Set AUDIO settings to factory preset condition ADVANCE SETTINGS Improve sound performance VOLUME CORRECTION Lower volume ...

Page 22: ...menu or CURSOR to return to previous menu SETUP SIGNAL SOURCE Select ANTENNA if you are using an indoor or outdoor antenna Select CATV if you have cable TV Press CURSOR or to highlight and select the correct SIGNAL SOURCE mode Press EXIT to quit MENU or CURSOR to return to previous menu ...

Page 23: ...V channels in CHANNEL ADD DEL This will allow you to skip over unused channels when using the CHANNEL UP or DOWN buttons If the EXIT button is pressed while the AUTO CHANNEL SET function is engaged programming will stop Remember to select the correct SIGNAL SOURCE mode before using AUTO CHANNEL SET See CHANNEL ADD DEL to add or erase additional channels CHANNEL ADD DEL Use this function after AUTO...

Page 24: ...ious menu CHANNEL LIST This function allows you to review which channels are labeled in CHANNEL ID NAME which have been added to CHANNEL ADD DEL SCAN and which are protected by CHILD LOCK LOCK Press CURSOR or to view more channels Press EXIT to quit menu or CURSOR to return to previous menu CLOCK SET Use this feature for all time related functions The time must be set before you can use the ON OFF...

Page 25: ...l make TV viewing easier and more enjoyable CHANNEL ID Use this feature to name up to 25 channels Press CURSOR or to select letters Press CURSOR to change character position Press CHANNEL or to select and label additional channels Press EXIT to quit menu or CURSOR to return to previous menu The CHANNEL ID will appear in the top right corner of the screen when the RECALL button is pressed The repre...

Page 26: ...f the screen Press MENU button to register your favorite channel Repeat until the category has been registered with your favorite channels To erase a FAMILY FAVORITES channel enter 00 as channel then press MENU button Once your favorite channels are registered in the FAMILY FAVORITES menu your TV set will change to that station when selected Press EXIT to remove FAMILY FAVORITES OSD from the SCREE...

Page 27: ...e the key number select CHANGE CODE Enter a new three digit key number you prefer If you forget your key number use the factory code 777 to erase your key number This will resets the key number back to the factory preset 000 ON OFF TIMER This function will automatically turn the TV set on or off one time only every day or once a week It can also be set to turn on to your favorite program or as a r...

Page 28: ...s are the dialogue narration and or sound effects of a television program or home video which are displayed on the TV screen allowing you to read the dialog being spoken when broadcast Your local TV program guide denotes these programs as or DISPLAY ON OFF will turn the display on or off MODE C C Closed Caption is for the program you are viewing MODE TEXT is for additional information such as news...

Page 29: ...just the amount of fine detail in the picture COLOR TEMP Use this function to adjust the white balance hue of the picture to your own color preference When shipped from the factory this is set to COOL If you prefer a reddish screen set to WARM RESET When RESET is selected the ARE YOU SURE display will apear on the screen to confirm our choice Press CURSOR to return VIDEO adjustments to factory pre...

Page 30: ... viewed on the screen and can also be adjusted by scrolling through them using the CURSOR or This is also true for all of the menu items in AUDIO ADVANCED SETTINGS Use ADVANCED SETTINGS to improve the sound performance of your TV depending on listening conditions Press CURSOR or to highlight a function Press CURSOR to change the function setting Press EXIT to quit menu or CURSOR to return to previ...

Page 31: ...reduce the volume level of up to four channels that sound loud compared to other channels Press CURSOR or to highlight one of the four volume corrections then CURSOR to select Press CHANNEL or and number buttons to select a channel Press MENU to set the channel to be volume corrected Press CURSOR or to adjust volume level in 5 increments Press EXIT to quit menu or CURSOR to return to previous menu...

Page 32: ...nd which provides a feeling of presence from stereo broadcasts and VCR tapes recorded with stereo sound Also a mono input simulating a stereo will increase the sound giving the listener simulated surround sound SURROUND OFF Use this for normal stereo mono broadcasts NOTE If sound is noisy when a stereo broadcast is received and the TV is set to the SURROUND mode decrease the TREBLE control or turn...

Page 33: ... 1 or MESSAGE 2 Press CURSOR or to highlight your selections Press CURSOR to select your choice Press or to select letters or other characters The asterisk represents a blank space To erase the message use CURSOR or until ERASE MESSAGE is highlighted then press CURSOR to erase message The ARE YOU SURE display will appear on the screen to confirm your choice Press CURSOR or to choose MODE or TIME P...

Page 34: ...n or near a heater Excessive heat or moisture may cause the unit to cease operation When the batteries run down remote control operation will become erratic or possibly stop altogether Replace the old batteries with two new AA size batteries IGNITION NOISE Black spots or horizontal streaks may appear picture may flutter or drift Usually caused by interference from automobile ignition systems neon ...

Page 35: ...atures Superfine Picture Quality 700 Line Horizontal Resolution Dark Tint CPT with Self Dynamic Focus Gun only 32CX32B Remote Transmitter Controls many VCR and Cable Box and Satellite Brands ICONS Color Graphic Guide Full set of Input Jacks including S Video Closed Caption Decoder Comb Filter Wide Band Video Amp and Temperature Control MTS Multi Channel Television Sound Stereo Broadcast Reception ...

Page 36: ...lity nearest you Just present proof of purchase and or delivery receipts to the Hitachi Authorized Service Facility and service will be rendered in accordance with the terms of the limited warranty as stated on your warranty card or operating guide Should you have any questions regarding warranty service operation or technical assistance please contact Hitachi Home Electronics America Inc Hitachi ...

Reviews: