background image

6

SPECIFIC SAFETY RULES AND SYMBOLS

1. DANGER! Keep hands away from cutting area and blade. Keep your second hand on

auxiliary handle, or motor housing.

 If both hands are holding the saw, they cannot be

cut by the blade.

Keep your body positioned to either side of the saw blade, but not in line with the saw
blade.

 KICKBACK could cause the saw to jump backwards. (See "Causes and Operator

Prevention of Kickback")

Do not reach underneath the work.

 The guard can not protect you from the blade

below the work.

2. Check lower guard for proper closing before each use. Do not operate saw if lower

guard does not move freely and close instantly. Never clamp or tie the lower guard
into the open position.

 If saw is accidentally dropped, lower guard may be bent. Raise

the lower guard with the Retracting Handle and make sure it moves freely and does not
touch the blade or any other part, in all angles and depths of cut.

3. Check the operation and condition of the lower guard spring. If the guard and the

spring are not operating properly, they must be serviced before use.

 Lower guard may

operate sluggishly due to damaged parts, gummy deposits, or a buildup of debris.

4. Lower guard should be retracted manually only for special cuts such as “Pocket Cuts”

and  “Compound Cuts.” Raise lower guard by Retracting Handle. As soon as blade
enters the material, lower guard must be released.

 For all other sawing, the lower

guard should operate automatically.

5. Always observe that the lower guard is covering the blade before placing saw down

on bench or floor.

 An unprotected, coasting blade will cause the saw to walk backwards,

cutting whatever is in its path. Be aware of the time it takes for the blade to stop after
switch is released.

6. NEVER hold piece being cut in your hands or across your leg.

 It is important to support

the work properly to minimize body exposure, blade binding, or loss of control.

7. Hold tool by insulated gripping surfaces when performing an operation where the

cutting tool may contact hidden wiring or its own cord.

 Contact with a “live” wire will

also make exposed metal parts of the tool “live” and shock the operator.

8. When ripping always use a rip fence or straight edge guide.

 This improves the accuracy

of cut and reduces the chance for blade binding.

9. Always use blades with correct size and shape (diamond vs. round) arbor holes.

 Blades

that do not match the mounting hardware of the saw will run eccentrically, causing
loss of control.

10. Never use damaged or incorrect blade washers or bolts.

 The blade washers and bolt

were specially designed for your saw, for optimum performance and safety of operation.

11. Causes and Operator Prevention of Kickback:

Kickback is a sudden reaction to a pinched, bound, or misaligned saw blade, causing
an uncontrolled saw to lift up and out of the workpiece toward the operator.
When the blade is pinched or bound tightly by the kerf closing down, the blade stalls
and the motor reaction drives the unit rapidly back toward the operator.
If the blade becomes twisted or misaligned in the cut, the teeth at the back edge of the
blade can dig into the top surface of the wood causing the blade to climb out of the kerf
and jump back toward operator.

Summary of Contents for C 7SB2

Page 1: ...us bodily injury This Handling Instructions contains important information about product safety Please read and understand this manual BEFORE operating the power tool Please keep this Handling Instructions available for other users and owners before they use the power tool This Handling Instructions should be stored in safe place Model Circular saw ...

Page 2: ... 6 DOUBLE INSULATION FOR SAFER OPERATION 11 FUNCTIONAL DESCRIPTION 12 NAME OF PARTS 12 SPECIFICATIONS 12 Page ASSEMBLY AND OPERATION 13 APPLICATIONS 13 PRIOR TO OPERATION 13 ADJUSTING THE SAW PRIOR TO USE 15 CUTTING PROCEDURES 16 MOUNTING AND DISMOUNTING THE SAW BLADE 17 MAINTENANCE AND INSPECTION 19 ACCESSORIES 21 STANDARD ACCESSORIES 21 ...

Page 3: ...ons are outlined in the SAFETY section of this Handling Instructions and in the sections which contain the operation and maintenance instructions Hazards that must be avoided to prevent bodily injury or machine damage are identified by WARNINGS on the power tool and in this Handling Instructions NEVER use this power tool in a manner that has not been specifically recommended by HITACHI MEANINGS OF...

Page 4: ...re grounded power cord and grounded power supply system 2 Avoid body contact with grounded surfaces such as pipes radiators ranges and refrigerators There is an increased risk of electric shock if your body is grounded 3 Do not expose power tools to rain or wet conditions Water entering a power tool will increase the risk of electric shock 4 Do not abuse the cord Never use the cord to carry the to...

Page 5: ...ories or storing the tool Such preventive safety measures reduce the risk of starting the tool accidentally 5 Store idle tools out of reach of children and other untrained persons Tools are dangerous in the hands of untrained users 6 Maintain tools with care Keep cutting tools sharp and clean Properly maintained tools with sharp cutting edges are less likely to bind and are easier to control 7 Che...

Page 6: ...before placing saw down on bench or floor An unprotected coasting blade will cause the saw to walk backwards cutting whatever is in its path Be aware of the time it takes for the blade to stop after switch is released 6 NEVER hold piece being cut in your hands or across your leg It is important to support the work properly to minimize body exposure blade binding or loss of control 7 Hold tool by i...

Page 7: ... large panels to minimize the risk of blade pinching and KICKBACK Large panels tend to sag under their own weight Supports must be placed under the panel on both sides near the line of cut and near the edge of the panel as shown in Fig 1 To minimize the risk of blade pinching and kickback When cutting operation requires the resting of the saw on the work piece the saw shall be rested on the larger...

Page 8: ...It is important to support the work piece properly and to hold the saw firmly to prevent loss of control which could cause personal injury Fig 4 illustrates typical hand support of the saw A TYPICAL ILLUSTRATION OF PROPER HAND SUPPORT WORKPIECE SUPPORT AND SUPPLY CORD ROUTING Fig 4 22 Place the wider portion of the saw base on that part of the work piece which is solidly supported not on the secti...

Page 9: ... than those specified Never use a power tool for applications other than those specified in the Handling Instructions 29 Handle tool correctly Operate the tool according to the instructions provided herein Do not drop or throw the tool Never allow the tool to be operated by children individuals unfamiliar with its operation or unauthorized personnel 30 Keep motor air vent clean The tool s motor ai...

Page 10: ...s inadvertently it may be deformed cracked or damaged 38 Do not wipe plastic parts with solvent Solvents such as gasoline thinner benzine carbon tetrachloride and alcohol may damage and crack plastic parts Do not wipe them with such solvents Wipe plastic parts with a soft cloth lightly dampened with soapy water and dried thoroughly 39 Never wear gloves made of material liable to roll up such as co...

Page 11: ...rnal grounding you must still follow the normal electrical safety precautions given in this Handling Instructions including not using the power tool in wet environments To keep the double insulation system effective follow these precautions 䡬 Only HITACHI AUTHORIZED SERVICE CENTER should disassemble or assemble this power tool and only genuine HITACHI replacement parts should be installed 䡬 Clean ...

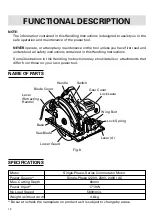
Page 12: ...ustrations in this Handling Instructions may show details or attachments that differ from those on your own power tool NAME OF PARTS Fig 8 Motor Single Phase Series Commutator Motor Power Source Single Phase 220V 230V 240V AC Max Cutting Depth 60mm Power Input 1710W No Load Speed 5800 min Weight without cord 4 6 kg SPECIFICATIONS Handle Switch Gear Cover Lock Lever Wing Bolt Lock Spring Lever A Lo...

Page 13: ...k the receptacle If the receptacle only loosely accepts the plug the receptacle must be repaired Contact a licensed electrician to make appropriate repairs If such a faulty receptacle is used it may cause overheating resulting in a serious hazard 5 Confirming condition of the environment Confirm that the work site is placed under appropriate conditions conforming to prescribed precautions 6 Prepar...

Page 14: ...refer to Fig 8 serves to protect your body from coming into contact with the saw blade Make absolutely certain that the cover smoothly performs to cover the saw blade If the safety cover should not move smoothly never use it without repairing it In such a case get in touch with the store where you bought the circular saw or the HITACHI Authorized Service Center for necessary repair 9 Eye protectio...

Page 15: ...ustment You can incline saw blade from 0 to a maximun angle of 55 in relation to the base As shown in Fig 11 by loosing the lever A on the bevel scale the saw blade may be inclined to an angle of 45 in relation to the base If you use inclination angle of over 45 as shown in Fig 12 move the lever A to inside the saw blade may be inclined to a maximum angle of 55 in relation to the base Always ensur...

Page 16: ...s should remain unchanged regardless of the inclination of the base 2 The switch should be turned to the ON position before the saw blade comes into contact with the work piece The switch is turned ON when the trigger is pulled by one s finger and is turned OFF when the trigger is released 3 Moving the saw straight at a constant speed will produce optimum cutting POCKET CUTTING WARNING To avoid se...

Page 17: ...NING To avoid serious accident ensure the switch is in the OFF position and disconnect the plug from the receptacle 1 Dismounting the saw blade 1 Set the cutting volume at maximum and place the Circular Saw as shown in Fig 16 2 Depress the lock lever lock the spindle and remove the hexagonal flange bolt and washer B with the wrench 3 While holding the lever to keep the lower guard fully retracted ...

Page 18: ...al bolt retaining the saw blade as much as possible Then depress the lock lever lock the spindle and thoroughly tighten the bolt 5 Confirm that the lock lever is in the original position Hexagonal Flange Bolt Washer A Washer B Saw Blade Fig 18 ...

Page 19: ... brushes which are consumable parts Replace the carbon brush with a new one when it becomes worn to its wear limit Always keep carbon brushes clean and ensure that they slide freely within the brush holders CAUTION Using this circular saw with a carbon brush which is worn in excess of the wear limit will damage the motor NOTE Use HITACHI carbon brush No 38 indicated in Fig 19 4 Replacing carbon br...

Page 20: ...ner 1 Turn the base face up Fig 21 and loosen the lever A 2 Apply a square to the base and the saw blade and turning the slotted set screw with a slotted head screwdriver shift the position of the base to produce the desired right angle Fig 21 Square Slotted Set Screw Base ...

Page 21: ... and could cause injury or mechanical damage NOTE Accessories are subject to change without any obligation on the part of the HITACHI STANDARD ACCESSORIES 1 Saw Blade 1 2 Wrench Code No 320976 1 3 Guide Code No 302691 1 NOTE Specifications are subject to change without any obligation on the part of the HITACHI External Diam Hole Diam Code No 185mm 20mm 302411 ...

Page 22: ...22 ...

Page 23: ...23 ...

Page 24: ...401 Code No C99120213 Printed in China Hitachi Koki Co Ltd ...

Reviews: