background image

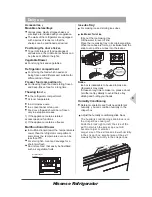
1. Remove the light cover

 .

2. Use the cross screw driver to take the


screw out

.                                               

3. Pull out the joint cable, and take down the 
old LED light.
4. Replace with a new LED light that is


same to the origin, screw the screw in.
5. Replace


the


light cover

.

Unplug the mains plug.
Press the bulb in the center with finger.

Warning!

 If the LED light bulb is 

damaged, DO NOT CHANG IT BY 
THE USER!

Before changing the light bulb, switch off 
the appliance and unplug it, or pull the 
fuse or the circuit breaker.
To switch off the appliance.

Changing the light bulb carry out by 
inexperienced persons may cause injury or 
serious malfunctioning.it must be replaced 
by a qualified persons in order to avoid a 
hazard. Contact your local Service Force 
Center for help. 

Fast Freeze

If


you


need


the


temperature


inside


the


freezer


to


drop


rapidly

press


the


FAST 

FREEZE button, all the LED indicator are full 
light, the freezer compartment will operate in 
FAST FREEZE mode for 24 hours, and the 
setting temperature is


-23 C

.

If you change


the temperature


setting, the fridge will exit 

FAST FREEZE mode.

ATTENTION:

 Normally


we


advise


you


setting the


temperature on “Mid”position.A 

colder setting on the temperature regulator 
means


more energy will


be


consumed. In


FAST FREEZE mode the compressor will 
run continuously or even non-stop!

FRIDGE TEMPERATURE

When


the


machine


is


not


in


the


temperature


setting mode, If you


want


to 

set the temperature inside the fridge , you 
can follow the two steps below:
1. Press “select

button, until the fridge light 

is on, and the LED indicator will indicate the 
current temperature


setting in fridge.

2. Then


you


can


set


the temperature from 

1 C to 9 C by pressing


and  , press the 

button once, the temperature will increase or 
decrease 1 C

,

and


 the LED indicator


will 

turn down or turn up between “cold”and 
“colder”

until


the


required


temperature


is


displayed. There is a  corresponding 
relationship between temperature setting 
and indicator lights, you can find it out in the 
same table upper.

Changing the light bulb

Before changing the light bulb, either the 
refrigerator or disconnect the electricity 
leading into the  refrigerator at the main 
power supply. Failure to do so could result in 
electrical shock or personal  injury. 

Fixing the handle

Before you use the product, please check 
the handle 

. If


the  handle 

is loose, you should fix it with the hexangular 
screwdriver in the clockwise direction, then it 
can be used normally. 

of the refrigerator 

The freezer compartment consist of 2 
sections. One is the 4-star section and the 
other one is the 2-star section.

The temperature for 2-star section is 
always below -12  , where the 
temperature for 4-star section is 
always below -18  .

C

C

Hisense Refrigerator

Summary of Contents for RD-65WR4SY1

Page 1: ...RD 65WR4SY1 ...

Page 2: ...Hisense Refrigerator ...

Page 3: ...Hisense Refrigerator ...

Page 4: ... packaging away from children as there is risk of suffocation If you are discarding the appliance pull the plug out of the socket cut the connection cable as close to the appliance as you can and remove the door to prevent children playing from suffering an electric shock or from closing themselves inside it If this appliance featuring a magnetic door seals is to replace an older appliance having ...

Page 5: ...ot use sharp objects to remove frost from the appliance Important Installation For electrical connection carefully follow the instructions given in this manual Unpack the appliance and check it If it is damaged do not plug in the appliance contact the shop immediately from where you purchased it In this case keep all packing materials It is advisable to wait at least four hours before connecting t...

Page 6: ...pliance cooking appliances Any electrical work required to do the servicing of the appliance should be carried out by a qualified electrician or person This product must be serviced by an authorized service center and only genuine spare parts must be used authorized 2 If the appliance contains a freezer compartment 1 If the appliance is Frost Free indicator will turn down or turn up between cold a...

Page 7: ...he compressor will run continuously or even non stop FRIDGE TEMPERATURE When the machine is not in the temperature setting mode If you want to set the temperature inside the fridge you can follow the two steps below 1 Press select button until the fridge light is on and the LED indicator will indicate the current temperature setting in fridge 2 Then you can set the temperature from 1 C to 9 C by p...

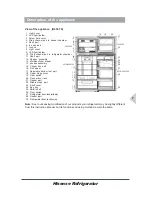
Page 8: ...ght inside 10 Wind channel part in refrigerator chamber 11 Shelf part 12 Shelves assembly 13 Multifunctional drawer 14 shelves assembly 15 Crisper box part 16 Roll wheel 17 Adjustable bottom feet part 18 Upper hinge cover 19 Door switch 20 Freezer door rack 21 Gasket part 22 Middle hinge part 23 Shelf cover 24 Egg tray 25 Small shelf 26 Door switch 27 Refrigerator door rack middle 28 Gasket part 2...

Page 9: ...ssories with lukewarm water and some neutral soap so as to remove the typical smell of a brand new product then dry thoroughly Appliances must not be exposed to rain Sufficient air must be allowed to circulate in the lower rear section of the appliance as poor air circulation can affect perfor mance Built in appliances should be positioned away from heat sources such as heaters and direct sunlight...

Page 10: ...f line Place the ice making tray in its original position When ice cubes are formed clockwise twist the knob to drop off ice cubes into the icebox Ice box is inadvisable to be used to make ice otherwise it may crack If it takes a long time to make ice please do not hold the ice tray directly to avoid the ice tray sticking and hurting your hands Notice Humidity Conditioning Deferent vegetable and f...

Page 11: ...igeration Do not store warm foods or evaporating liquids in the appliance Do cover or wrap the food particularly if it Hints for refrigeration Meat all types wrap in bags and place on the glass shelf above the vegetable drawer For safety store in this way only one or two days at the most Cooked foods cold dishes etc these should be covered and may be placed on any shelf polyethylene plastic Add bu...

Page 12: ...supply main power supply shut off Notice Remove the food from the appliance before cleaning Store them in a cool place well covered Never clean the appliance with a steam cleaner Moisture could accumulate in electrical components Hot vapor can lead to the damage of plastic parts Ethereal oils and organic solvents can attack plastic parts e g lemon juice or the juice from an orange peel butyric aci...

Page 13: ...ary carefully bend the component out of the way The compressor starts after a period of time Heavy build up of frost possibly also on the door seal Interior lighting does not work The appliance is near a heat source Light bulb is defective Please the Installation location section refer to Please look in the changing the Light Bulb section The food is too warm Temperature is not properly adjusted D...

Page 14: ...he dealer from whom you purchased this unit and be ready to provide information as listed in REQUIRED INFORMATION below CAUTION To prevent any electrical shock hazards do not disconnect the power cord plug from the wall outlet with wet hands Required Information Nature of malfunction as accurately as possible 1 Product number Serial number Customer s name address phone number inscribed on badge 4 ...

Page 15: ...used by the inappropriate waste handling of this product For more detailed information about the recycling of this product please contact your local council your household waste disposal service or the shop where you purchased the product Disposal of the appliance It is prohibited to dispose of this appliance in domestic household waste Packaging materials Packaging materials with the recycle symb...

Page 16: ......

Reviews: