Hisense LTDN40V86MH User Manual Download Page 10

HDMI3

COMP1

PC AUDIO

RJ12

PC

USB

VGA

HDMI2

COMP 2

HEADPHONE

AUDIO OUT

VIDEO

L

R

L

R

AV

DIGITAL

AUDIO OUT

Y

P

B

P

R

L

R

HDMI1

SERVICE

ANT IN

HDMI2

COMP 2

HEADPHONE

AUDIO OUT

VIDEO

L

R

L

R

AV

DIGITAL

AUDIO OUT

Y

P

B

P

R

L

R

HDMI1

SERVICE

ANT IN

Making connections

8

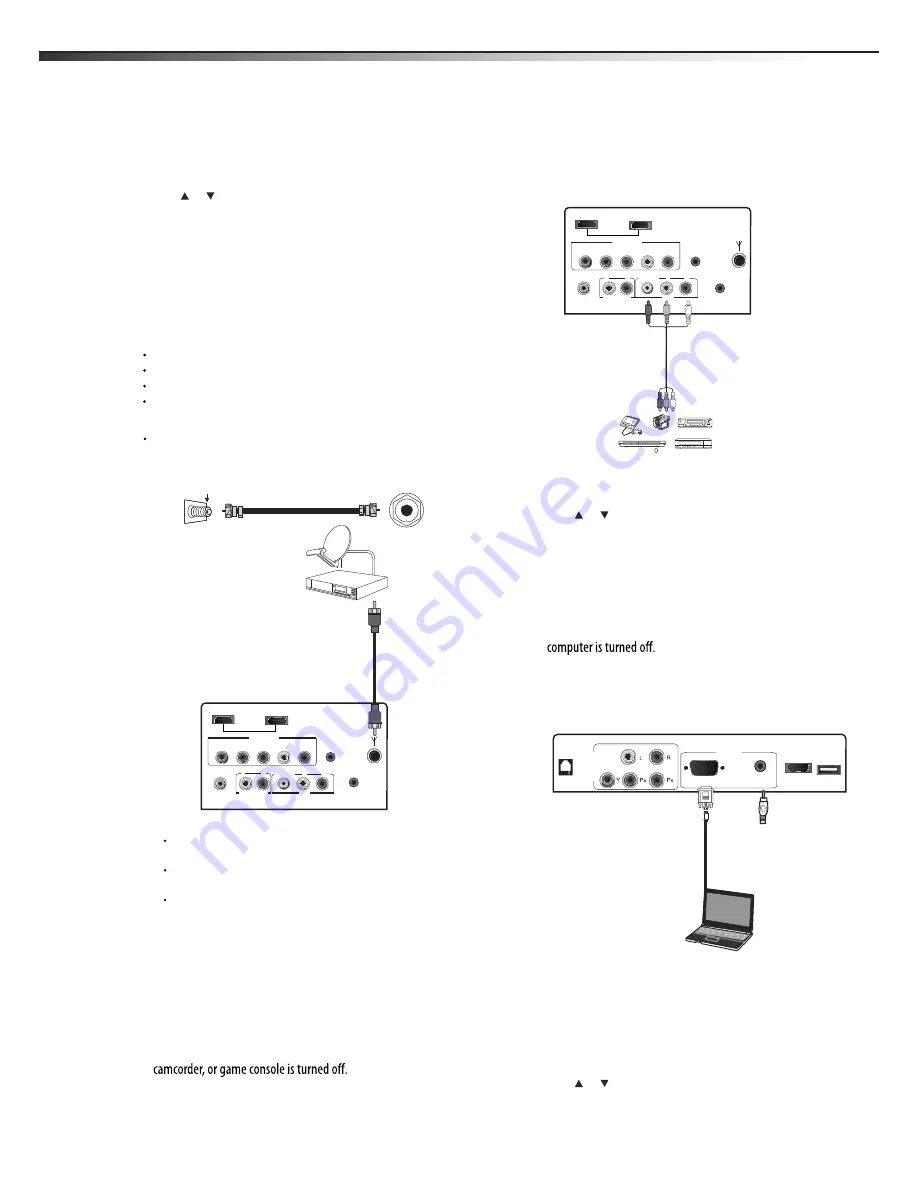
To connect an antenna, cable TV, or satellite TV box:

Connect one end of a 75-Ohm, coaxial cable to the                  jack 

ANT IN 

 on the back of the TV, then connect the other end of the cable to 

the antenna or cable TV wall jack.

Notes:

We recommend using a 75-Ohm, coaxial cable to reduce interference 
and noise that may be caused by radio wave transmissions.
Do not bundle the coaxial cable with the power cord or any other 
cables.
If you are using an antenna and reception is not good, contact a 
service technician to adjust the antenna.

Connecting a VCR, camcorder, or game 
console

Note

: If the VCR, camcorder, or game console has component jacks 

(better), or an HDMI jack (best), connect them using the best available 
connection.

To connect a VCR, camcorder, or game console:

1

Make sure that your TV’s power cord is unplugged and the VCR, 

2

Connect one end of a standard AV cable (not included) into the 

AV 

video jack on the back of the TV, then connect the other end 

of the cable to the 

AV OUT VIDEO

 jack on the external device.

3

Connect the audio connectors of the AV cable (the red and white 
connectors) to the 

AV OUT AUDIO

 jacks of the external device, 

then connect them to the 

AV L 

and

 R

 jacks on the back of your TV.

To play the external AV device:

1

Turn on the TV, then press 

INPUT

. The 

INPUT SOURCE

 menu 

opens.

2

Press   or   to select 

Video

, then press 

ENTER

.

3

Turn on the device, then start playback on the device.

Connecting a computer

To connect a computer:

1

Make sure that your TV’s power cord is unplugged and the 

2

Connect one end of a VGA cable (not included) to the

 VGA 

jack on 

the side of the TV, then connect  the other end of the cable to the 

3

Connect one end of an audio cable with a stereo mini-plug (not 
included) to the 

PC AUDIO 

jack on the side of the TV, then 

connect the other end of the cable to the 

AUDIO OUT

 jack on  

the computer.

To play video from the computer:

1

Turn on the TV, then press 

INPUT

. The 

INPUT SOURCE

 menu 

opens.

2

Press  

or  

to 

select 

PC

, then press 

ENTER

.

3

Turn on the computer, then adjust the computer display 
properties as needed.

ANT IN jack on 
the side of the TV

Antenna, cable TV, 
or satellite box

Home antenna terminal
(75 ohm)

To play from the component video device:

1

Turn on the TV, then press 

INPUT

. The 

INPUT SOURCE

 menu 

opens.

2

Press   or   to select 

Component1 or Component2,

 then press 

ENTER

.

3

Turn on the component video device and start playback. Refer to 
the instructions that came with the component video device.

Connecting an antenna, cable TV, or 
satellite TV box

If you are connecting a satellite TV or cable box, you can use one of the 
following (if available):

Best - HDMI cable
Better - Video component cables
Good - Video composite cable
Acceptable - 75-ohm coaxial cable.

VCR, camcorder, 
or game console

AV cable

Note

: Cables are often 

color-coded to connectors. 
Connect yellow to yellow, 
red to red, and white to 
white.

75-Ohm coaxial cable

VGA 
cable

Audio cable

Computer

LTDN40V86MH

Summary of Contents for LTDN40V86MH

Page 1: ...ES Innovation for life MODEL NO LTDN40V86MH HOSPITALITY LCD TELEVISION...

Page 2: ...ice Connecting an antenna cable TV or satellite TV box Connecting a VCR camcorder or game console Connecting a computer Connecting a home theater system Connecting headphones Understanding the basics...

Page 3: ...watching a program especially on a larger than life TV Make sure that you place or install the TV where it cannot be pushed pulled over or knocked down Make sure that you route all cords and cables so...

Page 4: ...ot remove any cover or expose the device to rain or moisture No user serviceable parts are Lightning For added protection for your device receiver during a lightning storm or when it is left unattende...

Page 5: ...new surroundings for about an hour before switchingiton ormakesurethattheroomtemperaturerisesgradually Condensation may also form duringthe summer if the TV is exposed to the breeze from an air condi...

Page 6: ...ing a wall mount bracket IfyouwanttoattachtheTVtoawall mountbracket notprovided you Warning only Toreducetheriskofhazards donotperformanyservicingother thanthatcontainedintheoperatinginstructionsunles...

Page 7: ...SAP SLEEP SOUND EXIT TV 1 2 3 5 6 4 7 8 9 0 LAST PICTURE MUTE 1 2 VOL VOL Press to increase or decrease the volume CCD SOUND more information Press to select the sound mode You can select Standard Cu...

Page 8: ...appear with explanations in the on screen display OSD Follow the steps shown in the OSD TV Press to select the TV as the video input source Selectscreenmode INPUT Press to open the INPUT SOURCE menu...

Page 9: ...green and blue color coded video connectors and red and white audio connectors Match the colors when making connections To connect a component video device 1 Make sure that your TV s power cord is un...

Page 10: ...TV then pressINPUT The INPUTSOURCE menu opens 2 Press or to select Video then press ENTER 3 Turn on the device then start playback on the device Connecting a computer To connect a computer 1 Make sure...

Page 11: ...eo input source To select the video input source 1 Turn on your TV then pressINPUT on the remote control or on the TV The INPUTSOURCEmenu opens 2 Press or to highlight the video source you want then p...

Page 12: ...resolution Digital signal information Displays channel number station name channel label if preset broadcast program name signal type audio information resolution and current program start and end ti...

Page 13: ...ench and Espana settings and daylight saving Adjust the clock used to synchronizing the image Lets you set the slide time long medium or short Adjust the time takes the OSD to disappear when no operat...

Page 14: ...ease the brightness of the picture Increasing the brightness can add more light to dark areas of the picture while decreasing the brightness can add more darkness to light areas of the picture Brightn...

Page 15: ...ss or tohighlightanoption thenpress or toaccess theoption Press or tohighlightaratingandpress to ENTER ENTER lock all other lower ratings theratingandallotherhigherratingsorunlocktheratingand U S TV r...

Page 16: ...You can select the mode of RF input and search the channels automatically Time Lets you set the exact time You can setup date time time zone and daylight saving Source Labels Lets you name each input...

Page 17: ...ssed If a setting is grayed the setting is not available in the current video input mode TV cabinet creaks When the TV is in use the temperature rises naturally and may cause the cabinet to expand or...

Page 18: ...aratus complies with Canadian ICES 003 CetappareilnumeriquedelaclasseBestconformealanormeNMB 003 du Canada Standard Television Receiving Apparatus Appareil de r ception t l vision ordinaire Canada BET...

Page 19: ...TV picture defaults to Normal viewing mode Normal Audio OFF Installer can go to and adjust settings and Zoom Aspect is full screen User Save Lock FUNCTION Lock Allows installer to lock the following...

Page 20: ...Feature menu adjustment in menu Locks Installation menu adjustment in menu Locks DMP menu adjustment in menu Installation Lock DMP Lock V Chip Locks V Chip function in menu Hotel mute Hotel Channel Se...

Page 21: ......

Reviews: