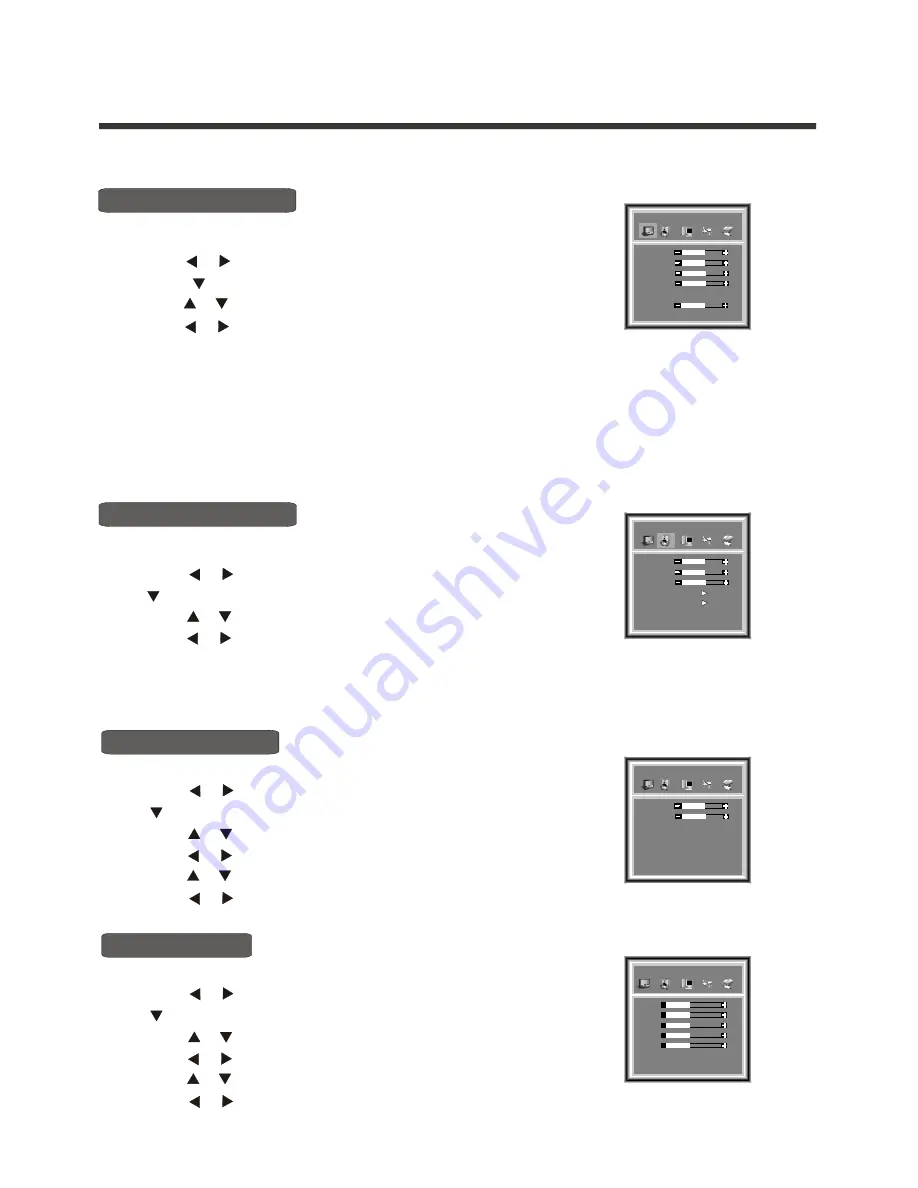
Hisense LCD2004 User Manual Download Page 15

Menu operation

Using the Picture Parameters  menu


1) Press the 

MENU

 button to enter the main menu.

2) Press the                  button to select the item 

Picture Parameters

, and 

    press   the           button to enter 

menu.

3) Press the                  button to select the item you want to adjust.
4) Press the                  button to adjust the level.
The adjusted data is stored automatically as the USER picture preset. To access the USER picture preset, 
press the P.MODE button repeatedly until the word 'USER' appears on screen. 
NOTE:1) There are some differences among different input  modes. For example, 

Phase

  will disappear unless the 

                 input signal is  from VGA or Component.
            2) The item 

Color Temp

 is for reference only.

Picture Parameters 

[     or     ]

[     or     ]

Adjust picture settings

[     or     ]

Using the Audio Settings  menu

[       ]

1) Press the 

MENU

 button to enter the main menu.

2) Press the                  button to select the item 

, and press 

    the           button to enter 

 menu.

3) Press the                  button to select the item you want to adjust.
4) Press the                  button to adjust the level.
The adjusted data is stored automatically as the USER audio preset. To access the USER picture preset, 
press the S.MODE button repeatedly until the word 'USER' appears on screen.
5) Press OK button to confirm your selection. Press OK again to exit from the menu. 

Audio Settings

Audio Settings

[     or     ]

[     or     ]

[     or     ]

[       ]

-14-

Adjust audio settings

Adjust audio settings

Adjust audio settings

HeadPhone settings

1) Press the 

MENU

 button to enter the main menu.

2) Press the                  button to select the item 

, and press 

    the           button to enter 

 menu.

3) Press the                  button to select the item 

HeadPhone

.

4) Press the                  button to enter 

.

5

Audio Settings

Audio Settings

HeadPhone

 menu

) Press the                  button to select the item you want to adjust.

6) Press the                  button to adjust the level.
7) Press OK button to confirm your selection. Press OK again to exit from the menu. 

[     or     ]

[     or     ]

[       ]

[     or     ]

[     or     ]

[     or     ]

Equalier


Britghtness


Contrast

Saturation


Sharpness
Color Temp

Normal

50

50
50

50

Picture Parameters

quAlier


Treble


Bass

Balance


HeadPhone
Equalizer

50

50
50

Audio Settings

quAlier


Volume

Balance

HeadPhone

50

50


45


45

100HZ


45


45

300HZ


45


45

1K


45


45

3K


45


45

8K

Equalizer

Equalizer Setting 

1) Press the 

MENU

 button to enter the main menu.

2) Press the                  button to select the item 

, and press 

    the           button to enter 

 menu.

3) Press the                  button to select the item

 Equalizer

.

4) Press the                  button to enter

 Equalizer

 .

5

Audio Settings

Audio Settings

 menu

) Press the                  button to select the item you want to adjust.

[     or     ]

[     or     ]

[       ]

[     or     ]

[     or     ]

6) Press the                  button to adjust the level
7) Press OK button to confirm your selection. Press OK again to exit from the menu. 

[     or     ]

Hue

50

5) Press OK button to confirm your selection. Press OK again to exit from the menu.

LANGUAGE              ENGLISH

LANGUAGE              ENGLISH

Summary of Contents for LCD2004

Page 1: ...English LCD2004US Part No IES050704 USER MANUAL LCD COLOR TV R...

Page 2: ...heremotecontrolforuse Shortcutkeysoperation Menuoperation UsingthePictureParameters menu UsingtheAudio Setting menu Usingthe Geometry menu UsingtheGeneralSettings menu UsingtheSearch menu Appendix Cle...

Page 3: ...wl kitchensink or laundrytub in awet basement or neara swimming pool and the like 6 CLEAN ONLY WITH DRY CLOTH Unplug the TV from thewall outlet beforecleaning Do notuse liquid cleanersor aerosol clean...

Page 4: ...m shouldnot be locatedin the vicinityof overhead powerlines or otherelectric light orpower circuits or whereit can fallinto such powerlines or circuits When installing anoutside antenna system extreme...

Page 5: ...SOURCE SCAN CCD PARENT LOCK M E N U SAP M U T E P M O D E S MODE R E C A L L VOL CH SLEEP DISPLAY SCAN Scan availablechannels POWER Power on off SOURCE Select oneof five inputsignal sources PARENT Pa...

Page 6: ...the channelnumber you desire 7 Picture adjustment 1 Press the MENU button to enter the main menu 2 Press the button to select the item Picture Parameters and press the button to enter Picture Paramet...

Page 7: ...provideall the connectionsyou will needto connect otherequipment to yourTV Side Controls Connections Note The above figures are for reference only Please refer to the actual connection jacks to determ...

Page 8: ...pment Remote control sensor POWER button standby POWER indicator Channel up cursor up Channel down cursor down Volume up cursor right Volume down cursor left TV AV PC input select MENU button AV audio...

Page 9: ...nnecting to an Aerial Cable antenna PC NB To VGA RGB line You can use yourTV as a monitor for connecting through the PC IN VGA connection jack your PC or Notebook by Connect the devices as shown below...

Page 10: ...evision to the output of the Converter Descrambler box usually channel 3 or 4 and use the Converter Descrambler box remote control to select channels For Subscribers to Unscrambled Basic Cable with Sc...

Page 11: ...ntrol 10 3 Close the battery cover Note 1 Dispose of your batteries in a designated disposal area Do not throw your batteries into fire 2 Do not mix battery types or combine used batteries with new on...

Page 12: ...ll turn red Press POWER again to turn the LCD TV back on The POWER indicator will turn blue ON OFF Standby Component Component VGA VGA S Video S Video Video Video S Video S Video NOTE The explanation...

Page 13: ...r example to select channel 120 press the button 1 1 will appear on the screen then press the button 2 and the button 0 successively Changing channels Displaying current channel number on screen Press...

Page 14: ...ound with the MTS feature MTS can also transmit a second audio program SAP containing a second language or other audio information Press the SAP button on the remote control to switch among Mono Stere...

Page 15: ...from the menu Audio Settings Audio Settings or or or 14 Adjust audio settings Adjust audio settings Adjust audio settings HeadPhone settings 1 Press the MENU button to enter the main menu 2 Press the...

Page 16: ...ion Auto configuration Geometry Using the General Settings menu Timer or 1 Press the MENU button to enter the main menu 4 Press the button to enter the Timer menu 5 2 Press the button to select the it...

Page 17: ...the password xxxx or Password is a four digit number The preset password is 0000 You must enter a password to access the next three operations 1 Press the button to select Password change and press t...

Page 18: ...e blocked as well For example if you choose to block the MPAArating R the higher ratings NC 17 and X are automatically blocked too Rating Description E Exempt C Children C8 Children eight years and ol...

Page 19: ...tton to enter menu 3 Press the button to select Auto Search 4 Press the button to start auto search Search Auto Search or or or Using the Search menu Equalier Program Tuning Mode Skip Auto search 1 Of...

Page 20: ...s moisture with a clean dry cloth 4 Polish the cabinet with a quality furniture polish to maintain the finish and appearance of the cabinet Caution Never use strong solvents such as thinner benzene or...

Page 21: ...er channel Adjust the picture from the menu The station may have broadcast difficulties Try another channel Use a highly directional outdoor antenna The station may have broadcast difficulties Try ano...

Page 22: ...VIDEO input VIDEO 1 S VIDEO 1 Y YPbPr YCbCr 1 Y VGA Analog RGB 15pin 1 AUDIO input AV audio 1 10KW 1 0Vrms input 30Ibs Width 525mm Height 420mm Depth 260mm Design and specifications are subject to cha...

Reviews: