background image

English


2

Installing the Stand

Installing the Stand

 NOTES

The TV screen is very fragile,and must be protected at all times when removing the 
base stand. Be sure that no hard or sharp object, or anything that could scratch or 
damage the screen, come into contact with it.DO NOT exert pressure on the front 
of the TV at any time because the screen could crack.

For tabletop use, the TV must be attached to the provided stand as shown on this 
page.


Product images are only for reference, actual product may vary in appearance. 

WARNING

Be sure to disconnect the AC power cord before installing a stand or wall-mount 
brackets.

CAUTION

Carefully place your TV facedown on a soft,cushioned surface to prevent damage 
to the TV or scratching to the screen.

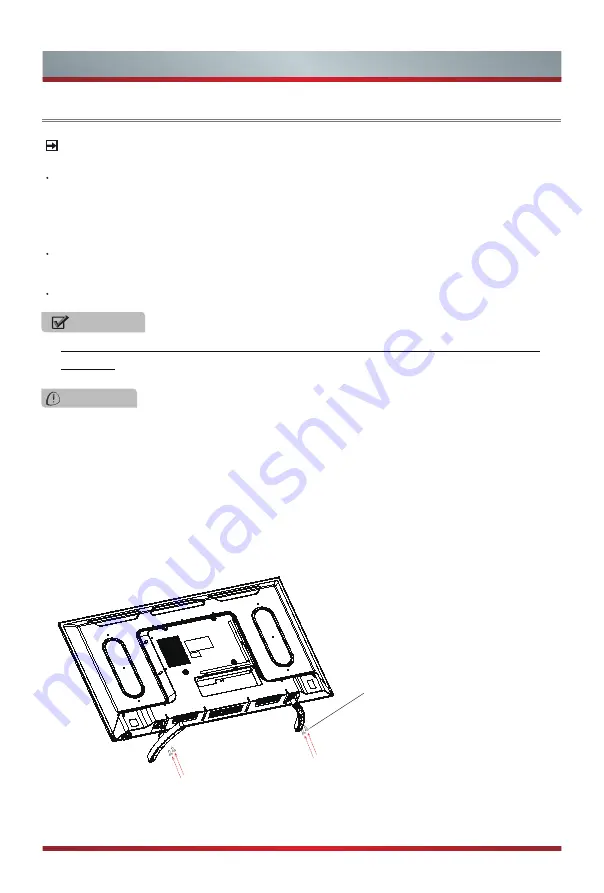
Follow the illustrations and textual instructions below to complete the installa-
tion steps:
1. Attach the stand to the TV set as shown in the picture.
2. Use the screws to fix the stand tightly.

40″ Screws: (ST4 × 14F) × 4

32″ Screws: (ST4 × 12F) × 4

Summary of Contents for HE32M2160HTS

Page 1: ...English QUICK SETUP GUIDE Before using the TV please read this guide thoroughly and retain it for future reference For more detailed instructions please see the User Manual HE32M2160HTS HE40M2160FTS ...

Page 2: ... Front 3 TV Rear 4 Making Connections 5 Remote Control 9 Specifications Other Information 1 12 1 Product image is only for reference actual product may vary in appearance Parts of the software function changes with the system upgrade User Manual Quick Setup Guide Remote Control Battery 2 Screw 4 YPbPr cable 1 AV INPUT Cable 1 ...

Page 3: ... be attached to the provided stand as shown on this page Product images are only for reference actual product may vary in appearance WARNING Be sure to disconnect the AC power cord before installing a stand or wall mount brackets CAUTION Carefully place your TV facedown on a soft cushioned surface to prevent damage to the TV or scratching to the screen Follow the illustrations and textual instruct...

Page 4: ...tion Remote sensor Receive remote signals from the remote control Do not put anything near the sensor as its function may be affected Remote indicator Red light up in standby mode Blue light up in power on mode Touch to select among the different signal sources STANDBY SOURCE Press the button to turn on the TV Press the button for a few seconds to put the TV in standby mode Remote Sensor Remote In...

Page 5: ...image or color problems Make sure that all connections are tight and secure Not all A V devices have the ability to connect to a TV please refer to the user s manual of your A V device for compatibility and connections procedure Before connecting external equipment remove the mains plug from the wall socket This may cause electric shock TV Bottom Panel TV Side View ...

Page 6: ... Input Source appears press to select the source HDMI then press OK to connect TV JACK not included HDMI DVD Blu Ray AV receiver Set top Box HDMI ANT1 Connect an outdoor VHF UHF antenna or cable TV JACK Outdoor Antenna Antenna Cable 75Ω or ANT OUT Cable VHF UHF Antenna ANT1 DVB T2 C not included SCART Connect the Scart cable from an external A V Device Press Source button when the list of Input So...

Page 7: ...dual non standard high capacity mobile hard disk if it s impulse current is greater than or equal 500mA it may cause TV rebooting or self locking So the TV does not support it The USB port supports a voltage of 5V The maximum supported storage space of the hard disk is 1T If you want to store the video streaming of a DTV program the transfer rate of the USB storage device must not be less than 5MB...

Page 8: ...le and card from the service provider of the channels you want to watch Insert the CI module with the SmartCard in the direction marked on the module and SmartCard CI is not supported in some countries and regions check with your authorized dealer OPTICAL Connect to an external digital audio device Before connecting a digital audio system to the OPTICAL jack you should decrease the volume of both ...

Page 9: ...s Y PB and PR on the VCD or DVD can sometimes be identified as Y CB and CR Press Source button when the list of Input Source appears press to select the source YPbPr and press OK to connect TV JACK TV JACK VCR DVD Player Recorder Set top box Satellite Receiver Video Camera Video L A V OUT R R L PR PB Y Component VCR DVD Player Recorder Set top box Satellite Receiver Video Camera AV COMP L R AV COM...

Page 10: ...l menu display Enter or confirm the operation Up Down Left Right Electronic program guide Picture mode selecting Volume Up Volume Down 1 2 numbers For direct channel access To return to the last view program Text Size Reveal Hold Index Subpage refer to teletext function Play Pause Stop etc are used in media mode Analog Digital TV Select USB Digital Media player mode Mono Stereo operation Audio sel...

Page 11: ...ones Remove depleted batteries immediately to prevent battery acid from leaking into the battery compartment If you do not intend to use the remote control for a long time remove the batteries Batteries should not be exposed to excessive heat such as sunshine heat registers or fire Battery chemicals can cause a rash If the batteries leak clean the battery compartment with a cloth If chemicals touc...

Page 12: ...ower consumption 50W 70W Power supply 100 240V 50 60Hz AV Colour System PAL NTSC SECAM NTSC MADE IN CHINA Television System PAL SECAM B G D K DVB T C DVB T2 DVB S S2 Environmental conditions Temperature 5 C 45 C Humidity 20 80 RH Atmospheric pressure 86 kPa 106 kPa Component mode 480I 60Hz 480P 60Hz 576I 50Hz 576P 50Hz 720P 50Hz 720P 60Hz 1080I 50Hz 1080I 60Hz 1080P 50Hz 1080P 60Hz VGA mode 4 2 0 ...

Reviews: