background image

5

TV Front

TV Front

 NOTES

The Picture is Only for Reference. 
Powering on the TV requires several seconds to load program. Do not rapidly turn 

the TV off as it may cause the TV to work abnormally. 

TV Bottom Panel

TV Back View

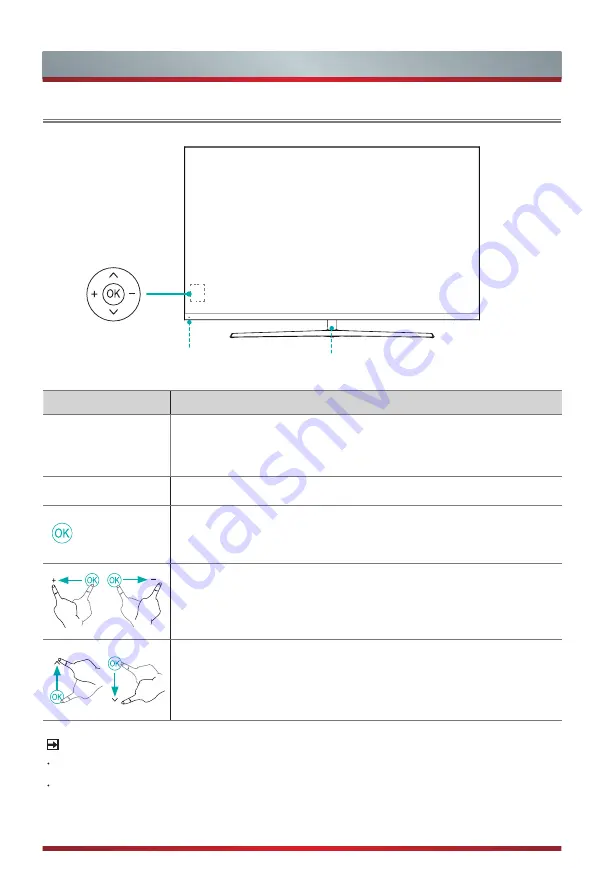
Remote sensor

Light effect

Item

Description

Remote sensor

Receives remote signals from the remote control.
Do not put anything near the sensor, as its function may be


affected.

Light effect

The illumination can be set on or off.
Select among the different input signal sources and put the TV 
in standby mode, and you can turn on the TV when TV is in 
standby mode.

Toggle the OK button left and right to adjust the volume.

Toggle the OK button up and down to select the channel.

Summary of Contents for 65N8

Page 1: ...English 65N8 ES A171701 1 QUICK SETUP GUIDE Before using the TV please read this guide thoroughly and retain it for future reference For more detailed instructions please see the User Manual ...

Page 2: ...ty fitness for a particular purpose accuracy quiet use and non violation of any third party s rights to the maximum extent permitted by applicable law Manufacturer gives no guarantee on the accuracy validity timeliness legitimacy and completeness of any content or service provided through this device or the fitness of such device content or service for your particular requirement or the protection...

Page 3: ...sal of this product you will help prevent potentially hazardous to the environment and to human health which could otherwise be caused by unsuitable waste handling of this product The recycling of materials will help conserve natural resources Please do not therefore dispose of your old electrical and electronic equipment with your household waste For more detailed information about recycling of t...

Page 4: ...uring the television set is not overhanging the edge of the supporting furniture Not placing the television set on tall furniture for example cupboards or bookcases without anchoring both the furniture and the television set to a suitable support Not placing the television set on cloth or other materials that may be located between the television set and supporting furniture Educating children abo...

Page 5: ... product Objects filled with liquids such as vases should not be placed on the product 6 Setting Do not place this TV on an unstable cart stand or table Placing the TV on an unstable base can cause the TV to fall resulting in serious personal injuries as well as damage to the TV Use only a cart stand bracket or table recommended by the manufacturer or salesperson 7 Ventilation Slots and openings i...

Page 6: ...s Where installing an outside antenna system extreme care should be taken to keep from touching such power lines or circuits as contact with them might be fatal 12 Overloading Do not overload wall outlets and extension cords as this can result in a risk of fire or electric shock 13 Object and Liquid Entry Never push objects of any kind into this TV through openings as they may touch dangerous volt...

Page 7: ...ing instructions as an improper adjustment of other controls may result in damage and will often require extensive work by a qualified technician to restore the TV to its normal operation e If the TV has been dropped or the cabinet has been damaged f When the TV exhibits a distinct change in performance this indicates a need for service 17 Replacement Parts When replacement parts are required be s...

Page 8: ...ng accessories are included with TV NOTE Figures and illustrations in this manual are provided for reference only and may differ from actual product appearance Quick Setup Guide 1 Remote Control 1 Column Base 1 Power Cord 1 AAA Battery 2 Back Base 1 Base Cover B 1 Cover Plate 1 Screw 9 APP APP OK T Shift Cable Clamp 1 Our sample doesn t come with this clamp Two different types of screws are being ...

Page 9: ...me because the screen could crack Follow the illustrations and textual instructions below to complete the installation steps Installing the Stand Installing the Stand or Wall Mount Bracket Base Cover A 1 Carefully place your TV face down on a soft flat surface to prevent damage to the TV or scratching to the screen 2 Open Base Cover A by using the bulge on it and take it away Base Cover A is on th...

Page 10: ...cket Base Cover B 5 Take out Base Cover B in the accessory bag and install it downward at the place shown in the illustration 4 Secure the Base Support to the TV with the 4 screws in accessory tightly Screws M5 16 Base Support should it be M4 ...

Page 11: ...e on the back cover of TV Cable clamp can help you to arrange power line and signal lines Mounting Hole Cable Clamp 9 5 11 5mm Wall Mount Bracket Screw Spacer The TV s rear cover NOTE Pictures are only for reference actual product may vary in appearance NOTE Whether the wall mount bracket is included in the accessories is decided by customer demand WALL MOUNT BRACKET SPECIFICATIONS not included in...

Page 12: ...ect Item Description Remote sensor Receives remote signals from the remote control Do not put anything near the sensor as its function may be affected Light effect The illumination can be set on or off Select among the different input signal sources and put the TV in standby mode and you can turn on the TV when TV is in standby mode Toggle the OK button left and right to adjust the volume Toggle t...

Page 13: ...power cord is plugged in It may cause electric shock Pictures are only for reference actual product may vary in appearance AC INPUT COMMON INTERFACE TV Bottom Panel TV Side View LAN Y VIDEO PB L PR R AV IN COMPONENT IN Note There s one screw at the place of arrow and it is usually covered by an AC INPUT label ANT SERVICE HEADPHONE DIGITAL AUDIO OUT DC 5V 0 5A MAX USB 1 DC 5V 1A MAX USB 2 HDMI 3 4K...

Page 14: ...Antenna Cable 75Ω or ANT OUT Cable VHF UHF Antenna TV JACK ANT not included COMMON INTERFACE Insert the CI module for watching scrambled services like pay tv channels or some HD channels SMART CARD CAM CARD TV JACK 1 2 NOTES Before you insert remove the CI module ensure that the TV is switched off Then insert the CI card into the CI module in accordance with the Service Provider s instructions Do ...

Page 15: ... signal input at the same time TV JACK TV JACK HDMI cable not included MHL cable not included HDMI Audio Amplifier Speaker MHL enabled Device MHL Connect an MHL cable from your MHL enabled device such as a cell phone BEST HDMI Video Effect BETTER COMP GOOD AV Video Camera Set top Box Satellite Receiver AV Y Pb Pr Component L R Video L R VIDEO L R P R P B Y COMPONENT IN NOTE MHL is only available t...

Page 16: ...r data loss DIGITAL AUDIO OUT Connect to an external digital audio system Before connecting a digital audio system to the DIGITAL AUDIO OUT jack you should decrease the volume of both the TV and the system to avoid that the volume suddenly becomes bigger DIGITAL AUDIO cable not included Audio Amplifier Speaker HEADPHONE Connect Headphone for audio out of the TV The built in speakers will be disabl...

Page 17: ...ou don t have to enter them manually Most home networks already have DHCP Wireless setup Connect your TV to your wireless network you need a wireless router or modem See the illustration below The TV s built in Wireless LAN Adapter supports the IEEE 802 11 ac b g n communication protocols We recommend using IEEE 802 11ac router Low transfer rates for b g n may have the influence on the quality of ...

Page 18: ...d be less than 10 meters What is Freeview Plus Freeview Plus is a new television service delivered via broadband providing a state of the art Electronic Program Guide EPG and seamless access to catch up TV across the free to air networks with the simple press of a button How does it work First ensure the TV is connected to internet and an antenna system Then when you re watching TV you ll briefly ...

Page 19: ... or exit the application Special function buttons Display the channel list on the screen Navigation buttons Up Down Left Right Confirm button Display the on screen keyboard Media content control function buttons Start Timeshift Display subtitles in the Live TV Record the current program DTV mode Quick access buttons to apps Enter the media mode Fast access to all applications Mute and restore soun...

Page 20: ...he battery compartment with a cloth If chemicals touch your skin wash immediately 1 Slide the back cover to open the battery compartment of the remote control 2 Insert two AAA size batteries Make sure to match the and ends of the batteries with the and ends indicated in the battery compartment 3 Close the battery compartment cover 1 Gently push and slide 3 Gently push and slide 2 Insert the batter...

Page 21: ...ion Select the Country where you will operate the TV Time Zone Select the local time zone according to your region TV Usage Select Home Mode or Store Mode Home Mode uses less energy Store Mode should only be selected by Retailers who plan to demonstrate the TV End User License Agreement Accept EULA Help promote the TV user experience Network Connection If your TV does not detect an Ethernet connec...

Page 22: ... 15W 15W Power consumption Please refer to the rating label Power supply 100 240V 50 60Hz Standby Power 0 5W Receiving systems Analog PAL D K B G I SECAM D K B G L L Digital DVB T T2 DVB C Environmental conditions Temperature 5 C 45 C Humidity 20 80 RH Atmospheric pressure 86 kPa 106 kPa Component Input 480 I 60 Hz 480 P 60 Hz 576 I 50 Hz 576 P 50 Hz 720 P 50 Hz 720 P 60 Hz 1080 I 50 Hz 1080 I 60 ...

Reviews: