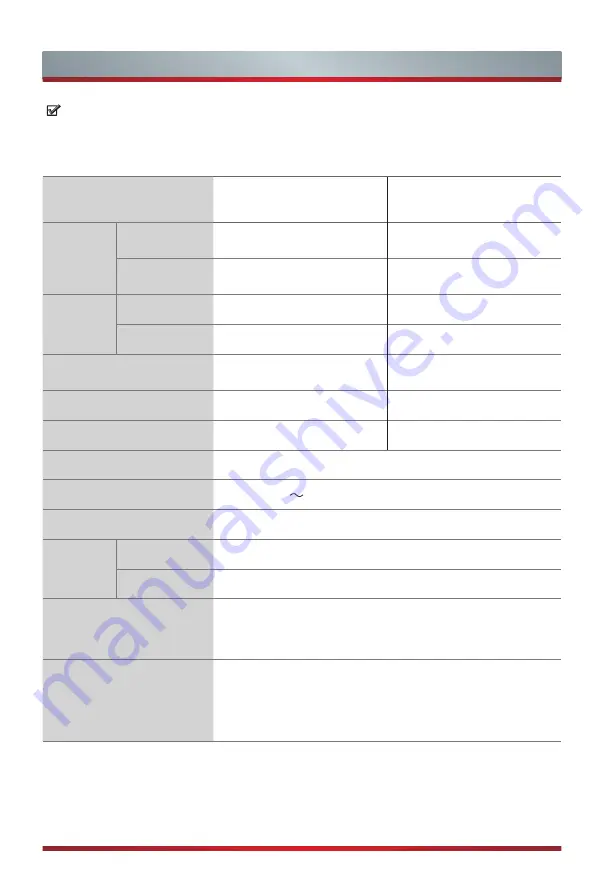
Hisense 55PX Quick Setup Manual Download Page 22

15

Specifications

Features, appearance and specifications are subject to change without notice.
If you encountered difficulty when setting up your TV, we suggest you refer to the 

troubleshooting tips in the User Manual.

Item

55"

65"

Dimension

(mm)

Without Stand

(W × H × D)

1226 × 707 × 59  

1447 × 831 × 62  

With Stand

(W × H × D)

1226 × 755 × 272

1447 × 881 × 326

Weight

(kg)

Without Stand

20.5

24.3

With Stand

22.7

27.3

Active Screen Size 

(Diagonal)

55 inches

65 inches

Screen resolution

3840 × 2160

3840 × 2160

Audio power

10W + 10W

15W + 15W

Power consumption

Please refer to the rating label.

Power supply

100


-


240V   50/60Hz

Standby Power

0.5W

Receiving 

systems

Analog

PAL-D/K, B/G, I  SECAM-D/K, B/G, L/L’

Digital

DVB-T/T2, DVB-C

Environmental conditions

Temperature: 5°C - 45°C
Humidity: 20% - 80% RH
Atmospheric pressure: 86 kPa - 106 kPa

HDMI Input

60 Hz (640×480, 800×600, 1024×768)

60 Hz (480 I, 480 P, 720 P, 1080 I, 1080 P)

50 Hz (576 I, 576 P, 720 P, 1080 I, 1080 P)

24 Hz 30 Hz (3840×2160 HDMI 3,4)

24 Hz 30 Hz 50 Hz 60 Hz (3840×2160 HDMI 1,2)

Summary of Contents for 55PX

Page 1: ...English 55PX 65PX ES A182404 1 QUICK SETUP GUIDE Before using the TV please read this guide thoroughly and retain it for future reference For more detailed instructions please see the User Manual...

Page 2: ...y fitness for a particular purpose accuracy quiet use and non violation of any third party s rights to the maximum extent permitted by applicable law Manufacturer gives no guarantee on the accuracy va...

Page 3: ...isposal of this product you will help prevent potentially hazardous to the environment and to human health which could otherwise be caused by unsuitable waste handling of this product The recycling of...

Page 4: ...he television set is not overhanging the edge of the supporting furniture Not placing the television set on tall furniture for example cupboards or bookcases without anchoring both the furniture and t...

Page 5: ...liquids onto the product Objects filled with liquids such as vases should not be placed on the product 6 Setting Do not place this TV on an unstable cart stand or table Placing the TV on an unstable...

Page 6: ...uching such power lines or circuits as contact with them might be fatal 12 Overloading Do not overload wall outlets and extension cords as this can result in a risk of fire or electric shock 13 Object...

Page 7: ...the TV ask the service technician to perform safety checks to determine that the TV is in safe operating condition 19 Heat The product should be situated away from heat sources such as radiators heat...

Page 8: ...unction changes with the system upgrade Accessories List 1 Installing the Stand or Wall Mount Bracket 2 TV Front 5 TV Rear 6 Making Connections 7 Remote Control 12 Turning the TV on for the First Time...

Page 9: ...age the screen display comes into contact with it DO NOT exert pressure on the front of the TV at any time because the screen could crack Installing the Stand Installing the Stand or Wall Mount Bracke...

Page 10: ...the Stand or Wall Mount Bracket Base Cover 3 Install the Base Cover downward at the place shown in the illustration 2 Secure the Base Stand to the TV with the 4 screws in accessory tightly Base Stand...

Page 11: ...th the Wall mount bracket Whether the wall mount bracket is included in the accessories is decided by customer demand Installing the Wall Mount Bracket 16 18 mm Wall mount bracket Screw Spacer Rear co...

Page 12: ...remote signals from the remote control Do not put anything near the sensor as its function may be affected Power indicator The light is red in standby mode Select among the different input signal sour...

Page 13: ...nual of external device Do not connect external equipment while TV s power cord is plugged in It may cause electric shock Service jack is not available for you to connect an external device It can onl...

Page 14: ...ace and cause a malfunction You must obtain a CI module and card from the service provider of the channels you want to watch Insert the CI module with the SmartCard in the direction marked on the modu...

Page 15: ...o directly output the digital sound through an HDMI cable Please note that it works only when the TV is connected to the audio receiver that supports the ARC Audio Return Channel function When this po...

Page 16: ...e same time update is also an easy thing and will be done just by plugging the USB with the updating files into the USB interface NOTES When connecting a hard disk or a USB hub always connect the main...

Page 17: ...otocols NOTES You must use the built in Wireless LAN Adapter to use a wireless network because the set doesn t support external USB network adapter If the wireless router supports DHCP your TV can con...

Page 18: ...ir networks with the simple press of a button How does it work First ensure the TV is connected to internet and an antenna system Then when you re watching TV you ll briefly see a prompt at the top le...

Page 19: ...or exit the application Special function buttons Display the channel list on the screen Navigation buttons Up Down Left Right Confirm button Display the on screen keyboard Media content control functi...

Page 20: ...e battery compartment with a cloth If chemicals touch your skin wash immediately 1 Slide the back cover to open the battery compartment of the remote control 2 Insert two AAA size batteries Make sure...

Page 21: ...he menu Location Select the location where you will operate the TV Time Zone Select the local time zone according to your region Only available in certain countries End User License Agreement Accept E...

Page 22: ...tive Screen Size Diagonal 55 inches 65 inches Screen resolution 3840 2160 3840 2160 Audio power 10W 10W 15W 15W Power consumption Please refer to the rating label Power supply 100 240V 50 60Hz Standby...

Reviews: