Hisense 43N6 User Manual Download Page 15

13   

2.4

    Using the Sound Menu

Sound Mode

Select a preset sound mode to suit the type of content you are listening to.

Apply Sound 

Mode

Adjust current sound mode to apply to all source or just current source.
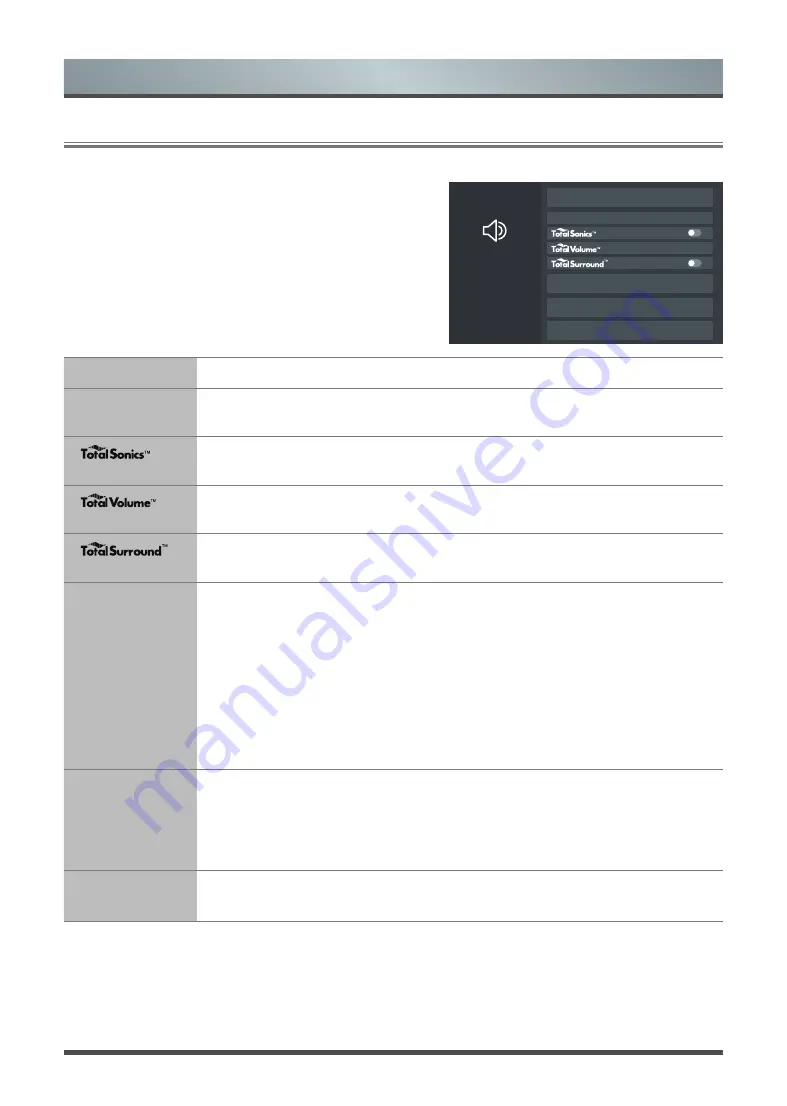
Total Sonics

Optimizes overall sound quality by increasing bass, making dialog clear and natural, 

and widening the sound field.

Total Volume

Maintains consistent loudness levels from wide dynamic range programs, too-loud 

commercials, and channel or input changes. 

Total Surround

Provides surround sound experience with psycho-acoustic processing to place 

sounds beside, behind, and above the viewer. For best results use with Total Sonics.

Speakers

• 

Speakers: 

Select the speakers which you want to use.

• 

Headphone Mode: 

Change the way audio is sent through the type of device that’s 

connected to your TV Audio Out port. 

• 

Digital Audio Out: 

Select the digital audio output format that best suits the audio 

device type.


For example, choose RAW (which is uncompressed audio in RAW 

form) if you have 5.1 Channel Surround Sound Speaker set up. Choose PCM if 

you have an amplifier that does not support Dolby Digital technology.

• 

Digital Audio Delay: 

Adjust the digital audio output delay time to sync sound from 

an external speaker with the images on the TV.

• 

Lip Sync: 

Synchronize the displayed image with the audio output.

Advanced Audio 
Settings

Tune the audio settings and quality of the TV.

• 

Balance:

 Adjust the left and right speaker strength to optimize audio for a specific 

location.

• 

Equalizer:

 Boost the volume at different frequencies.

• 

Audio Type:

 Select the audio type of programs.

Restore Default
Audio Settings

Restore all of the audio settings in current audio mode to the factory default values.

The sound setting allows the user to optimize the 
output audio sounds of the TV.

Menu

Sound Mode: Standard

Apply Sound Mode                          

<  Current Source  >


<   Normal Mode   >

Speakers

Advanced Audio Settings

Restore Default Audio Settings

Select a preset sound mode to suit

the type of content you are 

listening to.

Sound

Summary of Contents for 43N6

Page 1: ...Bar code...

Page 2: ...ES A170505 LED Backlight TV Read the manual carefully and ensure you have fully understood its contents before operating this device for the first time English...

Page 3: ...the Network Menu 14 2 6 Using the Channels Menu 15 2 7 Using the System Menu 16 2 8 Using the About TV Menu 18 3 Advanced Features 3 1 Getting familiar with the Home screen 19 3 2 Apps 20 3 3 Media 21...

Page 4: ...y fitness for a particular purpose accuracy quiet use and non violation of any third party s rights to the maximum extent permitted by applicable law Manufacturer gives no guarantee on the accuracy va...

Page 5: ...te handling of this product The recycling of materials will help conserve natural resources Please do not therefore dispose of your old electrical and electronic equipment with your household waste Fo...

Page 6: ...as damage to the TV Use only a cart stand bracket or table recommended by the manufacturer or salesperson 7 Ventilation Slots and openings in the cabinet are provided for ventilation to ensure reliab...

Page 7: ...quiring Service Unplug the TV from the wall outlet and refer servicing to qualified service personnel under the following conditions a When the power supply cord or plug is damaged b If liquid has bee...

Page 8: ...firm your selection 1 2 Selecting the Input Source Shortcuts Instructions You can use shortcuts on the remote control for fast operation Refer to the Quick Setup Guide for more information 1 3 Using t...

Page 9: ...h a cable provider you can view your list of channels by pressing OK on your remote You will see the channel list display on the right side of the screen Creating a Favorites List To quickly access yo...

Page 10: ...nt options Select and set Start time Stop time Press the buttons to move to the position you want to set press the OK button and then press the 0 9 buttons to input the desired numbers Selecting and s...

Page 11: ...ise the recording will not commence Press the button on the remote to display the menu press the II button to pause the live broadcast and press the button to play Press the button to rewind and press...

Page 12: ...ng conditions There are six types of picture modes available Standard Natural Cinema PC Game Dynamic Football Sound Mode Select a preset sound mode to suit the type of content you are listening to Sta...

Page 13: ...1 Press the button on your remote press the v button on the remote to select Settings and then press the OK button to enter the Settings menu The Settings Menu consists of the following settings Pictu...

Page 14: ...according to the changes in image and increase the contrast NOTE Some models don t support this function Noise Reduction Improve how clear the picture appears by reducing noise Expert Settings Colour...

Page 15: ...e audio device type For example choose RAW which is uncompressed audio in RAW form if you have 5 1 Channel Surround Sound Speaker set up Choose PCM if you have an amplifier that does not support Dolby...

Page 16: ...connection Connection Type Wireless Choose a wireless network connection to access the Internet Advanced Settings Configure the advanced wireless network settings for the TV Refresh Refresh wireless n...

Page 17: ...Locks Turn the Lock system On or Off Block Time Block certain channels and programs during certain periods of time Channel Block Block programs by channels when you activate the parental controls set...

Page 18: ...urn the TV Off within a specified time Power On Timer Enable the Power On Timer to Off Once or Weekly Power Off Timer Enable the Power Off Timer to Off Once or Weekly Menu Timeout Set the amount of ti...

Page 19: ...or 4 2 0 10 bit and above Advanced Settings Access the Advanced Settings menu PVR T Shift Setting Initialize the external USB disk to support PVR and Time Shift Since the function record temporary th...

Page 20: ...to devices that are available for sharing data Disclaimer Click to read the Disclaimer details System Upgrade Set your TV to receive the latest firmware Restore To Factory Default Restore your TV back...

Page 21: ...for you to determine if you still have Internet connectivity when you use the TV Names of sections that appear on the Home screen The Home screen displays the following section names Notifications Ap...

Page 22: ...time 4 Use the navigation buttons of your remote to select the app A page displays that shows a written description of the app 5 Click on OPEN or ADD TO FAVORITES Removing an App You can only delete...

Page 23: ...r Music The library of items displays on the screen 2 Press the v v buttons to select the name of the folder that contains your content 3 Press the OK button to enter play the folder content If you wa...

Page 24: ...V We will provide software updates to continuously enhance your TV and correct any issues that may impact your user experience therefore we recommend that you keep your TV connected to the Internet to...

Page 25: ...ears Is this normal Yes this is normal That is the TV searching for previous setting information and initializing the TV Picture is normal but no sound Check the volume settings Check if Mute mode is...

Page 26: ...eck if the batteries are correctly installed Smart Television with wireless network capability Wi Fi fail to join a local network Configure the local wireless router or access point for WPA PSK securi...

Reviews: