background image

6

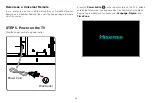
STEP 1. Attach the TV Stand or Wall Mount Bracket (not included)

Attach the TV Stand 

(For steps to attach the wall mount see page 7)

CAUTION:

Be sure to disconnect the A/C power cord before installing a stand or Wall-Mount brackets.
The LED display is very fragile and must be protected at all times when installing the legs that form the stand. Be sure to protect the TV 
screen from getting scratched or damaged by any hard objects. In addition,  DO NOT exert pressure on the front of the TV at any time because 
it could crack.

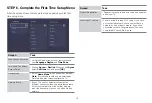
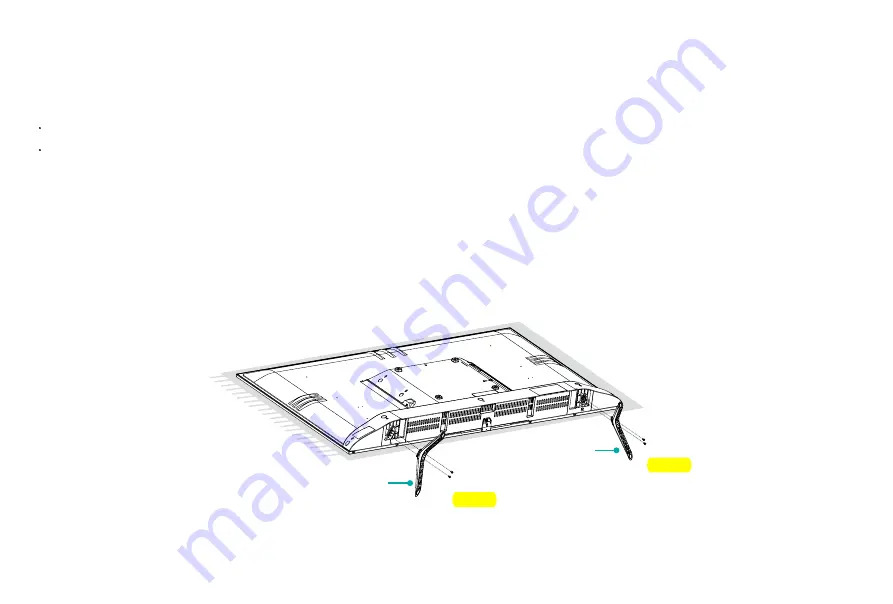
To attach the left and right leg that forms the stand:

1. Carefully place your TV face down on a soft,  flat surface to prevent damage to the TV or scratching to the screen.
2. Remove the 2 legs from the foam and then insert the legs into the bottom slots of the TV.
3. Use the screws that came inside the carton with your TV to secure each leg tightly.

Screws: 
M4×25

Screws: 
M4×25

leg

leg

Summary of Contents for 40H5000F

Page 1: ...sense improve the environment by reducing paper waste For detailed instructions and feature descriptions access the full User Manual for your TV online Before using the TV please read this guide caref...

Page 2: ...of Hisense Company Ltd and its subsidiaries All other trademarks are the property of their respective holders USA Hisense USA Corporation 7310 McGinnis Ferry Road Suwanee GA 30024 MEXICO Hisense Mexic...

Page 3: ...5F 43H5F 40H5000F 40H5030F 40H5040F 40H5050F 40H5060F 40H5070F 40H5080F 43H5000F 43H5030F 43H5040F 43H5050F 43H5060F 43H5070F 43H5080F 40H5509 43H5509 This Quick Setup Guide supports the following mod...

Page 4: ...Wall Mount Bracket 6 Connect Devices to your TV 8 Establish a Network Connection 10 Buttons on your TV Remote 12 Begin Using your Remote 13 Power on the TV 14 Complete the First Time Setup Menu 15 Be...

Page 5: ...n Monday Friday 9 AM to 9 PM EST Saturday Sunday 9 AM to 6 PM EST Service Email Service hisense usa com http www hisense usa com support https www hisense usa com support register CANADA Phone 1 855 3...

Page 6: ...your TV be sure to check ALL of the foam in the carton box Required tools and devices Wireless router not included for Internet connectivity Phillips screwdriver not included to secure the TV stand HD...

Page 7: ...4 Buttons and Ports on the TV Back View of the TV 40 TV Side View STANDBY INPUT DIGITAL AUDIO OUT ANT CABLE AV IN LAN USB2 USB1 DC 5V 0 5A MAX HDMI 2 ARC HDMI 1...

Page 8: ...5 Back View of the TV 43 TV Side View TV Back View STANDBY INPUT VIDEO AV IN L R ANT CABLE DIGITAL AUDIO OUT LAN USB2 USB1 DC 5V 0 5A MAX HDMI 2 ARC HDMI 1...

Page 9: ...to protect the TV screen from getting scratched or damaged by any hard objects In addition DO NOTexert pressure on the front of the TV at any time because it could crack To attach the left and right l...

Page 10: ...ng screws not provided that are 8 0 10 0 mm in length when measured from the attaching surface of the mounting hook Rear cover of the TV Spacer Screw Wall mount bracket 8 0 10 0 mm Wall mount hole pat...

Page 11: ...antenna HDMI DVD Player Recorder Set top Box Satellite Receiver Satellite antenna cable VCR Video Camera Connect a High Definition Multimedia Interface HDMI cable from an external device AV IN VIDEO...

Page 12: ...rom the TV Headphones with microphones are not supported LAN LAN Connect an Ethernet cable to access a network or the Internet The TV also has a wireless connectivity feature SERVICE This port is not...

Page 13: ...blish a wired network connection Automatically obtain an IP address 1 Select Wired LAN The TV will automatically obtain an IP address and connect to the network NOTE The default option of IP Settings...

Page 14: ...ect Wireless The list of networks will be displayed automatically 2 Select a wireless network from the list input the password and select Connect 3 If the network connection does not appear in the lis...

Page 15: ...pad up down left right navigation buttons OK Confirmation button Return to the previous place in the menu or app SLEEP Adjust sleep timer setting Display the Home screen BUTTON DESCRIPTION VOL Volume...

Page 16: ...rk at a 30 degree horizontal or vertical angle Program Your Universal Cable or Satellite Remote Control to Operate Your New Television only for USA If you would like to program your other household re...

Page 17: ...Box or Satellite Receiver Remote as a Universal Remote then visit the Support page to view a list of the codes Press the Power button on the remote to turn on the TV A splash screen that shows the lo...

Page 18: ...de Select Home Mode which appears by default Note Store Mode should only be selected by Retailers who plan to demonstrate the TV Network Setup If your TV does not automatically detect an Ethernet conn...

Page 19: ...audio description of relevant programs Text to Speech can convert written text into voice text to help visually impaired people listen to the information they are unable to read In addition the Video...

Page 20: ...15 6 lbs 7 1 kg Active Screen Size Diagonal 39 6 inches 42 6 inches Screen Resolution 1920 1080 Audio Power 7 W 7 W Power consumption 70 W Power Supply 120 V 60 Hz Picture Quality Screen resolution19...

Page 21: ...e subject to change without notice to improve reliability function design or other aspects Operating Temperature 5 C 35 C 41 F 95 F Operating Humidity 20 to 80 non condensing Storage Temperature 15 C...

Page 22: ...if Mute mode is set to On Sound but no picture or black and white picture If the picture is black and white unplug the TV from the AC outlet and replug it after 60 seconds Check that the Color is set...

Page 23: ...different from that to which the receiver is connected Consult the dealer or an experienced radio TV technician for help NOTE The manufacturer is not responsible for any radio or TV interference caus...

Page 24: ...posed together with other domesticgarbage to avoid damage to the environment or human health due to the disposal of uncontrolled waste Recycle it responsibly for promoting the sustainable reuse of mat...

Reviews: