Hisense 32H3 User Manual Download Page 14

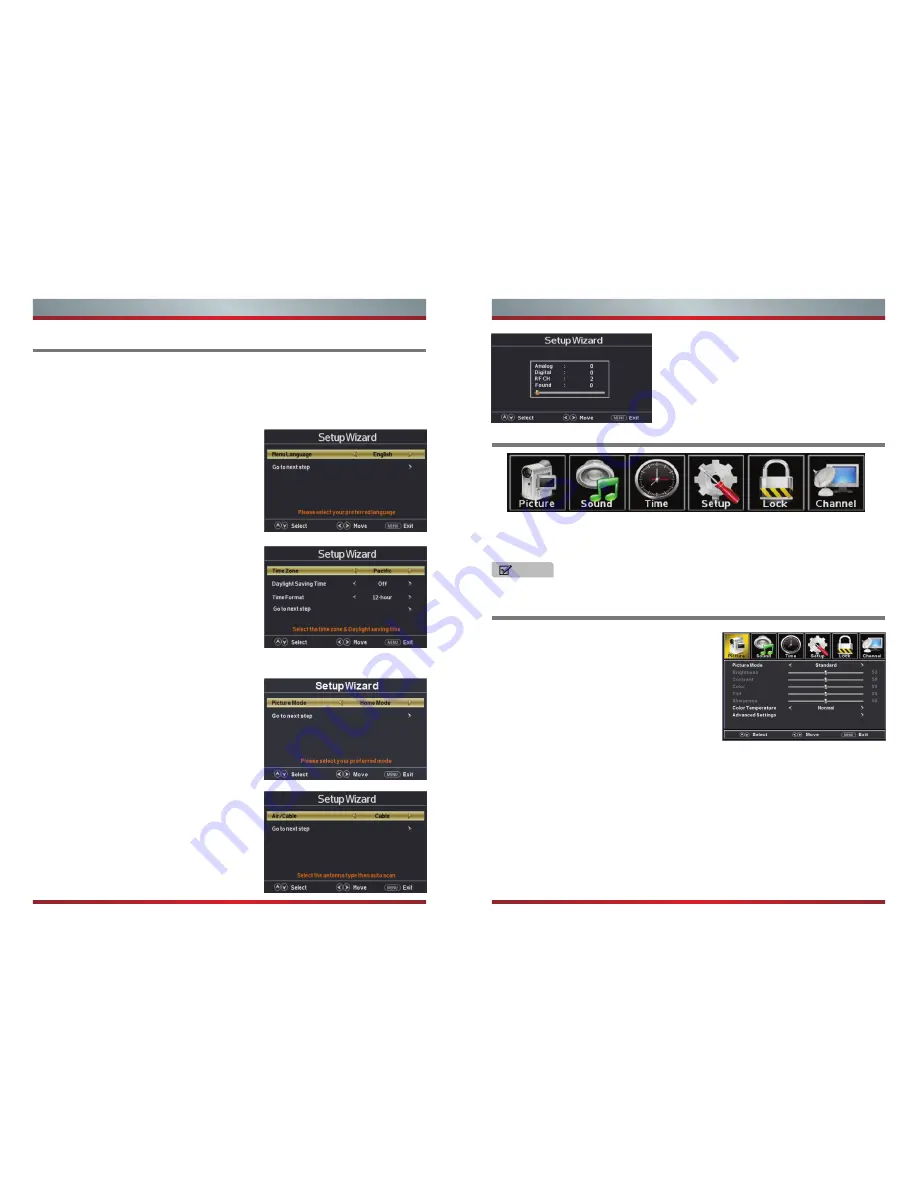
Turning your TV for the First Time

Using the Picture Menu

Press [

Menu

] to display the main menu or return to the previous menu or close the 

main menu.

Press [◄/►] to highlight the desired menu icon, and press [

OK

] to select.

NOTE

If no buttons are pressed,the menu will close automatically after about 10 seconds.

Picture Mode

 - Adjust the Picture Mode. You can 

select Standard,Vivid,Soft,User,Energy saving.

Brightness 

- Increase or decrease the brightness 

of the picture. Increasing the brightness can add 
more light to dark areas of the picture, while 
decreasing the brightness can add more 
darkness to light areas of the picture.

Contrast 

- Increase or decrease the contrast of the picture.Increase the contrast to 

adjust the white areas of the picture or decrease the contrast to adjust the black 

areas of the picture.

Color

 - Adjust the intensity of the colors.

Tint

 - Adjust the hue(Red,Green,Blue) of the picture.

Sharpness

 - You can increase the sharpness level for clearer images or decrease the 

sharpness level for smoother images.

Color Temperature

 - Adjust the overall color of the picture.

Advanced Settings

 - Access advanced video settings such as Aspect Ratio,Noise 

Reduction,and Dynamic Contrast.

You can adjust:

13

14

Basic Features

Basic Features

The Initial Setup menu appears the first time you turn on the TV. It will assist you to 
specify the Energy Saving mode.
Connect your TV’s power cord to a power outlet, then press power. The Initial Setup 

screen opens.

Press [◄ / ►] button on the remote control to 
select the language to be used for menus and 
message.
Press [▼ / ▲] button on the remote control to 
select go to next step and press [

OK

 /►] button 

to go.

Select Language

Press [▼ / ▲] button on the remote control to 
select the time zone, daylight saving time and 
time format you want to.
Press [◄ / ►] button on the remote control to 

adjust.

Press [▼ / ▲] button on the remote control to 
select go to next step and press [

OK

 /►] button to go.

Select Time

Press [◄ / ►]button on the remote control to 

select Home Mode or Retail Mode.

Press [▼ / ▲] button on the remote control to 
select go to next step and press [

OK

 / ►] button 

to go.

Select Picture Mode

Press [◄ / ►] button on the remote control to 
select the antenna type,Air or Cable.
Press [▼ / ▲] button on the remote control to 
select go to next step and press [

OK

 /►] button 

to start auto scan.

Auto Scan

To Use the Main Menu

Summary of Contents for 32H3

Page 1: ...English ES M140730 ...

Page 2: ...er to the presence of important operating and maintenance servicing instructions in the literature accompanying the appliance 1 Read these instructions 2 Keep these instructions 3 Heed all warnings 4 Follow all instructions 5 Do not use this apparatus near water 6 Clean only with dry cloth 7 Do not block any ventilation openings Install in accordance with the manufacturer s instructions 8 Do not i...

Page 3: ... pack shall not be exposed to excessive heat such as sunshine fire or the like 17 The mains plug is used as disconnect device the disconnect device shall remain readily operable 18 This equipment is a Class II or double insulated electrical appliance It has been designed in such a way that it does not require a safety connection to electrical earth 27 26 25 24 D ...

Page 4: ... de chaleur poêles ou d autres appareils y compris les amplificateurs qui produisent de la chaleur 9 Ne contournez pas le dispositif de sécurité d une fiche polarisée Une fiche polarisée possède deux lames dont l une est plus large que l autre Une fiche de type mise à la masse possède deux lames et une fourche de mise à la masse La lame large ou la troisième fourche sont conçues pour assurer votre...

Page 5: ...TRICITÉ UNITÉ DE DÉCHARGE D ANTENNE NEC SECTION 810 20 CONDUCTEURS DE MISE À LA TERRE NEC SECTION 810 21 CÂBLE D ENTRÉE D ANTENNE CONDUCTEURS DE TERRE SYSTÈME D ÉLECTRODE DE MISE À LA TERRE DU SECTEUR NEC ART 250 PARTIE H COLLIER DE MISE À LA TERRE ÉQUIPEMENT ÉLECTRIQUE NEC CODE NATIONAL DE L ÉLECTRICITÉ S2898A H 24 Lorsque des pièces de rechange sont requises assurez vous qu un technicien de serv...

Page 6: ...yclés et réutilisés Pour de l information en rapport avec la mise au rebut et le recyclage contactez les autorités locales ou Electronic Industries Alliance www eia org Pixels non actifs L écran ACL compte près de 3 millions de transistors en couches minces fournissant une qualité d image extrêmement élevée À l occasion des pixels inactifs peuvent apparaître à l écran sous forme de point fixe noir...

Page 7: ...e FCC Rules Opera tion is subject to the following two conditions 1 this device may not cause harmful interference and 2 this device must accept any interference received including interference that may cause undesired operation K Energy Savings Energy Savings ...

Page 8: ...lete the installation steps 2 2 3 4 5 6 21 22 22 23 24 25 11 11 11 12 13 14 14 15 16 16 17 19 19 NOTES WARNING CAUTION 1 The LCD display is very fragile and must be protected at all times when removing the Table Top Stand Be sure that no hard or sharp object or anything that could scratch or damage the LCD display comes into contact with it DO NOT exert pressure on the front of the TV at any time ...

Page 9: ... Your New Hisense Television If you would like to program your other household remote controls to your new Hisense television please consult the User s Manual supplied by your Cable or Satellite provider The Cable or Satellite providers User s Manuals should include instructions on how to program their remote to your television Getting Started Getting Started FOR ILLUSTRATION ONLY Powering up or d...

Page 10: ...ternal digital audio device USB Photo Music Movie play and software update HDMI High Definition Multimedia Interface provides an uncompressed all digital audio video interface between this TV and any HDMI device such as a set top box Blu ray disc player or A V receiver AUDIO OUT 5 6 Getting Started Getting Started Below is a list of Hisense codes for the most common Cable and Satellite providers U...

Page 11: ...Cable 1 Use a component cable to connect the external A V device s component output jacks to the TV s YPBPR jacks Use an audio cable to connect the external A V device s component audio jacks to the TV s AUDIO L R jacks 2 Plug the connected devices into the mains socket before switching on the TV 3 Select the corresponding source from the TV Connecting an A V Device with HDMI Cable Support digital...

Page 12: ...n the source is connected to the TV via HDMI only 2 CH audio will be heard from the home theater receiver If you want to hear 5 1 CH audio connect the digital audio out jack from your DVD Blu ray player cable box STB satellite receiver directly to an amplifier or home theater NOTES 9 10 Getting Started Getting Started HDMI HDMI TV JACK EXTERNAL DEVICES DVD Player Recorder Set top box Equipment wit...

Page 13: ...ic keys on the remote control If you are entering a two or three digit channel number the time between key presses should be less than 3 seconds To select the video input source The first time you turn on your TV you must select the TV signal source Your TV stores this information so you do not need to change the TV signal source unless it changes For example you change from an outside antenna to ...

Page 14: ... the overall color of the picture Advanced Settings Access advanced video settings such as Aspect Ratio Noise Reduction and Dynamic Contrast You can adjust 13 14 Basic Features Basic Features The Initial Setup menu appears the first time you turn on the TV It will assist you to specify the Energy Saving mode Connect your TV s power cord to a power outlet then press power The Initial Setup screen o...

Page 15: ...Configures the multi track sound You can adjust Sleep Timer Set a timer for the TV to turn off automatically Time Zone Select your time zone Daylight Saving Time Set the daylight saving time for your area Time Format Select your time format Auto Clock Select On for automatic date and time setting using information from broadcast stations in your area Clock Set the time manuslly when Auto Clock is ...

Page 16: ... Other Settings Set the parameter of blue screen and audio only Blue screen Set the background when there is no signal The background will show blue screen when it s on and show noise when off Audio Only Play the audio with the picture turned off When you turn the Audio Only on and exit the OSD menu the panel will be dark and then press any key to exit the Audio Only status Software Update USB Upd...

Page 17: ...ir Cable Select signal type Auto Scan Automatically search for channels Favorites Add channels to create a favorite list Show Hide Show or hide the channels in your program list Channel No Show the channel number Channel Label Create label for channel up to 7 characters You can adjust H Pos Adjust the horizontal position of the picture V Pos Adjust the vertical position of the picture Clock Minimi...

Page 18: ... in the file selecting menu then press OK button on your remote control to enter sub menu Press button to select Return option and press OK to back to the previous menu Press button to select drive disk then press OK button to enter Press button to select return option to back Press button to select the file you want to watch in the file selecting menu then press OK or button to display and operat...

Page 19: ...A or more 23 24 Press button to select drive disk then press OK button to enter Press button to select return option to back Press button to hide the menu in the bottom When you press DISPLAY the menu in the bottom will appear again NOTE When highlighting the option you select the file information will appear on the right and the picture of photo and movie will be previewed in the center Enjoy Vid...

Page 20: ...25 26 ...

Page 21: ... size diagonal 31 5 inches Screen resolution 1366 768 Audio power 6 W 6 W Power consumption Please refer to the rating label Power supply 120 V 60 Hz Receiving systems Analog Digital NTSC ATSC Environmental conditions VIDEO INPUT VGA Format Up to 1280x1024 60Hz Video System PAL NTSC Video level 1 0 Vp p 5 480i 480p 720p 1080i 1080p 480i 480p 720p 1080i 1080p VIDEO COMPOMENT HDMI Temperature 5 C 45...

Reviews: