background image

10 


Installation into Panel 


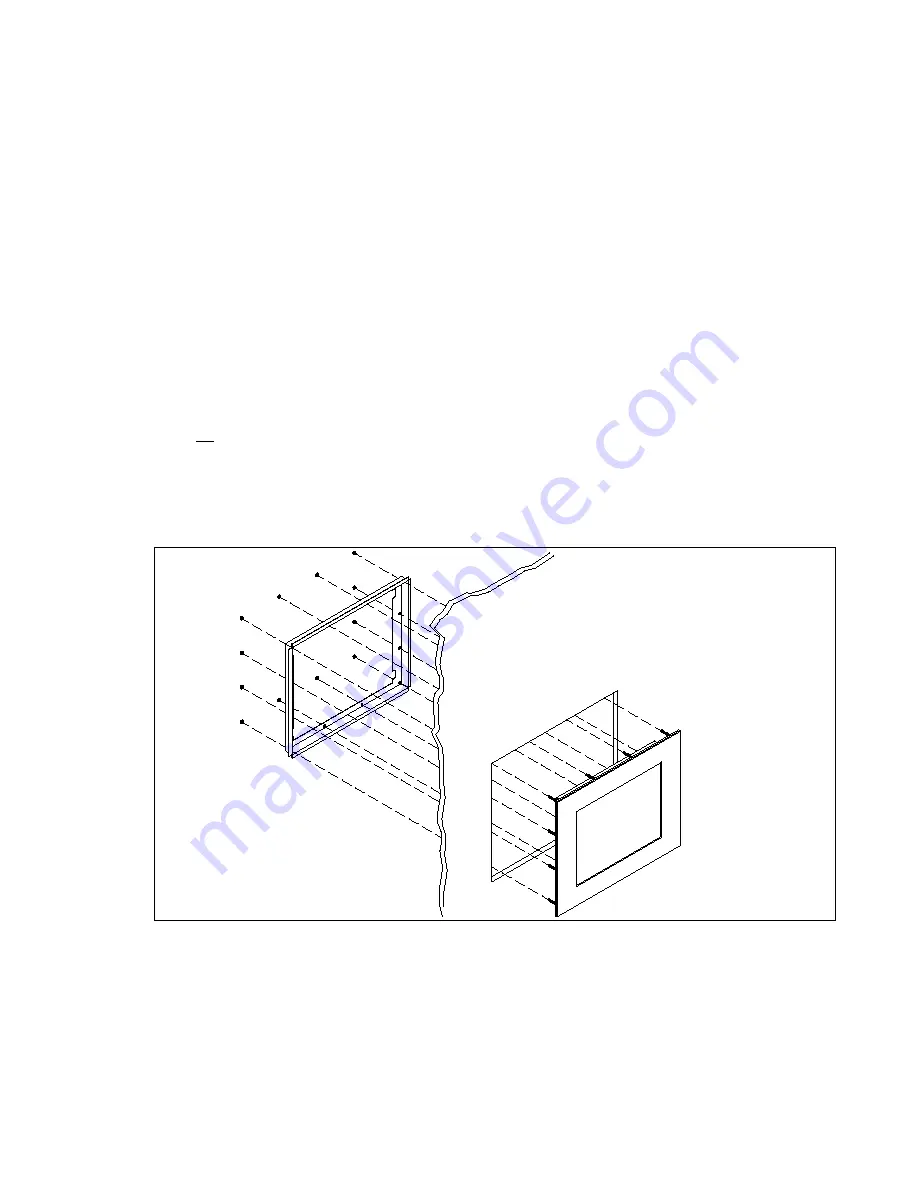
1.  Refer to the drawing below. 
 
2.  Locate position in panel for mounting of the monitor.  Assure that there is adequate space 

begin the panel.  Allow extra space (0.5 in. behind and on each side) for air ventilation. 

 
3.  Cut a rectangular hole in the panel.  Clean and deburr.  Dimensions:  17.85” (454mm) W 

x 14.44” (367mm) H ; +/- .020” 

 
4.  Separate the rear collar from the unit by removing the 12 nuts. 
 
5.  Insert the unit into the front of the panel and re-attach the collar. 
 
6.  Tighten all


 12 nuts to a torque of 24 inch-pounds to assure a water-tight seal between the 

poron bezel gasket on the monitor and equipment panel.  

HIS will not assume liability for 

damage to internal electronics due to improper installation.


Summary of Contents for ML19-D

Page 1: ...1 Hope Industrial Systems Inc User Manual 19 Panel Mount Industrial Monitor Model No HIS ML19 _ _ _D ...

Page 2: ...Adjusting the Screen Image 5 Main Menu Controls 6 Installation Instructions 9 Preparing for Installation 9 Installation into Panel 10 Touchscreen Driver Installation 11 Cleaning 12 Resistive Touchscreen model 12 Tempered Anti Reflective Glass Window 12 Acrylic Window 12 Video Troubleshooting 13 Drawings 14 Specifications 16 Compliance 17 Warranty Statement 19 ...

Page 3: ...like rated enclosure This product is a UL Recognized Component and must be used with a listed computer FCC Notice This equipment has been tested and found to comply with the limits for a Class A digital device pursuant to Part 15 of the FCC Rules These limits are designed to provide reasonable protection against harmful interference when the equipment is operated in a commercial environment This e...

Page 4: ...ft Windows ME 200 XP these settings may be found at this location Control Panel Display Settings WARNING Do not set the graphics card in your computer to exceed the maximum refresh rate of 75Hz doing so may result in permanent damage to your LCD display OSD and Power Lock Settings o OSD Lock Press and hold 1 and the up arrow for 10 seconds If any buttons are pressed the message OSD Locked will dis...

Page 5: ... 3 After the control is selected press button 2 A control screen like the one shown below appears 4 To adjust the control press the up or buttons 5 To save the adjustments and exit the menu press button 1 twice The following tips may help you optimize your display o Adjust your computer s graphic card so that it outputs a video signal 1280 x 1024 60 Hz to the LCD display Look for instructions on c...

Page 6: ...is feature may also be accessed by pressing 2 outside of the OSD menu NOTE Auto Image Adjust works with most common video cards If this function does not work on your LCD display lower the video refresh rate to 60 Hz and set the resolution to 1280 x 1024 or other compatible resolution listed in this manual Contrast adjusts the difference between the image background black level and the foreground ...

Page 7: ...lighting o 6500K Adds red to the screen image for warmer white and richer red o 5400K Adds green to the screen image for a darker color o User Color Individual adjustments for red R green G and blue B o To select color R G or B press button 2 o To adjust selected color press or down Information displays the timing mode video signal input coming from the graph ics card in the computer See your grap...

Page 8: ...th of time an on screen display screen is dis played For example with a 15 second setting if a control is not pushed within 15 seconds the display screen disappears o OSD Background allows you to turn the On Screen Display background on or off Memory Recall returns the adjustments back to factory settings if the display is operating in a factory Preset Timing Mode listed in the Specifications of t...

Page 9: ...F Remember that heat rises the temperature at the top of the cabinet will be much hotter than at the bottom when the air is not circulating Also remember that even though this product is designed to operate at 45 C with proper ventilation the life span of any electronic device is short ened when it is consistently operated at high temperatures Therefore it is wise to take steps to keep the tempera...

Page 10: ...ole in the panel Clean and deburr Dimensions 17 85 454mm W x 14 44 367mm H 020 4 Separate the rear collar from the unit by removing the 12 nuts 5 Insert the unit into the front of the panel and re attach the collar 6 Tighten all 12 nuts to a torque of 24 inch pounds to assure a water tight seal between the poron bezel gasket on the monitor and equipment panel HIS will not assume liability for dama...

Page 11: ...e enclosed CD ROM contains documentation and drivers for all major operating systems touchscreen models only To assure you have the most current information check the following Internet address http HISmonitors com Touchscreen_Drivers htm ...

Page 12: ...it and cause damage Vinegar or ammonia will not hurt the touchscreen Again spray the cloth and then clean the touchscreen Tempered Anti Reflective Glass Window Use any standard glass cleaner as long as there is no abrasive or oily content The anti reflective coatings are physically part of the surface of the glass and resist degradation to the Military Speci fications Acrylic Window The acrylic fr...

Page 13: ...eo signal the LED will be blue Rolling Unstable Screen Press Auto Adjust function on OSD menu Make sure the PC display resolution is not set greater than 1280x1024 at 60hz Make sure the PC display resolution matches one of the factory preset timings in this manual Change the PC display resolution to 1280x1024 at 60hz Reset the monitor to the factory setting Screen is not perfect Make sure the PC d...

Page 14: ...14 Drawings Front View ...

Page 15: ...15 Bottom and Rear View showing cutout dimensions ...

Page 16: ...t ratio 1000 1 min Back light 4 CCFTs Cold Cathode Fluorescent Tube 50 000 hours half life replaceable Screen protector when not shipped with touch screen Tempered glass to ANSI Z97 1 SPEC AR coated on both sides 98 Transmission of light 99 Reduction of glare 53 UV blocking 30 NIR Blocking Video Input connector HD 15 Input signal format RGB analog 0 7 1 0 Vp p 75 ohms separate sync Horizontal scan...

Page 17: ...1 0g 57 640Hz sine Altitude Operating up to 10 000 feet Non operating up to 40 000 feet Functional Panel controls rear access Power soft 1 DOWN UP 2 OSD On Screen Display controls Auto Image Adjust Contrast Brightness Color Adjust In formation Manual Image Adjust Setup Memory Recall Touch screen option Elo Touch Systems AccuTouch 5 wire resistive system emulates a mouse Serial RS 232 or USB interf...

Page 18: ...owder Coated Carbon steel black or Stainless Steel Front bezel outside di mensions 19 0 482 6mm W x 15 7 398 8mm H x 0 28 7 1mm thick not including gasket Cutout dimensions 17 85 453 4mm W x 14 44 366 8mm H 020 Net weight 17 lbs Shipping weight 21 lbs VGA Pin assignment Pin No Signal Pin No Signal 1 Red 9 No pin 2 Green 10 Ground 3 Blue 11 Ground 4 Ground 12 SDA 5 Ground 13 H sync 6 Ground 14 V sy...

Page 19: ... pixels out of 1 3 million do not make a good case for exchanging the unit Please contact our Customer Service De partment if the number of pixel faults exceeds the above mentioned figure What Does This Warranty Not Cover This warranty does not cover equipment which has been damaged due to misuse abuse or accident such as operating the equipment outside of published specifications exposure to chem...

Page 20: ...20 Hope Industrial Systems Inc 1325 Northmeadow Parkway Suite 100 Roswell GA 30076 www HISmonitors com Publication ML19D January 2008 2008 Hope Industrial Systems Inc ...

Reviews: