background image


User Manual 


- 6 -


  Quick Start Guide 


1) Installing the SenseView 

(1)  Place the SenseView on the table and facing the control panel 

forward. 

(2)  Connect the AC adaptor (supplied) with DC IN (at the back side). 

(3)  Connect the monitor (or TV) with the SenseVeiw, using VGA cable 

(supplied). SenseView users can either put momitor or tv on the 

SenseView or beside SenseView. 


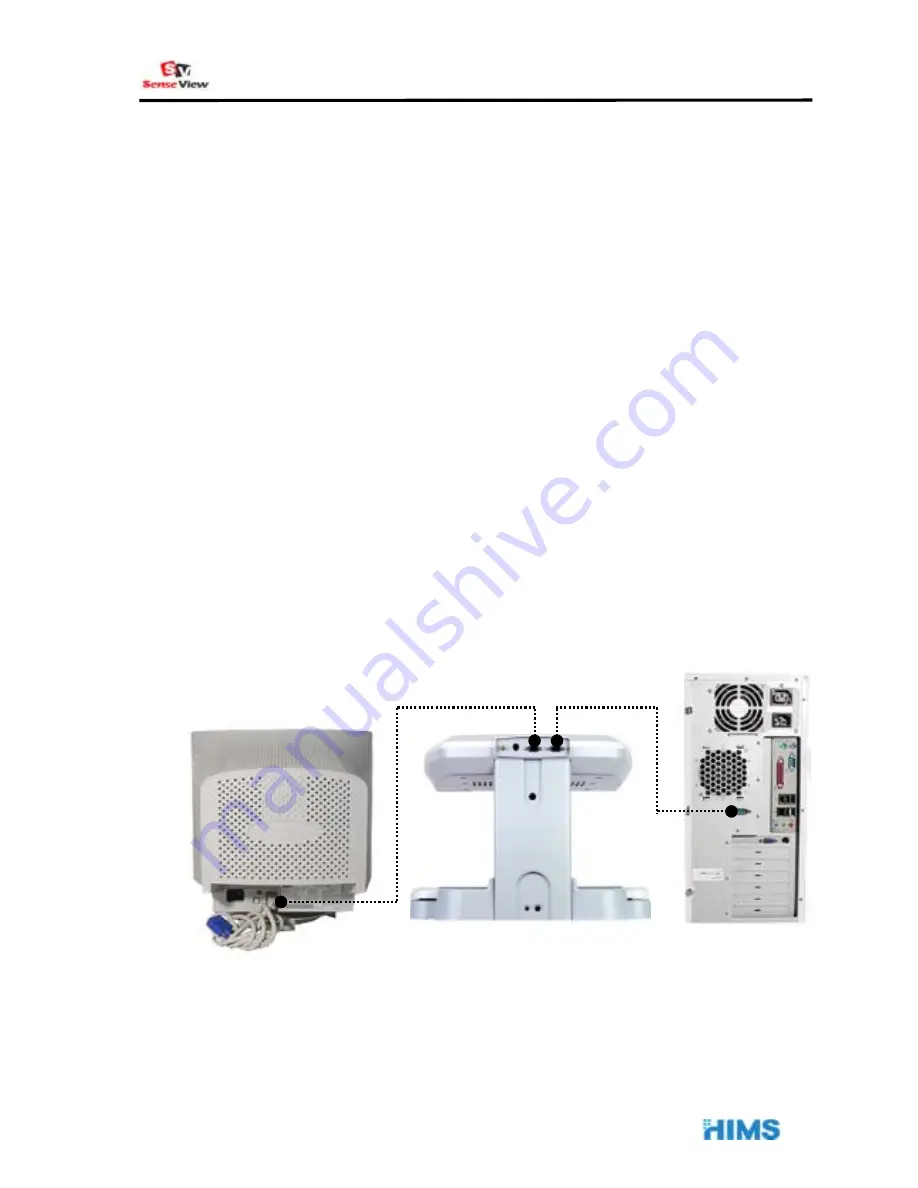
  Connecting the Monitor (include PC) 


SneseView users want to use SenseView with the PC, SenseView has 

to conncet with the monitor and the PC together. On the other hand 

Monitor 

SenseView

PC 

Summary of Contents for SenseView DUO

Page 1: ...SenseView User Manual HIMS Co Ltd TEL 82 42 864 4460 FAX 82 42 864 4462 E mail hims himsintl com http www himsintl com...

Page 2: ...l not occur in a particular installation If this equipment does cause harmful interference to radio or television reception which can be determined by turning the equipment off and on the user is enco...

Page 3: ...l 2 The SenseView Package supplied accessories AC adaptor Cable for TV Cable for PC connection User manual If your package does not include all the listed items above please contact your retailer or H...

Page 4: ...ntrols operated smoothly Oversized easy glide moveable reading table with wrist rests a new ergonomic designed handles and easy set break enhance comfort and controls instant auto focus with intellige...

Page 5: ...Continuous auto focus provides instant readability and vividness 3 21 Color Modes SenseView designed with the low vision user in mind it provides full color monochrome high contrast positive and high...

Page 6: ...User Manual 5 SenseView Overview...

Page 7: ...ith DC IN at the back side 3 Connect the monitor or TV with the SenseVeiw using VGA cable supplied SenseView users can either put momitor or tv on the SenseView or beside SenseView Connecting the Moni...

Page 8: ...ble supplied The electricity supply to the Monitor and PC using their AC adaptors Switching the monitor between the SenseView and the PC will be illustrated Senction12 Connecting the TV The TV provide...

Page 9: ...el of the SenseView the black round jack and the TV at the rear panel of the TV the stainless steel round jack The TV adjustment is required by the remote controller The TV user guide will provide the...

Page 10: ...t the ZOOM DIAL you can adjust ZOON IN OUT ZOOM IN Turn the ZOOM DIAL Right ZOOM OUT Turn the ZOOM DIAL Left 4 Selecting Color Modes Press the blue arrow buttons 21 color modes will be displayed on th...

Page 11: ...nd color No Text color Back ground color No Text color Back ground color 1 Full color 2 High contrast full color 3 Negative color 4 Black White 5 Black White 6 White Black 7 Blue White 8 Blue White 9...

Page 12: ...ill focus on your hand automatically FOCUS LOCK Press the blue diamond button Release FOCUS LOCK Auto Focus Lock Press the blue diamond button again The SenseView power is off the Focus Lock will be r...

Page 13: ...e MARKER button right and left the Horizontal Window Maker size will change getting bigger and smaller Vertical Window Marker When the Horizontal Window Marker is on the Screen Pressing the MARKER but...

Page 14: ...tton again the laser beam will disappear 8 Setting the Beep Sound and Voice When you turn the SenseView on it will have no sound but the SensView provides speech output feature by pressing the FOCUS L...

Page 15: ...ingle function Beep and Voice Output When the Voice output is on press and hold FOCUS LOCK button and then the press POINTER button then you release both buttons simultaneously The Beep and Voice outp...

Page 16: ...OCUS LOCK button once Year will be set and MONTH will blink c You can select desired MONTH by turning MARKER dial and press FOCUS LOCK button in order to set MONTH The MONTH will be set and DAY will b...

Page 17: ...et TIME DATE the Line Window markers will be cancelled automatically You turn the SenseView off while the date and time is displayed the date and time will not be displayed if you turn it on again The...

Page 18: ...lp you to write 11 CCTV PC Switching You can display objects that on the table of the SenseView and the PC on the monitor or TV Please check the connecting among the SenseView the monitor or TV and th...

Page 19: ...g range 300mm x axis 270mm y axis Power 12V 3A Size 400mm W 560mm D 310mm H Color Modes Full color mode 6 monochrome modes black white blue white green white red white black yellow blue yellow Normal...

Page 20: ...User Manual 19...

Reviews: