6
ANTI-CODE RESTORE
After the fault has been cleared the panel may display ‘Anti-Code Restore Required’. If this occurs, observe the following
procedure:
1. Note down the number displayed (including the ‘G’) and call the ARC.
2. Quote the number and record the six digit number received.
3. Press
x
so that the home screen is displayed and enter the six digit number.
4. The OK LED should stop flashing and the panel should return to normal.
USER MENU CODE CHANGE
1. Press
d
then enter your user code.
2. The screen will display ‘CHANGE CODE?,’ press
t
,
3. Press
c
to delete the old user code. The LCD will now display ‘CHANGE CODE?’.
4. Press
t
, enter your new user code and press
t
.
ENABLING & DISABLING CHIME
If enabled on zones by the engineer, press
c
whilst the panel is in day mode to toggle through the three chime options. The
current chime mode will be indicated in the bottom right corner of the LCD.
‘blank’ - chime is off
c - keypad chime
(Capital) C - keypad and speakers chime
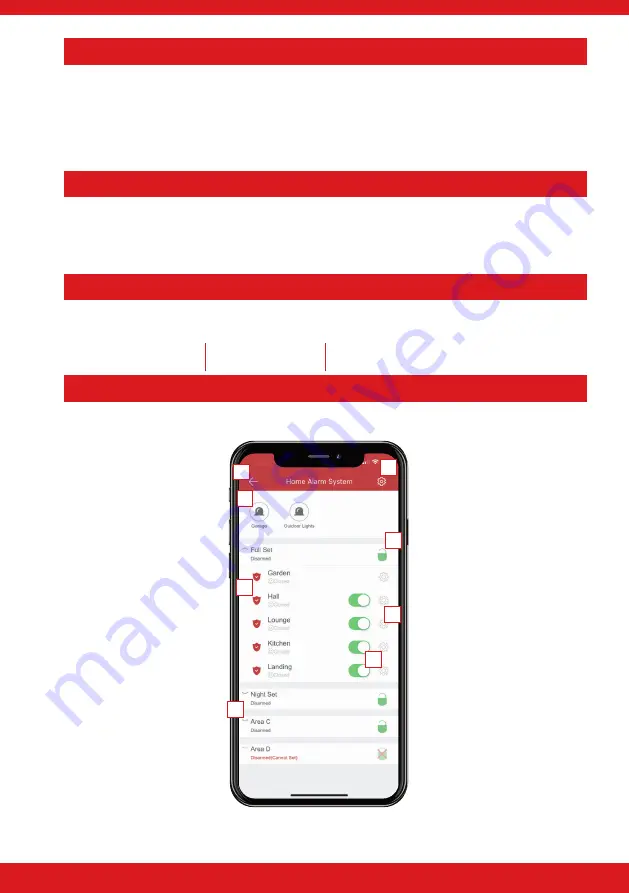
HIK-CONNECT OVERVIEW
10:09
2. PGMS
Tap the PGM to trigger it. Whilst
triggered, the icon will turn red.
Tap to turn off.
1. DISCONNECT FROM SYSTEM
Tap this to disconnect from the
system and return to the
homescreen.
4. ZONES IN AREA
Tap this to view the dropdown
of all the zones allocated in the
area.
3. ZONE STATUS
Displays the status of the zone
such as open, closed, tamper or
bypassed.
5. CONTROL PANEL SETTINGS
Tap here to view the system ID,
change the alias, view
history/logs and delete control
panel.
6. ARM/DISARM PADLOCK
Displays whether the area is
armed or disarmed. To arm the
area, tap the padlock and once
armed, the icon will change to a
red closed padlock. Tap again to
disarm the area.
8. BYPASS ZONE SLIDER
If the zone has been
programmed so it can be
bypassed, this is used to operate
that function. Tap to slide on
and off. Whilst the bar is green,
the zone is active.
7. ZONE INFORMATION
Tap the picture of the ‘cog’ to
view information about the
zone such as the areas it has
been allocated in, the device
location and its status.
1
2
3
4
5
6
7
8
Summary of Contents for Pyronix MX-SERIES
Page 24: ......


