background image


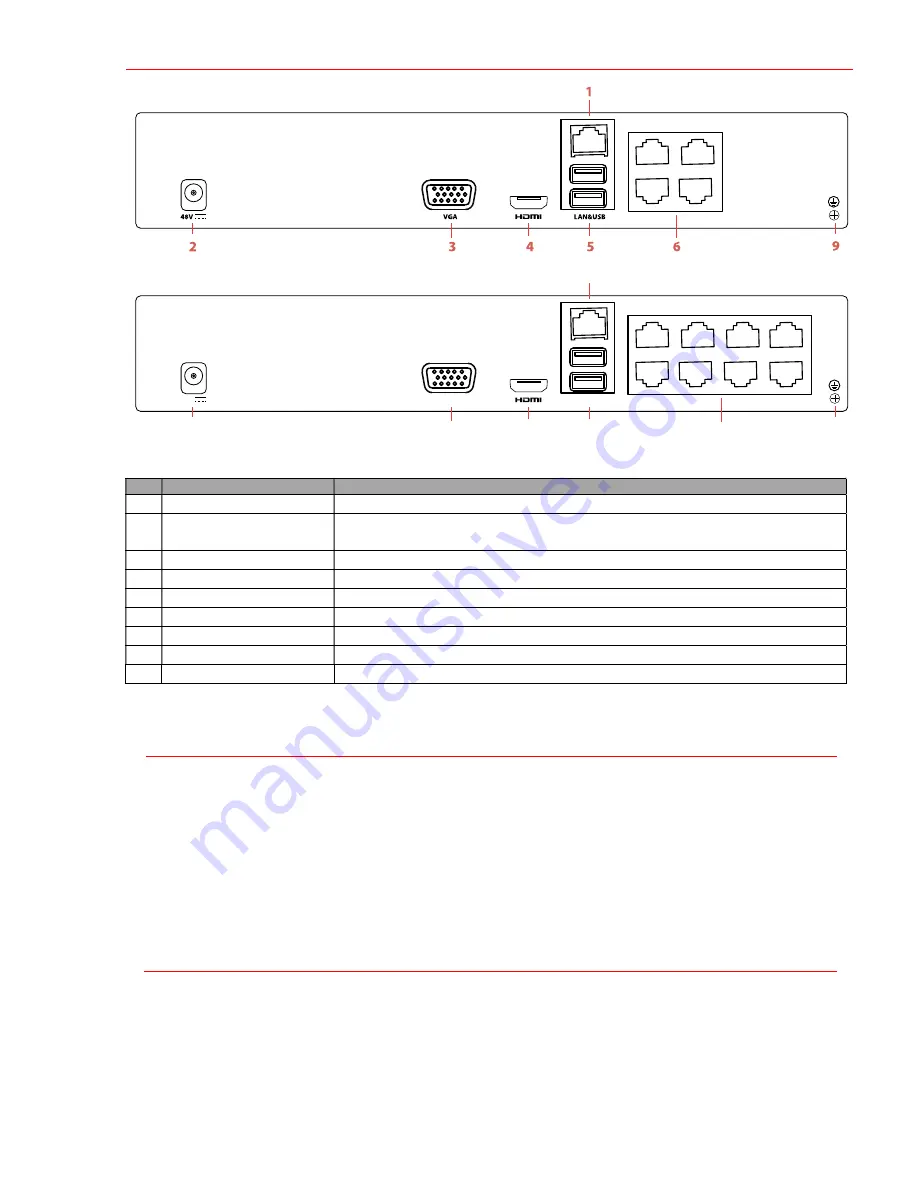
R E A R   P A N E L S  


ERI-Q104-P4 

LAN&USB

VGA

3

4

5

6

48V

2

1

9


ERI-Q104-P8 


No. 

Item 

Description 

LAN 

Connector for network 

Power Supply 

Input: 100 to 240 VAC 

Output to NVR: 48 VDC 

VGA 

DB-15 connector for VGA output. Displays local video output and menu. 

HDMI 

HDMI video output connector 

USB Interface 

Universal Serial Bus (USB) port for additional devices 

PoE/IP Camera Inputs 

PoE out and IP camera inputs 

--- 

--- 

AUDIO IN/OUT 

RCA connectors 

Ground 

Grounding screw 

  1 

C O N N E C T I N G   D E V I C E S  


Connect power supply to NVR and plug into 110 to 240 VAC outlet (surge suppressor recommended). 


Connect NVR to LAN using Cat 5e cable. 


Connect video monitor(s) to NVR using HDMI and/or VGA cables, as appropriate. 


Connect mouse to USB port (wireless mouse can be used in lieu of included mouse). 


Connect to audio I/O using RCA connectors. 


Turn power switch on. Power indicator LED will remain on to indicate unit is starting/on. 

  2

S T A R T U P    


Proper startup is crucial to expanding the life of the NVR. 


Check the power supply is plugged into an electrical outlet.   


It is HIGHLY recommended that an Uninterruptible Power Supply (UPS) be used in conjunction with the 

device.   


The Power LED should turn green. The unit will start. 

Summary of Contents for ERI-Q104-P4

Page 1: ...ived including interference that may causeundesired operation EU Conformity Statement This product and if applicable the supplied accessories too are marked with CE and comply therefore with the applicable harmonized European standards listed under the EMC Directive 2004 108 EC the RoHS Directive 2011 65 EU 2012 19 EU WEEE Directive Products marked with this symbol cannot be disposed of as unsorte...

Page 2: ...re that the bend radius of the cables are no less than five times than its diameter Ensure the NVR is grounded Environmental temperature should be within the range of 10 to 55 C 14 to 131 F Environmental humidity should be within the range of 10 to 90 F R O N T P A NE L No Icon Description 1 Indicator turns green when DVR is powered up 2 Indicator lights when data is being read from or written to ...

Page 3: ...onnect power supply to NVR and plug into 110 to 240 VAC outlet surge suppressor recommended Connect NVR to LAN using Cat 5e cable Connect video monitor s to NVR using HDMI and or VGA cables as appropriate Connect mouse to USB port wireless mouse can be used in lieu of included mouse Connect to audio I O using RCA connectors Turn power switch on Power indicator LED will remain on to indicate unit i...

Page 4: ...igh security systems resetting the password monthly or weekly can better protect your product Figure 1 1 Set Admin Password Clear text password is supported Click to show the password Click again to hide Using the Unlock Pattern for Login You can configure a device unlock pattern for Admin login once the device is activated 1 Use the mouse to draw a pattern among the nine dots on the screen Releas...

Page 5: ... E T H E H AR D D R I V E I F N E E D E D System will beep display Do you want to initialize drive if HDD s are not initialized Click Yes to initialize 1 Go to Menu HDD General 2 Use the checkboxes to select the HDDs that need to be initialized 3 Press INIT factory installed HDDs come initialized initializing again will erase any record video 7S E T D A T E A N D T I ME 1 Go to Menu System Configu...

Page 6: ...neral network parameters 3 Click Apply to save the settings 4 Check the Enable DHCP checkbox 5 Press Refresh to update the IPv4 address subnet mask and IPv4 default gateway 6 Disable DHCP uncheck the checkbox 7 Change Preferred DNS Server value to 8 8 8 8 leave Alternate DNS Server blank Set Remote Viewing Ports After assigning the IP information click the More Settings tab The More Settings tab c...

Page 7: ...ed with port forwarding Port forwarding steps differ by router For port forwarding assistance contact your ISP router manufacturer or www portforward com Hikvision is not associated with www portforward com and is not responsible for activity between user and www portforward com Avoid downloading any software from the site 2 Proceed to the Routers section on the Web site for step by step instructi...

Page 8: ... to Hik Connect mobile app with your user name e mail or mobile number and password 2 Click upper right corner on the Home screen 3 Enter the device s information If you have device s QR Code Use the QR Code Scanner to scan the device s QR Code If you do not have device s QR Code Enter the device information manually a Click Edit pencil on top right corner b Enter device serial number device must ...

Page 9: ...d camera Camera disconnected click icon to get camera s exception information Delete the IP camera Play connected camera s live video Camera connected NVR CAMERA CHANNELS Cameras connected to NVR PLAY Play camera s live video EDIT Pencil Change IP address in LAN range CAMERA LIST White Added cameras LAN CAMERAS LIST Yellow Detected cameras will appear here NOTE To change camera name go to OSD ...

Page 10: ...t Continuous Record or Motion Detection Record on your demand 3 Click Yes in the pop up box to confirm 14P L AY B A C K The recorded video files and pictures on the hard disk can be played back in the following modes instant playback all day playback for the specified channel and playback by normal event smart tag system logs sub periods external file search picture 1 Go to Menu Playback 2 Check t...

Page 11: ...ore viewing the live video and managing the camera Close the Web browser to finish the plug in installation After login you can operate and configure the device including using live view playback log search configuration etc 16B A C K U P V I D E O RE C O R D I N G S A N D CL I P S Back up recorded video clips to ensure important video is not lost or destroyed Choose Recorded Video Clips to Back U...

Page 12: ...se video clip s to back up and click Export 4 Choose backup device USB flash drive USB HDD or DVD writer 5 Click Export to check backup choose recorded file in Export interface and click CAMERA LIST Select cameras to view CALENDAR Select dates to view PLAY STOP Toggles between Play and Stop START STOP CLIPPING Toggles between Start Clipping and Stop Clipping LOCK Locks selected video clips to prev...

Page 13: ...QSG ERI Q10x Px 021418NA ...

Reviews: