background image

Face Recognition Terminal


User Manual


17 


Chapter 5


Basic Operation 

5.1


Activate Device 

Purpose: 

You are required to activate the terminal first before using it.   
Activation via device, activation via SADP, and activation via client software are supported.   
The default values of the control terminal are as follows. 


The default IP address: 192.0.0.64. 


The default port No.: 8000. 


The default user name: admin.   

5.1.1


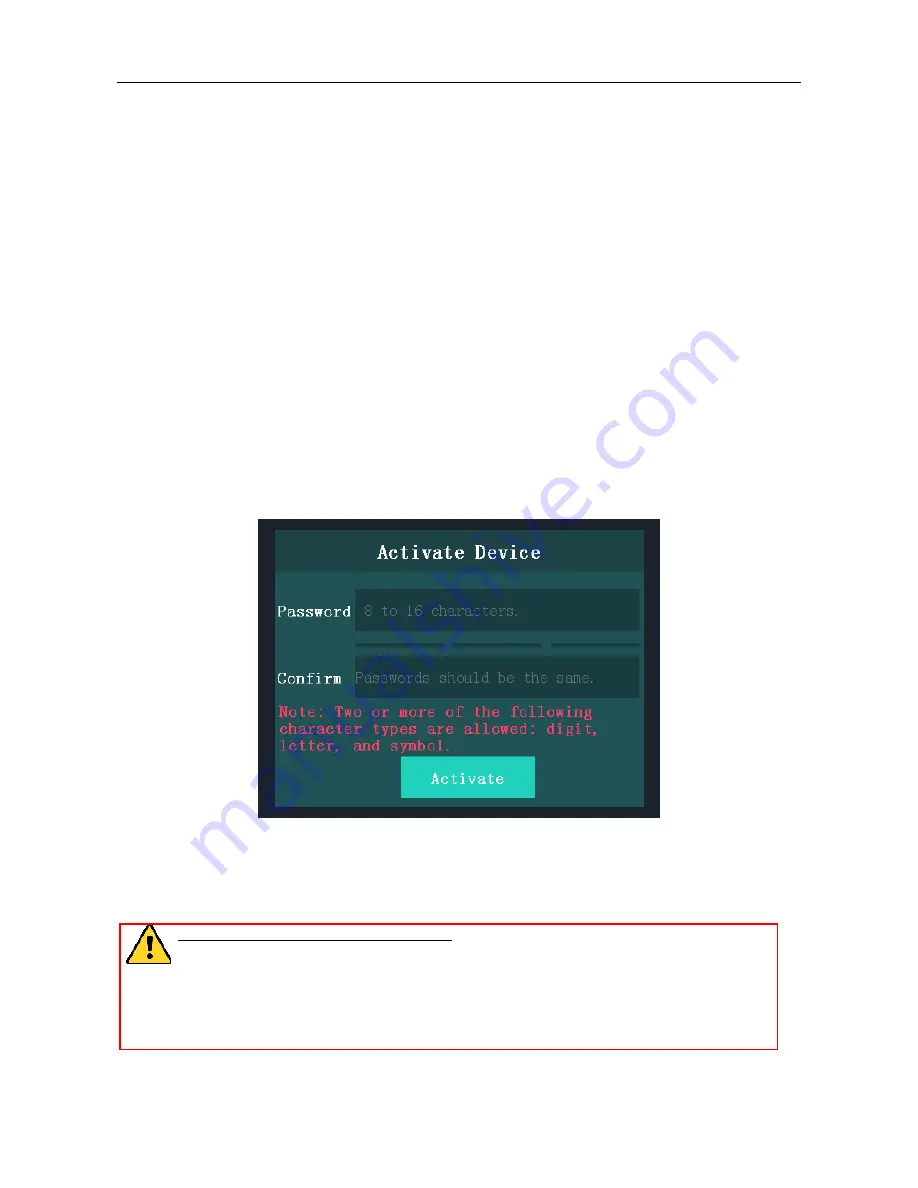
Activating via Device 

If the device is not activated, you can activate the device after it is powering on. 


Steps: 

1.


Tap the Password field and create a password. 

2.


Tap the Confirm field and input the password again. 

3.


Tap 

Activate

 and the device will be activated. 

STRONG  PASSWORD  RECOMMENDED

–  We  highly  recommend  you  create  a  strong 

password of your own choosing (using a minimum of 8 characters, including upper case 
letters,  lower  case  letters,  numbers,  and  special  characters)  in  order  to  increase  the 
security  of  your  product.  And  we  recommend  you  reset  your  password  regularly, 
especially  in  the  high  security  system,  resetting  the  password  monthly  or  weekly  can 
better protect your product. 

Summary of Contents for DS-K1T604M

Page 1: ...Face Recognition Terminal User Manual...

Page 2: ...express permission Disclaimer TO THE MAXIMUM EXTENT PERMITTED BY APPLICABLE LAW HIKVISION MAKES NO WARRANTIES EXPRESS OR IMPLIED INCLUDING WITHOUT LIMITATION THE IMPLIED WARRANTIES OF MERCHANTABILITY...

Page 3: ...cate the receiving antenna Increase the separation between the equipment and receiver Connect the equipment into an outlet on a circuit different from that to which the receiver is connected Consult t...

Page 4: ...utions Neglecting any of the cautions may cause injury or equipment damage Warnings All the electronic operation should be strictly compliance with the electrical safety regulations fire prevention re...

Page 5: ...ource such as heater or radiator is forbidden ignorance can cause fire danger Do not aim the device at the sun or extra bright places A blooming or smear may occur otherwise which is not a malfunction...

Page 6: ...ral Parameters Settings 23 5 3 1 Communication Settings 23 5 3 2 System Settings 26 5 3 3 Setting Time 30 5 4 User Management 31 5 4 1 Adding User 31 5 4 2 Managing User 35 5 5 Setting Access Control...

Page 7: ...Face Recognition Terminal User Manual vi A 1 Positions Recommended Distance 0 5m 49 A 2 Expression 49 A 3 Posture 50 A 4 Size 50 Appendix B Tips for Installation Environment 51 Appendix C Dimension 52...

Page 8: ...detected and authenticated Deep learning algorithm Max 10 000 face pictures storage Multiple authentication modes face picture card and face picture card and fingerprint and face picture face picture...

Page 9: ...ging the system backend Connects one external card reader via RS 485 protocol Connects external access controller or Wiegand card reader via Wiegand protocol Connects secure door control unit via RS 4...

Page 10: ...ashing Red Authentication failed Solid Green Authentication completed Flashing Green Authenticating combined 3 Fingerprint Module Card Swiping Area Scan fingerprint or swipe card Note Only the device...

Page 11: ...Face Recognition Terminal User Manual 10 5 Micro SIM Card Slot Insert SIM card 6 Network Interface Connect to Ethernet 7 Network Interface Connect to Ethernet 8 Power Interface Connect to power supply...

Page 12: ...allation Environment Installation Types Wall mounting with gang box and wall mounting without gang box 3 1 Installing with Gang Box Steps 1 According to the datum line on the mounting template stick t...

Page 13: ...the bottom Notes The installation height here is the recommended height You can change it according to your actual needs For easy installation drill holes on mounting surface according to the supplied...

Page 14: ...ets of the setscrews in the drilled holes 4 Align the 4 holes to the mounting plate with the drilled holes 5 Fix and fasten the screws in the sockets on the wall or other surface 6 Remove the two scre...

Page 15: ...Face Recognition Terminal User Manual 14...

Page 16: ...nal with the alarm output input devices and connect the Wiegand terminal with the Wiegand card reader or the access controller If connect the WIEGAND terminal with the access controller the face recog...

Page 17: ...Face Recognition Terminal User Manual 16...

Page 18: ...ot activated you can activate the device after it is powering on Steps 1 Tap the Password field and create a password 2 Tap the Confirm field and input the password again 3 Tap Activate and the device...

Page 19: ...n the password field and confirm the password STRONG PASSWORD RECOMMENDED We highly recommend you create a strong password of your own choosing using a minimum of 8 characters including upper case let...

Page 20: ...nt software is versatile video management software for multiple kinds of devices Get the client software from the supplied disk or the official website and install the software according to the prompt...

Page 21: ...e 6 In the pop up window create a password in the password field and confirm the password STRONG PASSWORD RECOMMENDED We highly recommend you create a strong password of your own choosing using a mini...

Page 22: ...dify Netinfor button to pop up the Network Parameter Modification interface 9 Change the device IP address to the same network segment as your computer by modifying the IP address manually 10 Input th...

Page 23: ...ge for 3s to open the password inputting window 2 Tap the Password field and input the device activation password Note The password here is the activation password 3 Tap OK to enter the home page Note...

Page 24: ...k Parameters Purpose You can set the device network parameters including the IP address the subnet mask and the gateway Steps 1 On the Communication Settings page tap Network to enter the Network tab...

Page 25: ...according to your actual needs Note Controller represents the access controller Unit represents the secure door control unit and Reader represents the card reader 3 Tap Baud Rate to enter the Baud Ra...

Page 26: ...n terminal can connect a Wiegand card reader And there is no need to set the Wiegand mode Mode You can select either Wiegand 26 or Wiegand 34 By default the system selects Wiegand 34 4 Tap to save the...

Page 27: ...the device can read the CPU card information Auto Enable Supplement Light If enabling the function when it is too dark the device will auto open the supplement light If disabling the function the supp...

Page 28: ...ion the device can recognize whether the person is a live one or not Min Detection Area Width When the distance between the camera and the user is long the parameter represents the minimum percentage...

Page 29: ...n area The actual distance should be larger than the configured value when face picture authentication Other percentages distances and angles should also meet their conditions Margin Bottom The distan...

Page 30: ...e rejection rate FRR Upgrading Firmware On the Upgrade page plug in the USB disk and tap Start The device will automatically read the upgrading file in the USB disk and upgrade the firmware Note The u...

Page 31: ...nd Time Set the DST end time Bias Time Set the DST bias time when the DST starts 3 Tap to save the settings and go back to the Home page 5 4 User Management Purpose On the user management interface yo...

Page 32: ...ge 2 Tap the Employee ID field and edit the employee ID Notes The employee ID should be between 1 and 99999999 The employee ID should not start with 0 and should not be duplicated 3 Tap the Name field...

Page 33: ...o The card No cannot be duplicated 5 Tap the Password field and create a password and confirm the password Note Only numbers are allowed in the password Up to 8 characters are allowed in the password...

Page 34: ...Fingerprint 7 Tap the Face Picture field to enter the face picture adding page Follow the steps below to add the user s face picture 1 Position your face looking at the camera Note Make sure your face...

Page 35: ...n the user authenticates by swiping this duress card the device will upload an duress card event to the client software 10 Tap to save the user parameters and go back to the Home page 5 4 2 Managing U...

Page 36: ...lock locked time door open timeout alarm and max failed authentications Steps 1 On the Home page tap ACS Access Control Settings to enter the Access Control Settings page 2 Edit the access control pa...

Page 37: ...unlocking duration If the door is not opened for the set time the door will be locked Available door locked time range 1 to 255s Door Open Timeout Alarm The alarm can be triggered if the door has not...

Page 38: ...data and events stored in the device Clear Permission Clear the administrator s permission but the administrator and the related logs will not be deleted Delete Captured Pic Delete the device captured...

Page 39: ...the card No or the user name for search 4 Select time You can select from Custom Yesterday This Week Last Week This Month Last Month or All If you select Custom you can customize the start time and th...

Page 40: ...and the data will be exported from the device to the USB disk Notes The supported USB disk format is FAT 32 The system supports the USB disk with the storage of 1G to 32G Make sure the free space of...

Page 41: ...ements of face picture It should be taken in full face view directly facing the camera Do not wear a hat or head covering when taking the face picture The format should be JPEG or JPG The resolution s...

Page 42: ...pt Authenticated from the device And there will also be a prompt on the page RTC Test If the device RTC is working properly the page will display the device current time Button Test Press the doorbell...

Page 43: ...f DS K1T604M does not support displaying the fingerprint capacity Tap Info System Information Capacity on the Home page to enter the Capacity page Viewing Device Information Purpose You can view the d...

Page 44: ...pictures or all fingerprint pictures stored in the device 1 1 Matching When swiping card or ID card compare the captured face picture or the collected fingerprint with the information stored in the ca...

Page 45: ...e picture see Appendix A Tips When Collecting Comparing Face Picture 5 7 2 Authenticating via 1 N Matching If the authentication mode is Face Picture or Auto position the face looking at the camera to...

Page 46: ...Face Recognition Terminal User Manual 46 For detailed information about authenticating face picture see Appendix A Tips When Collecting Comparing Face Picture...

Page 47: ...t Scanning The figures of scanning fingerprint displayed below are wrong Environment The scanner should avoid direct high light high temperature humid conditions and rain When it is dry the scanner ma...

Page 48: ...Face Recognition Terminal User Manual 48 finger and try again...

Page 49: ...position when collecting or comparing face picture is as below Note For details about the relationship among person height device height and the distance between the person and the device see Appendi...

Page 50: ...gnition function Do not make your hair cover your eyes ears etc and heavy makeup is not allowed A 3 Posture In order to get a good quality and accurate face picture position your face looking at the c...

Page 51: ...nvironment 1 Light Source Illumination Reference Value Candel 10Lux Bulb 100 850Lux Sunlight More than 1200Lux 2 Install the device indoors at least 2 meters away from the light and at least 3 meters...

Page 52: ...Face Recognition Terminal User Manual 52 Appendix C Dimension 0100001080116...

Page 53: ...Face Recognition Terminal User Manual 53 UDB...

Reviews: