background image

HikDashcam AE-DC8322-G2PRO User Manual 

 UM AE-DC8322-G2PRO 032922NA 


13 


 I Specifications 


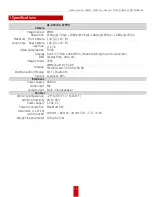
AE-DC8322-G2PRO 


Camera 

Image Sensor  CMOS 

Resolution  2160p @ 30 fps + 1080p @ 25 fps, 1080p @ 60 fps + 1080p @ 25 fps 

Maximum  

Lens Angle


Front Camera  135° (D), 124° (H) 

Rear Camera  125° (D), 110° (H) 

Aperture 

ƒ

/1.75 

Video Compression  H.265 

Display  Built-in 3" 854 x 480 IPS (In-Plane Switching) color touchscreen 

OSD  Display time, date, etc. 

Image Format  JPEG 

Storage   eMMC (built in): 64 GB 

MicroSD card: 32 GB to 256 GB 

Communication Module  Wi-Fi, Bluetooth 

Sensor  G-sensor, GPS 


Interfaces


Power Supply  USB 2.0 

Audio Input  Mic 

Audio Output  Built-in loudspeaker 


General


Working Temperature  -20° to 65° C (-4° to 158° F) 

Working Humidity  0% to 95% 

Power Supply  5 VDC, 2 A 

Power Consumption  Maximum 6 W 

Dimension (L x W x H)  

(w/o Bracket)   100 mm × 85 mm × 38 mm (3.6" × 3.5" × 2.8") 

Weight (Approximate)  150 g (0.33 lb) 


Summary of Contents for AE-DC8322-G2PRO

Page 1: ...HikDashcam AE DC8322 G2PRO User Manual ...

Page 2: ...E PRODUCT BY YOU IS AT YOUR OWN RISK IN NO EVENT WILL HIKAUTO BE LIABLE TO YOU FOR ANY SPECIAL CONSEQUENTIAL INCIDENTAL OR INDIRECT DAMAGES INCLUDING AMONG OTHERS DAMAGES FOR LOSS OF BUSINESS PROFITS BUSINESS INTERRUPTION OR LOSS OF DATA CORRUPTION OF SYSTEMS OR LOSS OF DOCUMENTATION WHETHER BASED ON BREACH OF CONTRACT TORT INCLUDING NEGLIGENCE PRODUCT LIABILITY OR OTHERWISE IN CONNECTION WITH THE...

Page 3: ...nna Increase the separation between the equipment and receiver Connect the equipment to an outlet on a circuit different from that to which the receiver is connected Consult the dealer or an experienced radio TV technician for help FCC Conditions This device complies with part 15 of the FCC Rules Operation is subject to the following two conditions 1 This device may not cause harmful interference ...

Page 4: ...l ne doit pas produire de brouillage et 2 l utilisateur de l appareil doit accepter tout brouillage radioélectrique subi même si le brouillage est susceptible d en compromettre le fonctionnement Under Industry Canada regulations this radio transmitter may operate only using an antenna of a type and maximum or lesser gain approved for the transmitter by Industry Canada To reduce potential radio int...

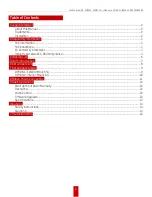
Page 5: ...onformity Statement 3 Industry Canada ICES 003 Compliance 4 C Packing List 6 D Parts Introduction 7 E Install Dashcam 8 F Install Rear Camera 9 OPTION 1 Exterior Mounting 9 OPTION 2 Interior Mounting 10 G Mobile Phone Connection 11 H Basic Operations 12 Start Up Shut Down Manually 12 Recording 12 Voice Control 12 Firmware Upgrade 12 Specifications 13 I Cautions 14 Safety Instructions 14 Cautions 14...

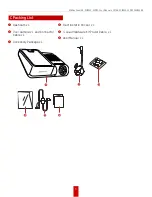
Page 6: ...322 G2PRO User Manual UM AE DC8322 G2PRO 032922NA 6 C Packing List Dashcam x 1 Rear Camera x 1 and Connector Cable x 1 Accessory Package x 1 Electrostatic Sticker x 1 3 Lead Hardware Kit Power Cable x 1 User Manual x 1 ...

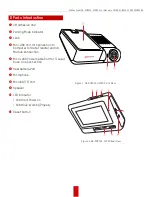
Page 7: ...ni USB Port for Connection to Computer for Data Transfer and 4G Module Connection Micro USB Power Cable Port for 3 Lead Buck Line Connection Rear Camera Port Microphone MicroSD TF Port Speaker LED Indicator Solid Red Power on Solid Blue Working Properly Reset Button Figure 1 AE DC8322 G2PRO Front View Figure 2 AE DC8322 G2PRO Rear View ...

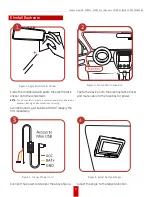
Page 8: ...he windshield NOTE The electrostatic sticker prevents residual marks and allows window cleaning and dashcam repositioning Avoid introducing air bubbles DO NOT reapply the film repeatedly Paste the device onto the electrostatic sticker and route cable to the fuse box for power Figure 5 Connect Power Cord Figure 6 Adjust Dashcam Angle Connect the power cord as per the above figure Adjust the angle to ...

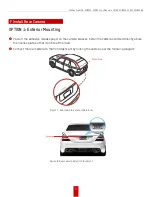
Page 9: ...el off the adhesive release paper on the camera bracket Install the camera centered directly above the license plate so that it points at the road Connect the rear camera to the front dashcam by routing the cable as per the following diagram Figure 7 Rear Camera Exterior Cable Run Figure 8 Rear Camera Exterior Placement ...

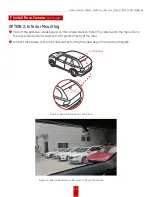
Page 10: ...dhesive release paper on the camera bracket Install the camera onto the top center of the rear window interior side so that it points directly at the road Connect the camera to the front dashcam by routing the cable as per the following diagram Figure 9 Rear Camera Interior Cable Run Figure 10 Rear Camera Interior Placement on Rear Windshield ...

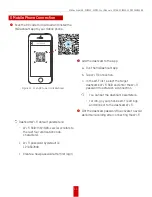
Page 11: ...Wi Fi list select the target dashcam s Wi Fi SSID and enter the Wi Fi password to establish a connection You can set the dashcam parameters For iOS go your phone s Wi Fi settings and connect to the dashcam Wi Fi Edit the dashcam password to activate to avoid abnormal recording after connecting the Wi Fi Dashcam Wi Fi default parameters Wi Fi SSID HIKVISION xxxx xxxx refers to the last four verifica...

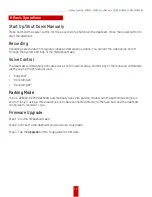
Page 12: ...am app Voice Control The dashcam automatically activates voice control upon startup Perform any of the following commands just by saying the phrase out loud Snapshot Recording On Recording Off Parking Mode The AE DC8322 G2PRO DashCam automatically goes into parking mode when the automobile engine is shut off only if using a three lead buck line cable connected directly to the fuse box and the dash...

Page 13: ...3 854 x 480 IPS In Plane Switching color touchscreen OSD Display time date etc Image Format JPEG Storage eMMC built in 64 GB MicroSD card 32 GB to 256 GB Communication Module Wi Fi Bluetooth Sensor G sensor GPS Interfaces Power Supply USB 2 0 Audio Input Mic Audio Output Built in loudspeaker General Working Temperature 20 to 65 C 4 to 158 F Working Humidity 0 to 95 Power Supply 5 VDC 2 A Power Con...

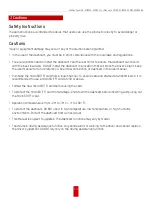
Page 14: ...ference See initial connection of dashcam in the user manual Purchase the microSD TF card from a legal channel To ensure safe and stable data transmission it is recommended to use a microSD TF card of V30 or above Format the new microSD TF card before using the card To protect the microSD TF card from damage shut down the dashcam before inserting and pulling out the microSD TF card Operating tempe...

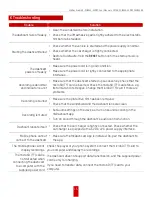
Page 15: ...lifespan Change the microSD TF card if there are problems Recording is blurred Make sure the protective film has been removed Check that the windshield and the dashcam lens are clean Recording is muted Set audio settings on the device or turn on sound recording in the HikDashcam app Turn on sound through the dashcam s audio control function Dashcam reboots itself Check that the car charger is tight...

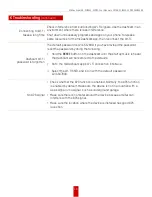
Page 16: ...ed the password reset the password by doing the following Hold the RESET button on the dashcam until the startup music is heard the dashcam will be restored to the defaults Go to the HikDashcam app s Wi Fi connection interface Select the Wi Fi SSID and log in with the default password 1234567890 No GPS signal Check whether the GPS function is enabled Normally the GPS function is enabled by default...

Reviews: