background image

Web RAID Management Interface

5-11

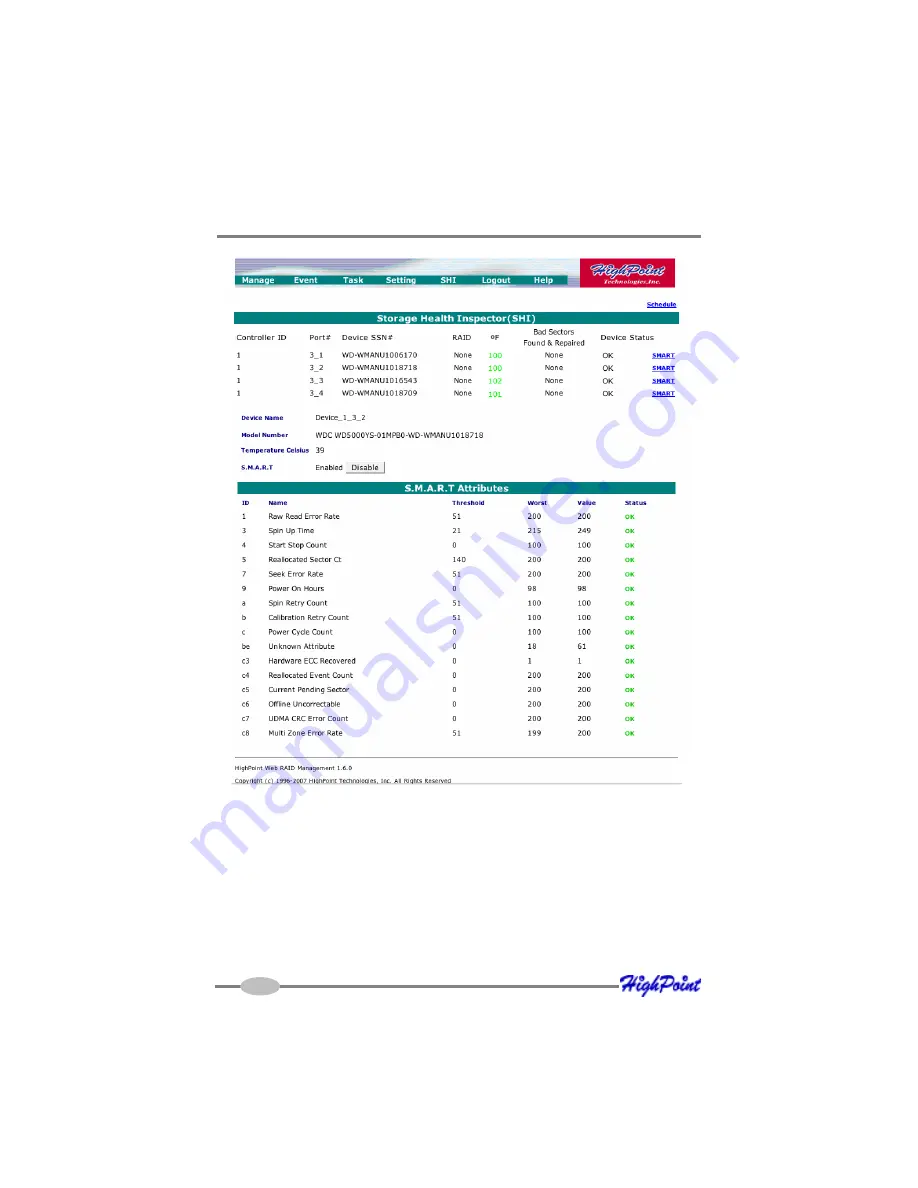
Note: S.M.A.R.T attribute data is drive-specific. The software includes a list of

definitions for popular drive models/manufacturers. Unknown S.M.A.R.T. attributes

will be shown as “unknown”. You can add the attribute definitions for your drive in

the file smart.def (which resides in the software installation directory).

Rescan Devices

When you physically add drives to the controller while the system is running, you

can rescan the controller to reflect the change.

Summary of Contents for RocketRAID 3522 SATAII

Page 1: ...RocketRAID 3522 SATAII Host Adapter User s Guide Revision 1 0 Date January 2008 HighPointTechnologies Inc...

Page 2: ...ot be registered trademarks or copyrights of their respective owners Backup your important data before using HighPoint s products and use at your own risk In no event shall HighPoint be liable for any...

Page 3: ...Features 1 5 Chapter 2 RocketRAID 3522 Hardware Description Installation 1 RocketRAID 3522Adapter Layout 2 1 2 Installing the RocketRAID 3522 Host Adapter 2 2 3 Verifying Installation 2 3 4 Battery Ba...

Page 4: ...14 Chapter 6 Linux Driver Support 1 Fedora Core Linux installation Overview 6 1 2 Red Hat Enterprise Overview 6 4 3 SuSE Linux Enterprise Server SLES installation Overview 6 8 Chapter 7 FreeBSD Driver...

Page 5: ...Contents of this Chapter About this guide Introducing the RocketRAID 3522 Host Adapter RocketRAID 3522 Features and Specifications Understanding RAID Concepts and Terminology Network Features Web Man...

Page 6: ...he latest product in storage technology combining the outstanding high performance capabili ties of SATA II with enterprise storage features such as Native Command Queuing NCQ staggered drive spin up...

Page 7: ...back cache 8 SATA II channels at 3Gb s per port Multi adapter support up to 4 adapters BIOS booting support BIOS PnP and BBS BIOS boot specification support Intel RAID 6 Engine for large capacity RAI...

Page 8: ...S API library for customizing AP Command Line Interface CLI Web browser base RAID management software Disk scrubbing to prevent degraded RAID arrays Bad sector repair and re mapping to reduce dropped...

Page 9: ...The disk was used on other controllers before use with the RocketRAID 3522 see legacy disk below Array initialization A redundant array RAID5 RAID1 RAID10 needs to be initialized to ensure full perfor...

Page 10: ...3522 that contain valid partition tables will be identi fied as legacy disks Alegacy disk attached to the RocketRAID 3522 can be accessed by the operating system but cannot be used to create RAID arr...

Page 11: ...etRAID 3522 Hardware Description Installation Contents of this Chapter RocketRAID3522Hardware 1 RocketRAID 3522Adapter Layout 2 Installing the RocketRAID 3522 Host Adapter 3 Verifying Installation 4 B...

Page 12: ...yout Port1 Port2 These represent the RocketRAID 3522 s two External Mini SAS ports Each port can support up to 4 hard disks J1 SAF TE connector BEEP1 Speaker Alarm speaker the speaker emits and audibl...

Page 13: ...sign 1 Open the system chassis and locate an unused PCI E x8 or x16 slot 2 Remove the PCI slot cover 3 Gently insert the RocketRAID 3522 into the PCI E slot and secure the bracket to the system chassi...

Page 14: ...on the system If the system detects the presence of the adapter the RocketRAID 3522 BIOS Utility will be displayed during bootup 2 Press Ctrl H to access the RocketRAID 3522 BIOS Utility The BIOS Util...

Page 15: ...in case of a critical system failure Data normally lost during a major system fault such as a power outage or CPU failure which was in transit at the time of the failure stored in the card s onboard c...

Page 16: ...Chapter 3 RocketRAID 3522 BIOS Utility Contents of this Chapter RocketRAID3522BIOSUtility 1 BIOS Command Overview 2 Disk Menu 3 Array Menu 4 Controller Menu...

Page 17: ...lighted in red to access the corresponding menu Alt D will open the Disk menu bar You can also press F10 to quickly browse through the various menu selections Use the arrow keys to select the desired...

Page 18: ...the Disk menu use the arrows keys to select a disk After highlighting the desired disk select Disk Information to view hardware data about this disk Disk initialization Disks must be initialized prior...

Page 19: ...Unplug use this option to safely remove the selected hard disk This allows you to safely park and power off a disk while the system remains active Rescan use this option when attaching hard disks to...

Page 20: ...s ENTER Other RAID array related functions Array Delete Array Unplug Array Verify Array Start task Array Stop task and Array Set Boot work in the same manner as the View an Array function Highlight th...

Page 21: ...iew information about the controller access the Controller menu select view and press ENTER ViewEvents To view the RocketRAID event log access the Controller menu select Evnetlog and press ENTER Use S...

Page 22: ...e this menu to configure the RocketRAID card s network settings Access the Controller menu select Network and press ENTER You can select Use automatic config to request the network information from th...

Page 23: ...Chapter 4 RocketRAID 3522 Driver and Software Installation Microsoft Windows 2000 XP 2003 Server Vista Contents of this Chapter Driver and Software CD Windows Driver Installation...

Page 24: ...nd install the RAID Management software for a variety of operating systems To create a driver diskette 1 Insert the CD into the system s CD DVD drive The program should start automatically 2 Insert a...

Page 25: ...te you want to create drop down button and select the appropriate OS from the list 6 Click on the OK button to create the driver diskette To install the RAID software 1 Click on Install RAID Managemen...

Page 26: ...ppy drive 3 At the Hardware Wizard screen select the floppy drive as the source then click the Next button Select the appropriate operating system folder then click the Next button 4 Windows will disp...

Page 27: ...and press ENTER to continue Windows Vista Driver Installation Installing the driver during a fresh Windows Vista installation 1 Boot from Windows Vista DVD 2 When the screen where do you want to inst...

Page 28: ...een installed and the system has been restarted 1 Click the Start button then right click My Computer icon Select the Properties item from the popup menu 2 In the popup window select Hardware tab and...

Page 29: ...3522 Web RAID Management Interface Contents of this Chapter 1 Web RAID Management Interface 2 Preparing Hard disks 3 Array Management 4 Device Management 5 Configuring Spare Disks 6 Managing Events a...

Page 30: ...hPoint In band Management software ForWindows Runsetup exefromthein bandmanagementsoftwarefolderonthesoftwareCD ForLinux The in band management software is distributed as a RPM package You can install...

Page 31: ...ial password is hpt You can change the password after you have logged in 2 Preparing Hard disks Disks must be initialized before they can be configured into RAID arrays Normally disks only have to be...

Page 32: ...en partitioned will be recognized as Legacy Disks Arrays cannot be created from Legacy Disks These disks would have to be initialized which may result in data loss 3 Array Management Creating an Array...

Page 33: ...a power failure Write through When the write through setting is selected writes to the array are always passed directly to the disks Subsequent reads may still be completed from the cache if appropria...

Page 34: ...y added to the array rebuild process will start automatically A progress bar will be displayed Note If the system utilizes hot swap capable enclosures you can add new physical disks to the RocketRAID...

Page 35: ...y all the original disks must be included in the target array and these disks must be selected in the same order as the original array If you want to migrate a JBOD array to another RAID level only th...

Page 36: ...m the menu 2 Highlight the desired RAID array 3 Click on the Maintenance button 4 Enter a new name for the array in the provided field 5 Click the Rename button Note An array running background tasks...

Page 37: ...l configurable device settings may be available Read Ahead Write Cache TCQ and NCQ Each feature can be enabled or disabled individually for each hard disk Unplug The Unplug option found below each Dev...

Page 38: ...e Web RAID management to upgrade controller s firmware SHI Storage Health Inspector The primary SHI interface displays a brief health summary of each hard disk ControllerID Which controller card the d...

Page 39: ...is in a healthy state A Failed status suggests the disk was taken offline due to a RAID SMART or sector failure Schedule Click on the blue Schedule link to access the Event menu S M A R T Status You c...

Page 40: ...odels manufacturers Unknown S M A R T attributes will be shown as unknown You can add the attribute definitions for your drive in the file smart def which resides in the software installation director...

Page 41: ...unction on the Array Management page 5 Configuring Spare Disks To configure spare disks attached to the RocketRAID card select the Manage Spare function The Spare Pool Management page will be displaye...

Page 42: ...ecuted by the Management Software or any disk array errors reported by the card while the OS is active are known as Events These events are logged recorded by the Management Software To view logged ev...

Page 43: ...t you want to verify or rebuild 2 Enter a name for the task 3 Configure the frequency for the task 4 Check the Submit button Delete a Scheduled Task To delete a task schedule 1 Select a task from the...

Page 44: ...file setting Audible Alarm setting Staggered Spinup setting Spindown Idle Disk setting Rebuild priority setting and Auto Rebuild setting The Upload SAF TE config file option allow user to upload the s...

Page 45: ...tings Email Enabling E mail notification ToconfigureE mailnotification 1 Select the Enable Event Notification option 2 Enter the appropriate information for the SMTP server 3 Click the Change Setting...

Page 46: ...NMP Trap Messages to the designated Trap Receiver through its Ethernet interface If you do not use the adapter s Ethernet interface you can setup the SNMP configuration in the In Band Management Servi...

Page 47: ...Chapter 6 Linux Driver Support Contents of this Chapter Fedora 7 Linux installation Overview Red Hat Enterprise 5 Overview SuSE Linux Enterprise Server SLES installation Overview...

Page 48: ...diskette image file On a DOS or Windows system a Fedora driver diskette can be generated using rawrite exe This utility is included on the Fedora Linux CD under dosutils Run rawrite using a command p...

Page 49: ...driver module load it using the following commands modprobe sd_mod insmod hptiop ko Arrays attached to the adapter can be accessed as SCSI devices e g dev sda Step 2 Mounting and Partitioning the Devi...

Page 50: ...e original driver is installed in the system s initrd Initial RAM Disk file when using a system installed to RocketRAID host adapter for example the driver module in the initrd file should be updated...

Page 51: ...o generate a boot diskette Insert a floppy disk into the floppy drive and type the following command dd if hptiop rhel 4u4 img of dev fd0 Step 2 Install Red Hat Enterprise Linux Start installing Red H...

Page 52: ...zip dc mnt floppy modules cgz cpio idumv Driver modules for all supported kernel versions will be extracted The driver module for the active kernel is located under the directory that matches the kern...

Page 53: ...river etc rc d rc5 d S01hptdriver Step 4 Configure System to Mount Volumes during Startup The system can be instructed to automatically mount the array s during startup by modifying the file etc fstab...

Page 54: ...reinstall the RAM disk lilo Update hptiop ko in lib modules cp tmp hptiop ko lib modules uname r kernel drivers scsi hptiop ko Reboot your system to allow the new driver take effect 5 Uninstalling th...

Page 55: ...er Diskette The driver is contained in a floppy diskette image file slesdd img On a DOS or Windows system a driver diskette can be generated using rawrite exe This utility is included on the SLES Linu...

Page 56: ...sure the RocketRAID host adapter s BIOS loads posts after the SCSI adapter s BIOS It may be necessary to move the adapter s to another PCI slot 2 The driver may work incorrectly on certain motherboard...

Page 57: ...configured between several hard disks This array will be registered to the system as device dev sda 1 To create a partition on this array which will listed as dev sda1 use the fdisk dev sda command 2...

Page 58: ...0 0 4 Updating the Driver To update the driver simply reinstall the driver following the steps in previous section Install RocketRAID driver on an Existing System Note If the driver is loaded in initr...

Page 59: ...reeBSD Driver Support Contents of this Chapter 1 Installing FreeBSD on the RocketRAID 3522 Controller 2 Installing the RocketRAID 3522 Driver on an Existing System 3 Updating the Driver 4 Uninstalling...

Page 60: ...to make the driver diskette For example Insert a floppy disk into the floppy drive and type the following command if you are installing FreeBSD 5 x versions ddif freebsd_5 x imgof dev fd0 Step 2 Insta...

Page 61: ...disk1 hptiop 4 3 ko for FreeBSD 4 4 RELEASE ok load kernel ok load disk1 hptiop 4 4 ko for FreeBSD 4 5 RELEASE ok load disk1 hptiop 4 5 ko for FreeBSD 4 6 2 RELEASE ok load disk1 hptiop 4 6 2 ko for F...

Page 62: ...ASE ok load disk0 hptiop 6 0 amd64 ko for FreeBSD 6 1 RELEASE ok load disk0 hptiop 6 1 ko for FreeBSD 6 1 AMD64 RELEASE ok load disk0 hptiop 6 1 amd64 ko 5 After the driver has been loaded remove the...

Page 63: ...rently running FreeBSD and would like to access drives or arrays attached to the RocketRAID host adapter follow the steps outlined below Step 1 Copy the Driver Module If you have made FreeBSD drivers...

Page 64: ...then dev da1 etc Example F1 FreeBSD Default F1 FreeBSD i386 BOOT Default 0 ad 0 a boot loader boot BTX loader 1 00 BTX version is 1 01 Console internal video keyboard BIOS driver A is disk0 BIOS drive...

Page 65: ...ould now automatically load each time the operating system starts up Note When using FreeBSD 4 x type in the following command to configure the system mknod dev hptiop c 200 0 Then check to make sure...

Page 66: ...Chapter 8 Mac OSX Driver Contents of this Chapter Installing the driver and RAID utility...

Page 67: ...in order to function properly 5 Click the Install button You will be prompted clicking the install button will install a basic installation of the software package on your selected volume Confirm the...

Page 68: ...Appendix Customer Support...

Page 69: ...and RAID Software have been installed for the RocketRAID 3522 Updates are available from our website Prepare a list of the computer system s hardware and software motherboard CPU memory other PCI devi...

Page 70: ...try to correct the interference by one or more of the following measures Reorient or relocate the receiving antenna Increase the separation between the equipment and receiver Connect the equipment int...

Reviews: