background image


- 4 - 

Quick Setup 

Step 1

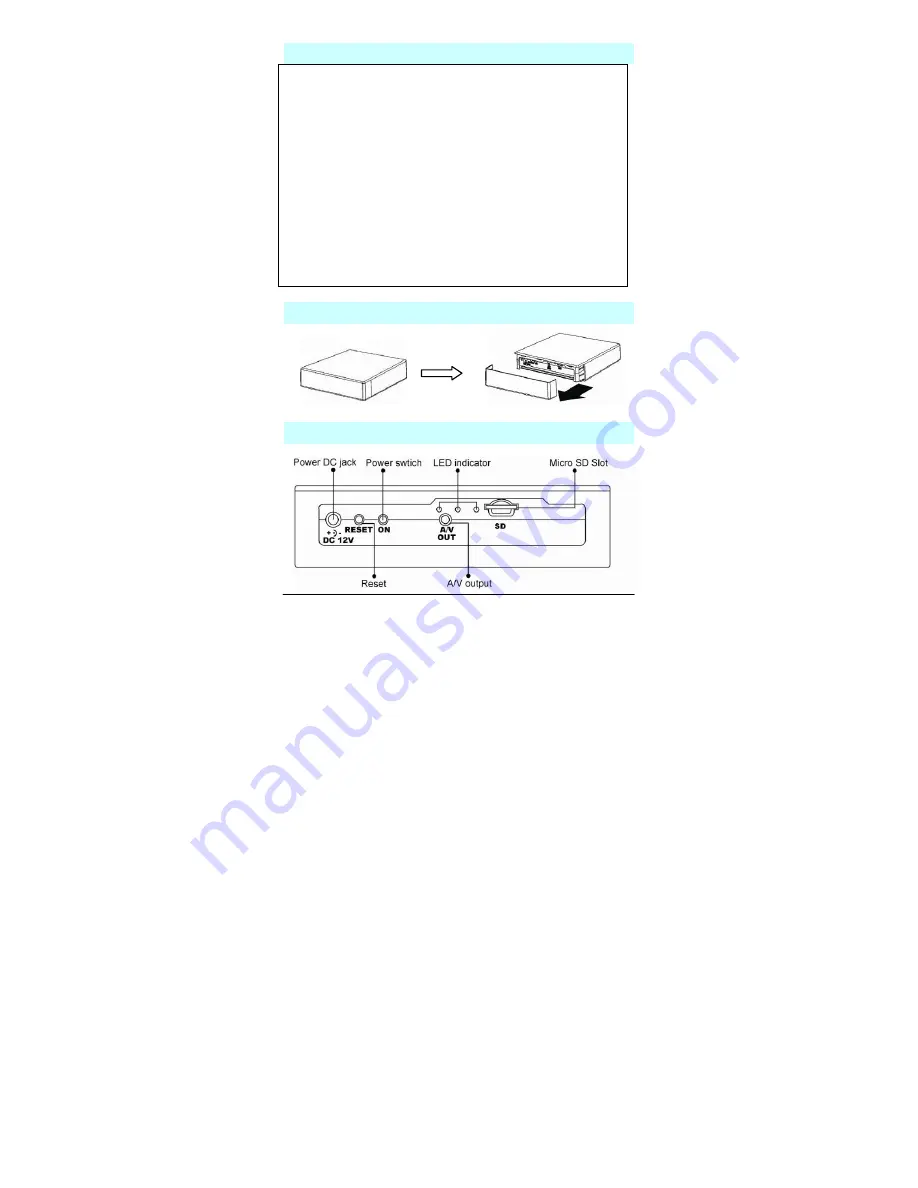
: Open the back cover 

Step 2

: Fully charge the battery for 10 hours for the first time 

using (please backup or format Micro SD card 
regularly to keep it efficient) 

Step 3

: Insert Micro SD card into Micro SD slot 

Step 4

: Set camera in the direction of your required 

application  

Step 5

: Press “ON” (power switch) to turn on 2

nd

 Generation 

Black Box.  The LED will be on and buzzer will beep 
around 2 seconds. To turn off 2

nd

 Generation Black 

Box, press and hold “ON” for 5 seconds and let go, all 
LEDs will be off. 

*Set

 the DATE/TIME to current date and time before 

recording; or the recording date and time will be incorrect.  

*Use

 bundled accessories.  Damage which is caused by other 

device will be beyond warranty 
 

How to open 2nd Generation Black Box 


Instruction 


Summary of Contents for M356942

Page 1: ...Hidden Video Recording System Manual P N F40072B00 Patent No M356942...

Page 2: ...u to contact related authorization before you dispose this product Do not open modify the device as it may cause damage to the unit For internal repairs consult your dealer or an Authorized Service Ce...

Page 3: ...5 3 How to open camera cover 5 4 How to change camera angle 6 5 How to install the bracket 8 6 How to charge the battery 8 7 IR Remote control sensing area 8 Default Value 9 Start to record 9 Playback...

Page 4: ...Generation Black Box IR remote control Power adapter 12VDC Bracket AV Output cable User manual Micro SD Card reader optional 3 7V 4800mA Li polymer battery Micro SD card optional Charger cradle for Li...

Page 5: ...pplication Step 5 Press ON power switch to turn on 2 nd Generation Black Box The LED will be on and buzzer will beep around 2 seconds To turn off 2 nd Generation Black Box press and hold ON for 5 seco...

Page 6: ...irstly open back cover and then slide off the battery cover according to the direction of arrow from two points to three points After removing the battery cover take out the battery for charging or ch...

Page 7: ...camera 180 horizontally Make the camera lens facedown and put it back to the device Make sure that the poles are correctly inserted into the holes of camera mechanism Firstly insert the camera cover...

Page 8: ...horizontally Take out the camera and turn it 90 vertically to make the lens face front Put the camera cover on and then the battery cover Close the back cover Put the camera back to the unit Make sure...

Page 9: ...ivation or power saving when out of schedule 2 nd Generation Black Box can last for longer NOTE Under low temperature conditions the battery will have a shorter life than normal NOTE Please use the bu...

Page 10: ...for this device Status Display On Start to record Once power on unit recording is factory preset at motion activated It can be reset as continuous recording having scheduled and external trigger acti...

Page 11: ...ck Volume up Left Move left fast backward OK Confirm the setting change Still image snapshot Right Move right fast forward Down Move downward or decrease While playback Volume down Esc Escape current...

Page 12: ...continuous recording Manual recording by pressing REC button on remote controller Frame rate per second Resolution 1280 x 720 Resolution 720 x 480 Resolution 320 x 240 Overwrite old recordings when M...

Page 13: ...80x720 Better 0 59 2 38 4 77 9 54 720 x 480 Fair 2 00 7 99 15 98 31 96 320 x 240 4 13 16 52 33 04 66 08 PAL 25 fps unit hour PAL 1GB 4GB 8GB 16GB 1280x720 Better 0 71 2 86 5 72 11 45 720 x 480 Fair 2...

Page 14: ...Default of schedule is All motion activate All means whole week from Sunday Monday to Saturday You can simply set All and it will apply to whole week or you can set certain schedule of an individual d...

Page 15: ...ish To escape schedule setting Or you can press Esc button on remote control too To set interval up to 24 00 This recorder does not have 24 00 in the schedule setting For interval end with 24 00 pleas...

Page 16: ...emoved 2 Make sure the battery is well placed and has enough power inside 3 When you use the remote control make sure it facing to the device the side with reference dot on the bottom 4 The device was...

Page 17: ...3 7V 4800mAh Li polymer battery Storage Media Micro SD card 1G to 32G SDHC Class 6 is most recommended Control IR remote control LED indicator Red Yellow Green can be on off via IR remote control Buz...

Reviews: