Hi Sharp HS-ML1002 User Manual Download Page 19


19


    (

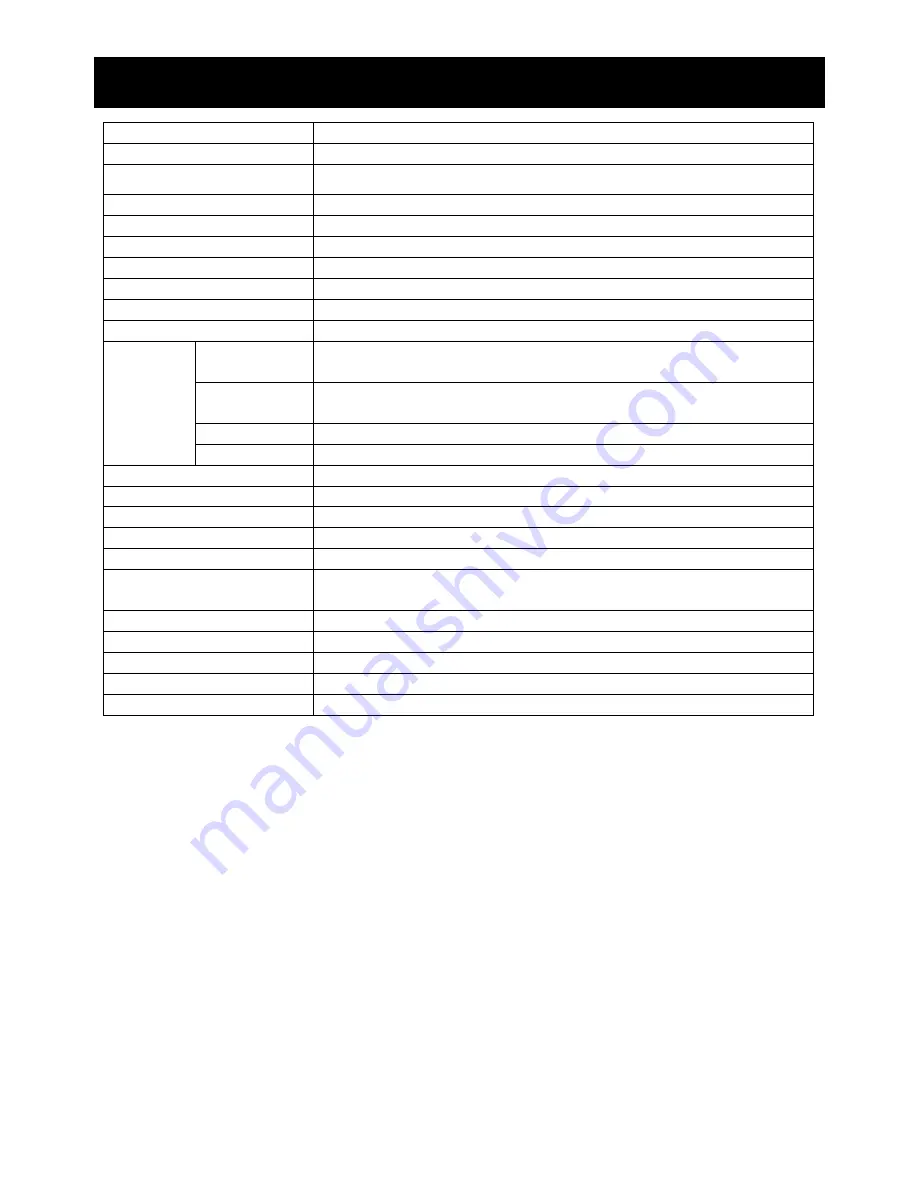
1) The brightness specification is from panel specification.   

       Design and Specifications are subject to change without notice. 


Panel Size 

10.4” 

Aspect Ratio 

4:3 

Resolution / Scan 

640 x 480 @ 60 

Brightness 350cd/m

2

 (*1) 

Contract Ratio   

300:1 (*1)


Viewing Angle(H/V)   

Left 70°/ Right 70° / Up 40° / Down 70° CR>10 

Response Time 

60ms 

Sync. Format 

NTSC / PAL   

Frequency (Horizontal) 

PC: 31.5K   

Frequency (Vertical) 

PC: 60Hz -75Hz, Video: 50 / 60Hz 

Video 
Interface 

15PIN D-SUB connectorx 1, Video In x 2 (BNC), Video Out x 2 

(BNC), S-Video In x 1 

Audio 
Interface 

Audio In x 2, Audio Out x 2, PC-Audio In x 1 

Input Voltage

DC 12V In   

Input 
Interfaces 

Termination  

75ohm 

(Auto 

Termination) 

Built-in Speakers 

Yes (2pcs) 

Front Panel Button 

Power, Source, Up, Down, Menu, Auto 

OSD Language 

Multi Language 

VESA Mounting 

VESA 75mm x 75mm 

Weight (N.W./G.W.) 

1.8kg / 2.9kg 

External Dimensions 
(WxHxD) 

261(W) x 63(D) x 223(H) mm 

Power 

DC 12V / 5A 

Power Consumption (max)

17W 

Temp (Oper.) 

-10°C to 50°C (14°F ~122°F) 

Humidity 

20% ~ 80% 

Accessories 

Power cord, User Manual, Remote Controller 

Specification


Summary of Contents for HS-ML1002

Page 1: ...Thank you for purchasing our product Please read this User s Manual before using the product Change without notice 10 4 T F T L C D M O N I T O R U S E R M A N U A L...

Page 2: ...head symbol within an equilateral triangle is intended to alert the user to the presence of uninsulated dangerous voltage within the product s enclosure that may be of sufficient magnitude to constitu...

Page 3: ...POWER CORD PROTECTION Power supply cords should be routed so that they are not likely to be walked on or pinched by items placed upon or against them paying particular attention to cords at plugs conv...

Page 4: ...ich can be determined by turning the equipment off and on the user is encouraged to try to correct the interference by one or more of the following measures Reorient or relocate the receiving antenna...

Page 5: ...he Monitor 8 Connecting your Monitor 9 Connecting Devices 10 Setup your Monitor 11 General Setup 12 Video Setup 13 VGA Setup 14 Audio Setup 14 PIP Setup 16 LCD Monitor Mounting Guide 17 Desktop 17 Tro...

Page 6: ...response time and refresh rate without time lagging Provides 6500 K and 9300 K color temperature selection for user s preference Provides Key Lock and power memory function for easy management CCD mo...

Page 7: ...You can operate your monitor by using the buttons on the front panel The side panels provide the inputs to connect other equipment to your monitor Front Panel Back Side Exploring Your New Monitor 10...

Page 8: ...is input is for AV1 or S Video Refer to Note below 7 8 AUDIO 1 OUT R L Audio looping outputs for AUDIO 1 9 S VIDEO IN Y C separated signal input 10 VIDEO 2 OUT Video looping output for VIDEO 2 11 VIDE...

Page 9: ...at the rear panel of the Monitor you will see that the terminals are color coded in the same manner as the cables z S video cables provide better picture performance than standard video cables S vide...

Page 10: ...and 2 BNC Connector as showing on the above picture d Support Resolution Connecting Devices 10 4 Monitor Display modes Mode Resolution Refresh rate VGA 640x480 60Hz Although this Monitor supports abo...

Page 11: ...F function SOURCE Select input signal from AV1 AV2 S Video or VGA PC POWER Monitor power ON OFF At OFF mode monitor will be at standby status Green Light ON Mode Orange Light Power Saving Refer to not...

Page 12: ...ded to prevent tempering To release key lock function press AUTO and DOWN Power Memorize This function enable the monitor to memorize the previous power status before power break Channel Display This...

Page 13: ...ost noticeable to the eye in reds and yellows and is also usually set for pleasing face tones Sharpness Sets the desired sharpening enhancement to the picture Color Temperature Selects color temperatu...

Page 14: ...y It adjusts the numbers of the pixel clock across one line time Therefore it can affect the picture position and size Note improper adjustment will caused image failure Phase Is used to adjust best p...

Page 15: ...15 Volume Controls built in speakers output volumes Mute To disable the audio function To enable press MUTE again Default Sets AUDIO settings to the original factory setting Audio Setup...

Page 16: ...P window size Sub Window H Position Control the PIP window position in horizontal position Sub Window V Position Control the PIP window position in vertical position Switching Enable PIP sources switc...

Page 17: ...o fit most comfortable monitoring status LCD monitor Mounting Guide Arm Mount VESA Standard When adjusting the VESA Standard Arms to the back side of the LCD monitor please use the M4x8mm L screw For...

Page 18: ...not turn on Makes sure the power cord is plugged in then press POWER button No picture no sound Check cable connections No sound picture OK Check audio Cable Connections Try pressing Volume up button...

Page 19: ...0Hz Video Interface 15PIN D SUB connectorx 1 Video In x 2 BNC Video Out x 2 BNC S Video In x 1 Audio Interface Audio In x 2 Audio Out x 2 PC Audio In x 1 Input Voltage DC 12V In Input Interfaces Termi...

Page 20: ...20 10 4 Dimensions...

Reviews: