Hi Sharp 16 CH DVR User Manual Download Page 44


44

4.12  Remote Setup  

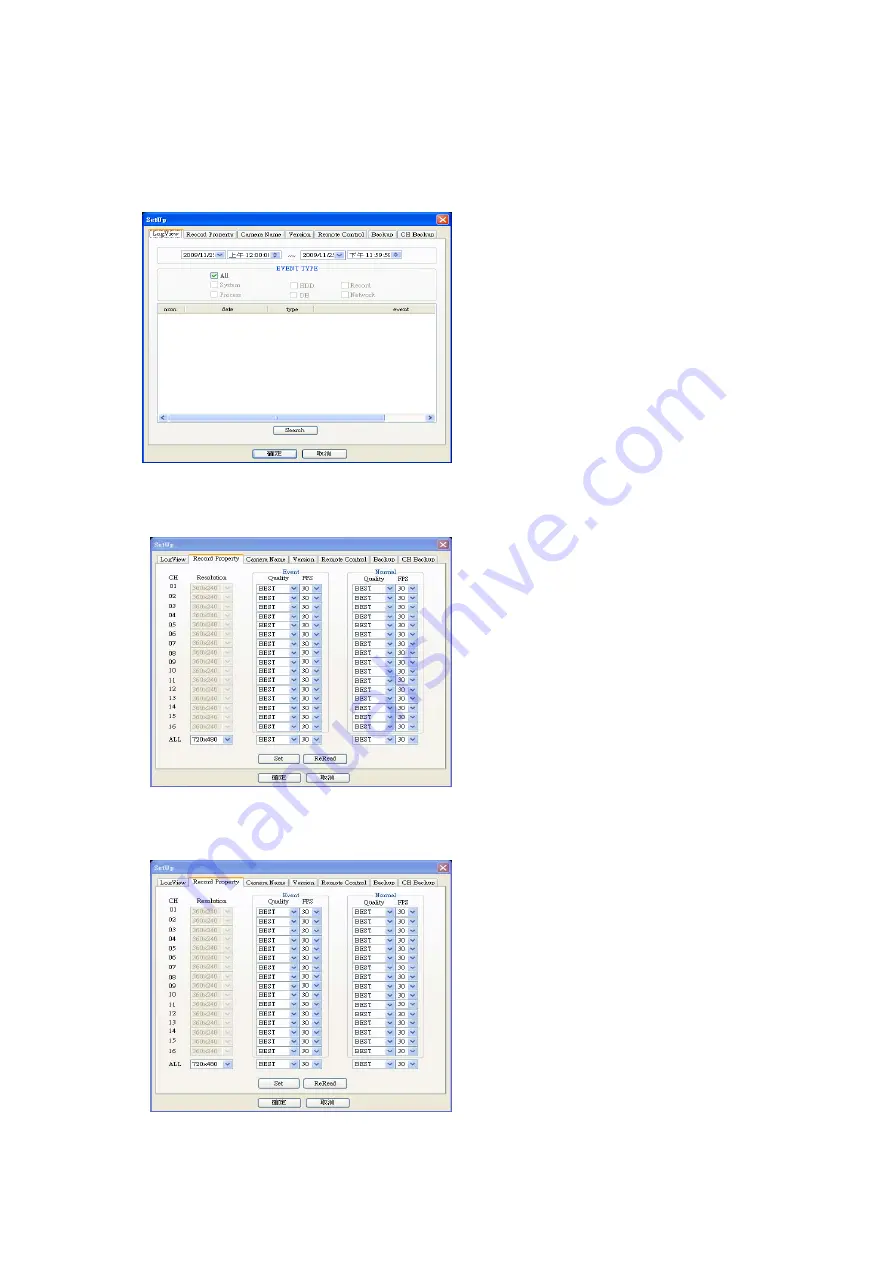
4.12.1 Log view   


4.12.2 Record Property   


4.12.3 Camera Name   


(1) Select desire date & time to search event   

(2) Select desire event type   

(3) Click Search button 

You can adjust resolution, Quality and frame rate to 

record. 

You can change camera name. DVR system is 

compatible with Unicode. So, you can type by Unicode. 

Summary of Contents for 16 CH DVR

Page 1: ...16 CH DVR User s Manual...

Page 2: ...Do not disassemble or reassemble the product It may cause malfunction or fire 3 Enquire to your vendor for repair It may cause electric shock or fire if the repair is not done properly 4 Do not touch...

Page 3: ...e grounding to connect the power cord It may cause fire 2 Do not connect on the middle of power cord or use extension cord It may generate heat or cause fire 3 Do not touch the power cord with wet han...

Page 4: ...TZ CONTROL 17 2 10 AUDIO 18 2 11 LOG VIEW 18 2 12 MOUSE CONTROL 18 2 13 S W UPGRADE 19 3 SYSTEM SETUP 21 3 1 DISPLAY 22 3 2 CAMERA 23 3 3 RECORD 25 3 4 EVENT 28 3 5 STORAGE 30 3 6 NETWORK 31 3 7 SYSTE...

Page 5: ...tem It will ask password with admin account after the DVR system startup Admin user has fully control to the entire DVR system PS Default password is 0000 System Shutdown To turn the power off press P...

Page 6: ...by manual 4 LED Indicator Indicates system status Power Record and Hard disk status 5 USB USB memory slot 6 FUNC Run system other function 7 Display Button Select screen display mode 8 Menu Button Op...

Page 7: ...tor 7 Audio Out Connect the audio output device 8 LAN Port 10 100 Ethernet connection terminal 9 USB Port USB port Ver 2 0 for mouse operation or Image backup x2 10 VGA Out Connect the P C VGA monitor...

Page 8: ...om camera 9 Digital Zoom 10 Direction Move cursor or control PTZ camera ENTER Select sub item in system setup mode 11 SEARCH Search recorded video 12 LOG Show running statue of DVR system 13 Reverse p...

Page 9: ...rding Motion detected Sensor alarm detected Channel sequencing STATUS BAR z MENU System Setup and function z Network client connection status z Backup status z USB connection status z External USB HDD...

Page 10: ...ide of current display range the quad containing selected numeric will be displayed E g you press 6 while current screen shows CH1 Ch4 CH5 CH8 will be displayed z 9ch display mode To see cameras by 9c...

Page 11: ...z PIP mode picture in picture In case of full screen display mode you can see other camera with a small window 1 Press PIP button of remote controller 2 If you press PIP button again in PIP mode the p...

Page 12: ...Menu Setup Display to get SPOT setting 1 TYPE SINGLE CHANNEL SINGLE SEQUENCE Each specific screen in SPOT OUT monitor is displayed while sequencing You can select the value of time range at SETUP mod...

Page 13: ...you press ENTER key selected Zoom Area will be displayed as full screen 2 5 Record Press REC button to record screens If you press REC button once more recording will be stopped 1 Check whether the v...

Page 14: ...elect desired date by pressing buttons and press ENTER button 3 Select desired Hour Min by pressing buttons and press ENTER button 4 Select OK and press ENTER button z SEARCH BY EVENT 1 If you select...

Page 15: ...6CH mode screen press QUAD 9CH 16CH button You can control playback speed with button Whenever pressing the button the speed of playback increases or decreases Rewind Reduce Fast Forward speed While F...

Page 16: ...te controller 3 Input backup options DEVICE Select device to backup MEDIA TYPE Select media type for CD ROM device FORMAT Format media for CD RW or DVD RW media CHANNEL Select desired channel TO AVI C...

Page 17: ...ra will zoom in out If you press numeric button of remote controller target camera will be changed z PTZ ADVANCE FOCUS Focus IN Focus OUT AUTO AUTO FOCUS mode IRIS Open Iris Close Iris AUTO AUTO IRIS...

Page 18: ...matically z Some kinds of USB mouse may not be compatible with product 2 12 1 Change screen mode Left button of mouse is for selecting an item Right button of mouse is usually for canceling menu table...

Page 19: ...view menu Hide all OSD indication in screen If you click right button of mouse OSD will appear again Go to Function menu Log out this DVR 2 13 S W upgrade MENU 2008 04 20 05 35 30 A B C D 77 MENU SETU...

Page 20: ...ystem will reboot automatically 2 13 2 Network upgrade 1 Press Menu button and go to Software Update MENU SETUP password SYSTEM SOFTWARE 2 Select UPGRADE then small window will appear 3 Select NETWORK...

Page 21: ...Move the pointer to desired letter with direction button 2 Press ENTER button to select desired letter 3 Then selected letter will be shown at text window DISPLAY OSD LIVE SEQ FULL LIVE SEQ QUAD SPOT...

Page 22: ...y during not using dvr LEFT MARGIN Move the OSD position of leftmost E g Name of CH 1 CH 5 CH 9 CH 13 Network USB Backup Icon of status bar RIGHT MARGIN Move the OSD position of rightmost E g Playback...

Page 23: ...SPOT OUT 3 1 3 DISPLAY MISC DEINTERLACE Playback option ON Prevent frames from being stirred up while playing 720X480 or 720X576 size images on low frame rate VGA RESOLUTION Select appropriate VGA re...

Page 24: ...tton to cancel 3 2 4 CAMERA SCAN POINT CAMERA Select a specific camera to set SCAN points LIST Create another SCAN list PRESET Select desired preset position CLEAR ALL Cancel all saved scan points SET...

Page 25: ...ion of camera COLOR HUE Adjust hue of camera DEFAULT Set all values to factory default 3 2 6 CAMERA POSITION CAMERA Select camera to adjust position LEFT RIGHT Move camera position to LEFT or RIGHT in...

Page 26: ...or each channel should be same as that for INTENSI or small ALL All channels would be changed according to selected resolution or quality or frame rate REMAIN XXX XXX XXX Indicate the remaining frame...

Page 27: ...hedule 2 Select desire time day and press ENTER button 3 Whenever pressing ENTER button recording mode will be changed C E I None 3 3 3 MISC OVERWRITE Losing the oldest recorded files by newly recorde...

Page 28: ...ion or Sensor is set WATER MARK Recording with water mark To detect image corruption 3 4 EVENT 3 4 1 MOTION MOTION AREA Set the area to detect motion SET ALL Select the whole area PART Select a block...

Page 29: ...YPE Select sensor type between NO and NC ALARM OUT Set the alarm out when motion occurs 3 4 3 E MAIL When below events happen system will notify by E mail You can register three email addresses z MOTI...

Page 30: ...ccurs BUZZER system alarm will be sounded when event occurs OUT TIME Enter the duration time of alarm out when event occurs EVENT POPUP When event happens the channel will popup POPUP OUT Select monit...

Page 31: ...al USB HDD after auto backup setting Please check Auto backup setup if it is correct 3 6 NETWORK 3 6 1 SETUP 1 Basically you can choose between STATIC or DHCP If you choose DHCP mode DVR system gets I...

Page 32: ...Choose DDNS server USER ID Enter your site ID PASWORD Enter your site PASSWORD HOST NAME Enter your host name here 3 6 3 CLIENT Choose one of given CLIENT PORT list and enter desired value at WEB PORT...

Page 33: ...allowed to access DVR 3 7 SYSTEM 3 7 1 CONFIG You can save system setting values to USB device or can load system setting values from USB device LOAD CONFIG Load saved configuration file from USB devi...

Page 34: ...re are two fixed users such as ADMIN and NETUSER Their values of authority are already set and unchangeable like right picture Additionally you can create Max 4 more authorized accounts and you also g...

Page 35: ...IN window will re appear after entered time from any signal input If you want to log out you need to go to MENU and select LOG OUT like right picture 3 7 6 SHUTDOWN Right before switching off use this...

Page 36: ...oring multi DVRs at the same time Up to 64 camera display on a screen Various screen mode supported 1 4 6 9 16 36 64 screed mode Remote controlling DVR setting value PTZ camera Change configuration va...

Page 37: ...plays appropriate channel mode automatically according to channel q ty of connected DVRs Also you can select desire channel mode among 4 9 16 64 channel mode You can see full scree mode by clicking ma...

Page 38: ...te 1 Making Group Select All and click button Then input desire Group name and click OK button 2 Making DVR site Select desire group and click button and Input information to connect DVR Site name Inp...

Page 39: ...you can save the camera list and load 4 3 1 Making display List Select desire group and click button and drag desire camera to display to right table Then input desire list name and click OK button to...

Page 40: ...will change to PTZ control mode Then you can control PTZ camera in one channel mode At DVR LIST You can control PTZ after selecting the DVR of the PTZ camera At PRELIST You can control PTZ after selec...

Page 41: ...ient S W by adding or deleting user 4 8 Snapshot Select screen and click the snapshot button to get a picture 4 9 OSD display You can select desire OSD to be shown each channel ADD add user DEL delete...

Page 42: ...42 4 10 Remote playback player 1 Select DVR site 2 Click button to change to remote playback mode 3 Select recorded data and select time and minute by dragging 4 Then click play button to play 3 3 4...

Page 43: ...ame time 3 Click to play Change backup file to AVI file One channel can be converted to AVI file 1 Click button 2 2 3 Input Select backup file to convert to AVI If you want to convert with Audio check...

Page 44: ...4 12 3 Camera Name 1 Select desire date time to search event 2 Select desire event type 3 Click Search button You can adjust resolution Quality and frame rate to record You can change camera name DVR...

Page 45: ...e system Config Upload you can change config data to DVR Config Download you can get config data from DVR Remote Reboot you can reboot DVR 1 Select desire date and click Backup list 2 Then backup list...

Page 46: ...46 4 12 7 CH backup 85 DH6070 A002G A You can backup specific channels with desire date time...

Reviews: