HFWS HF-S4 Operating Instructions Manual Download Page 14


14


How to Remove Device? 

Method one:Click:Device-Setting-Remove Device 
Note:If you replace a new phone or lose your phone.Use Method Two: 
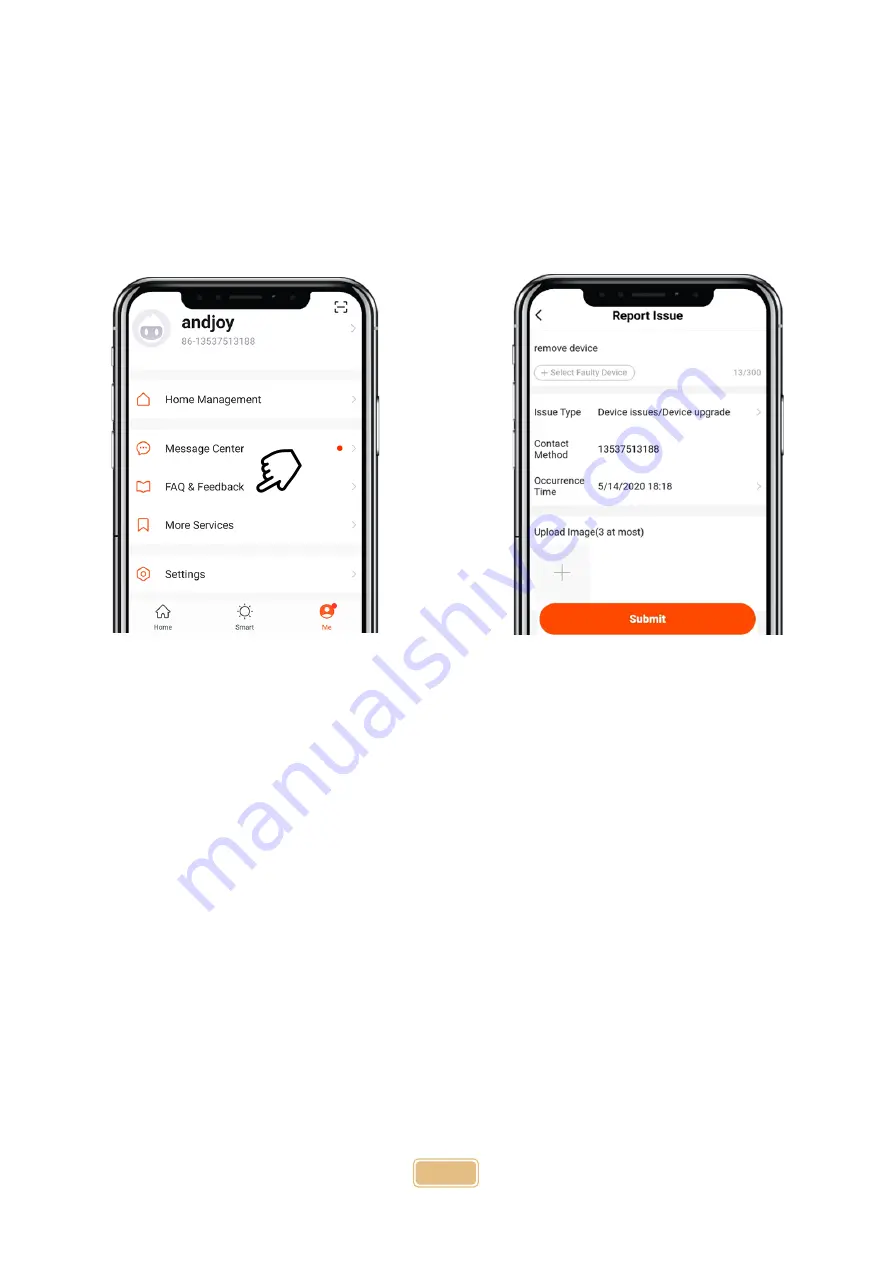
1:Click-

Me-FAQ&FeedBack-Report Issue 

2:Write the question, fill in the account, then take a screenshot and submit. Then send the screenshot to: 
[email protected] email. We Remove remotely 


FAQ: 

Q:The Device is not connected to Wifi 

A:1:Please confirm the WiFi is 2.4Ghz 
    2:Please power the device when next to the Wifi Router 
    3:Please confirm the WiFi account password is correct 
    4:WiFi accout password can’t have special characters 
    5:Whether the device is in the boot network starus 

Q:Your Phone Fails to receive the notification 

A:


Please check whether the mobile phone has disabled the information push function 

Q:Which Storage Method the device Supports 

A:Support cloud Storage(Payable) 
    Support Micro-Sd Card (Class 10 16,32,64,128G) 

Q:How to calculate the storage and usage time of the device 

A:If you use and 16G card and 6800mAh battery,You can use one for long-Term Recording day.If you only 
use 15minutes a day,You can use it for 4 months 

Q:what are the power supply methods for the device 

A:Can be powered by Micro-USB 5V 1A 


Summary of Contents for HF-S4

Page 1: ...1 Solar WiFi Camera Operating Instructions...

Page 2: ...2 A Product Details Model HF S4 Model HF S5...

Page 3: ...3 B First Use 1 Open the Camear Bottom Screw 2 Install Micro SD Up to 128G HF S4 HF S5 3 Long Press 2 3 Seconds to turn on 4 Power Indicator red HF S4 HF S5...

Page 4: ...D Resetore Factory Setting Why Restore Factory Settings 1 The camera Can t Connect to the phone 2 Change new router 1 IF you see the blue light The blue Light flashing please turn off and turn on 2 Lo...

Page 5: ...e Please fully charge Then connect the phone And then install 1 Paste Positioning Stickers 2 Bore A hole 3 Install the rubber plug 5 Adjust the angle 4 Install Screws F App Download Search Tuya Smart...

Page 6: ...6 F Connect Device The first installation should be close to the router and mobile phone must connect router WiFi 1 Open Tuya Smart App Register And Click 2 Click Video Survillance Smart Camera...

Page 7: ...7 3 Next Step 4 Select your router and enter your password confirm Note 2 4GHz Only 5 GHz Can t...

Page 8: ...o shake the phone druing the process 6 After hearing the device beep Click I Heard a Prompt Voice and Wait for the device to connect successfuly IF prompted connection failed 1 Is the wireless passwor...

Page 9: ...duct 5 All Devices 6 Room Management 7 Devices 8 Home page 9 Smart Page 10 ME Important Preview Page introduction 1 Setting 2 Signal 3 Audio ON OFF 4 HD SD Video 5 Full Scree 6 Battery Display Chargin...

Page 10: ...Settings Format SD Card 8 Purchase VAS Free 30days cloud Storage 9 Share Device Share Device up to 5 people 10 FAQ Feed back 11 Firmware Information 12 Remove Device Important IF you replace new phon...

Page 11: ...11 How To check motion detection 1 Click ME 2 Click Message Center 3 Click Device How to DO NOT Disturb Schedule 1 Click ME 2 Click Settings 3 Click App Notification 4 Click Do Not Disturb Schedule...

Page 12: ...k Device 2 Click Setting 3 Click PIR Note The distance up to 7Meters 23ft How to share with family 1 Click Device 2 Click Setting 3 Click Share Device 4 Click Add sharing Note All mobile phone need in...

Page 13: ...AI Filtered Notification Get notifications that you really care about stay away form false alarm Video Cloud Storage Camera will upload encrypted video data to the cloud once the service is subscribe...

Page 14: ...Fi account password is correct 4 WiFi accout password can t have special characters 5 Whether the device is in the boot network starus Q Your Phone Fails to receive the notification A Please check whe...

Reviews: