background image

26

11.5. Service Interval

There is a built-in service counter set to 2.400 ON hours. To view the status of this service 
counter, see the Settings Menu, Menu Item 7.  This SERVICE COUNTER counts down from the 
2,400 ON hours. If the amount of hours is more than 999 the display will show Hi. Once they 
have expired, an alarm will be triggered in the form of a noise and two flashing icons. These icons 

 will continue to flash until an authorised service technician has completed a service proce-

dure on the stove and reset the service counter. 
(The stove can still be used in this period)

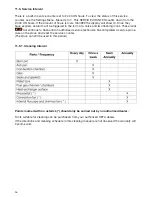
11.5.1. Cleaning Interval

Points marked with an asterisk (*) should only be carried out by an authorised dealer. 

Tools suitable for cleaning can be purchased from your authorised HETA dealer.  
If the directions and cleaning schedule in this cleaning manual are not observed the warranty will 
become void.

Summary of Contents for GREEN200

Page 1: ...OPERATING GUIDE GREEN200 UK Danish Design Danish Quality Danish Produced ...

Page 2: ...ations and requirements which confirm that the stove is made of high quality materials that it is economical to use and it is not harmful to the environment Please read these instructions for use carefully prior to installation and operation to avoid perso nal injury or damage to building parts or the product itself HETA A S Copyright 2014 HETA Jupitervej 22 7620 Lemvig Denmark Tel 45 96 63 06 00 ...

Page 3: ... 5 4 Menu navigation 11 5 4 1 Active touch buttons 11 5 4 2 Set the clock 11 5 4 3 Manual pellet advancement 11 5 4 4 Set the room temperature 11 5 4 5 Anti freeze 12 5 4 6 Select heat level 12 5 4 7 Select convection level 12 5 4 8 Set pellet quality 12 5 5 Sub menus 13 5 5 1 The settings menu 13 5 5 2 Time menu 13 5 6 Timer settings 14 5 6 1 Setting programmes 14 5 6 2 Setting days 15 6 Explanat...

Page 4: ...nd maintenance carefully before installing and lighting the stove If you need further infor mation please contact the dealer from whom you purchased the stove NOTE The stove has extra protection in line with po wer regulations and must have an earthed electrical connection Only quality pellets with a diameter of 6 8 mm should be used as fuel Before connecting power to the stove make sure that the ...

Page 5: ...re parts Extraordinary events 3 2 Spare parts Use only original spare parts If you have any questions concerning your pellet stove Heta strongly recommends that you contact your dealer immediately 3 The pressure sensor measures whether there is sufficient draught in the chimney If problems with inadequate draft or a blocked chimney arise the pressostat shuts down the stove press the reset button t...

Page 6: ... as shown The pellet lid now opens Open the lid full and fill in pellets Close the lid again Be sure to advance the pellets manually using the control panel see section 5 4 3 until pellets appear in the burn pot This ensures the correct start up sequence ...

Page 7: ...e installed in a spaci ous and central location in the house to ensure the best heat distribution The electrical connection must be with Pro tective Earth if the cable included is not long enough to connect to the closest power outlet use an extension cord with a Protective Earth connection 4 3 Temporary power failure If the power failure only lasts a few seconds the stove will restart and functio...

Page 8: ...mber Howe ver if there is a strong chimney draught we recommend a draught stabiliser be installed Otherwise the chimney will overrun the flue vacuum pump resulting in too much combu stion The stove operates best with a chimney draught of 4 pascals used for testing approval in a chimney with a diameter of 80 mm 4 8 External air supply In hermetically closed environments with little air replacement ...

Page 9: ...e sensor placed at the rear of the stove and ensure it is not in contact with hot surfaces 8 Connect the stove to a power outlet using the cable supplied 9 Use the control panel to configure all personal settings and then start the stove See the section on operating the stove NB The first time the stove is lit it is important to ventilate the environment very well as an un pleasant odour may arise...

Page 10: ...n audio tone for alarms etc Short tone When buttons are pressed on the control panel Long deep tone If something is entered incorrectly on the control panel Long high tone Stove alarm accompanied by an error code on the display 5 3 Remote control ...

Page 11: ...nual pellet advancement Press and hold Enter This sequence lasts approx 30 seconds Repeat the sequence until pellets appear in the burn pot Then empty the burn pot to ensure the correct start up sequence 5 4 4 Set the room temperature Set the room temperature in the Temperature Menu The current room temperature setting will be shown Press Enter to set the desired room temperature The display will ...

Page 12: ...Heat menu to set the stove s heat level Press Enter and select the desired ma ximum heat level for your stove 1 4 Auto Hi Press Enter to confirm You can also use the remote control to set the desired heat level See section 5 3 5 4 7 Select convection level The convection fan is set to Auto by default and follows the Heat level automatically in this set ting We recommend that you always set the con...

Page 13: ... alternates between the menu selected and room temperature 3 Display alternates between the menu selected and time 4 Beep Volume 1 2 3 4 5 This sub menu is used to select one of the following options 1 Low 5 High 5 Technical Info 6 Manual Pellet Advancement See section 5 4 3 7 Service Counter Number of hours ON until service 0 999 hours 999 hours Hi 8 Service Menu 5 5 2 Time menu 1 Current time Us...

Page 14: ...ress Arrow Right and the minute number will start to flash Press or until the minute figure you require is flashing Then press Arrow Right and the temperature reading will start to flash Press or until the maximum temperature you require is flashing Confirm the temperature by pressing Enter and the entire programme 1 P1 will be saved in Timer Repeat this process for the other programmes if you wis...

Page 15: ...e you require Off P1 to P6 is displayed Press Arrow Right and the display will show Off block C see below Press until the programme you require Off P1 to P6 is displayed Press Enter to confirm Day 1 d1 Monday has now been set Repeat this process for the other days if you wish to use them as well Example 2 A B C d1 Monday p1 p4 off d2 Tuesday p1 p4 off d3 Wednesday p6 off off d4 Thursday p6 p4 off ...

Page 16: ...16 6 Explanations 6 1 Start up sequence 6 2 Room temperature control ...

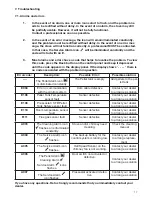
Page 17: ... pel let tank E004 Error in communication with the control system Com cable defective Contact your dealer to arrange a solution E106 Pellet Tank Temperature sensor fault Sensor defective Contact your dealer to arrange a solution E108 Pressostat STB Pellet Tank Safety sensor fault Sensor defective Contact your dealer to arrange a solution E110 Room temperature sensor fault Sensor defective Contact ...

Page 18: ...tween these parts is not tight unwanted air will be drawn through the pellet tank and into the stove This air will not contribute to the combustion process rather it will reduce the volume of air used for combustion The effect on diminishing of the combustion pro cess will be greater the fewer pellets are left in the tank because the air resistance through the tank falls in step with the quantity ...

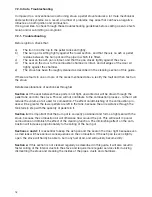
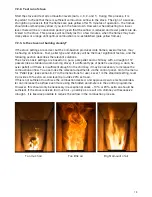
Page 19: ...ors and the following section describes the relevant solutions The stove s basic settings are based on a pure pale pellet and a chimney with a draught of 12 pascals like a standard wood burning stove If a different type of pellet is used e g a dark he avier pellet or if there is insufficient draught in the chimney it may be necessary to increase the combustion airflow You can make the relevant adj...

Page 20: ...denly occurred or it is an issue that has become worse over a period of time Was this a problem from the time that the stove was first connected Any other comment s __________________________________________________________________ ______________________________________________________________________________________ _________________________________________________________________________________...

Page 21: ...ing from inappropriate installation and or treatment of the stove and or customer errors Damage caused by incorrect use Freight costs in connection with repairs under the guarantee Assembly disassembly in connection with repairs under the guarantee Using pellets of poor quality or pellets made of materials other than pure wood can damage stove components As a result the warranty is considered null...

Page 22: ...22 9 EU declaration of conformity ...

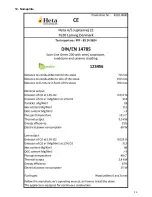
Page 23: ...23 10 Nameplate ...

Page 24: ...quires light but regular cleaning to ensure stable operation Clean the combustion chamber every 2 3 days for example using a vacuum cleaner Ensure that the ash is com pletely cool and all embers are extinguished NB The combustion chamber stone are a porous material and should be treated ac cordingly 11 2 3 Cleaning the glass Clean the glass whenever necessary Depen ding on the pellet quality and h...

Page 25: ...lied with the stove Vacuum any ash remainings inside the inspection hole at the front bottom of the stove 11 4 3 Cleaning the Pressostat The pressostat is connected to the chimney fan by a silicone hose Clean the silicone hose if dirty using water and soap ensure it is completely dry before reinstalling Apply suction to the presso stat inlet and listen to hear if it clicks 11 4 4 Cleaning the conv...

Page 26: ...n the form of a noise and two flashing icons These icons will continue to flash until an authorised service technician has completed a service proce dure on the stove and reset the service counter The stove can still be used in this period 11 5 1 Cleaning Interval Points marked with an asterisk should only be carried out by an authorised dealer Tools suitable for cleaning can be purchased from you...

Reviews: