background image

©2018 Hestan Commercial Corporation

16

EN

KEEP ANY ELECTRICAL CORD AND FUEL SUPPLY HOSE AWAY FROM ANY HEATED SURFACES.

1.  To protect against electric shock, do not immerse cord or plugs in water or other liquid.
2.  Unplug from the outlet when not in use and before cleaning.  Allow to cool before putting on or taking 

off parts.

3.  Do not operate any outdoor cooking gas appliance with a damaged cord or plug, or after the appliance 

malfunctions or has been damaged in any manner.  Contact the manufacturer for repair.

4.  Do not let the cord hang over the edge of a table or touch hot surfaces.
5.  Do not use an outdoor cooking gas appliance for purposes other than intended.
6.  Use only a Ground Fault Circuit Interrupter (GFCI) protected circuit with this outdoor cooking gas 

appliance.

7.  Never remove the grounding prong or use with a 2-prong ground adapter.
8.  Use only extension cords with a 3-prong grounding plug, rated for the power of the equipment, and 

approved for outdoor use with a W-A marking.

BURNER ADJUSTMENTS

Aspire side burners are similar to many residential gas cooktops.   They do not have any adjustments, except 

for the correct orifices, and adjustment of the low setting on the valve.  

BURNER FLAME ADJUSTMENT
Each side burner is tested and adjusted at the factory prior to shipment.  The proper orifice for the gas 

type, and the air-fuel adjustment was made at this time.  However, variations in the local gas supply, 

the elevation where you live, converting from one gas type to another, and other factors might make it 

necessary to adjust the burner flames.  

The flames of the burners should be visually checked and 

compared with the figures on the right.

Flames should be blue and stable with no yellow tips (LP units 

will have some yellow tipping).  There should be no excessive 

noise or flame lifting.  If any of these conditions exist, remove 

the burner cap and check if dirt, debris, spider webs, etc., are 

blocking the center venturi hole, or the individual burner 

ports.  The occasional orange flame that quickly goes away is 

usually a small amount of dust or water condensation which is 

burning off - this is normal. 

VALVE ADJUSTMENTS

The valves on your Aspire side burner are preset at the factory for optimum performance.  However, the 

valve also features a low (simmer) adjustment if altitude, low-heat performance, converting from one gas to 

another, or other factors indicate an adjustment is needed.  

NEVER ADJUST THE BURNER SO LOW THAT IT MAY GO OUT DURING 

USE.  DO NOT OPERATE THE SIDE BURNER WITH THE LOW HEAT SCREW 

REMOVED.  GAS CAN ESCAPE AND CAUSE A POTENTIALLY HAZARDOUS 

CONDITION.

GAS AND ELECTRICAL CONNECTIONS 

(continued)

Summary of Contents for ASPIRE AEB121-LP

Page 1: ...OUTDOOR COOKING Outdoor Side Burner AEB Use Care Manual Installation Operation ...

Page 2: ...this same perfectionist passion Our engineers experimented innovated tweaked and tinkered until they created the most powerful versatile and reliable outdoor products available We pride ourselves on restless innovation superior engineering and purpose built designs but also our in depth understanding of our target consumer and the interests and needs of the ultimate end users we serve and covet Fo...

Page 3: ...g Electrical Parts Components disconnect all power supplies and batteries before servicing DANGER If you smell gas 1 Shut off gas to the appliance 2 Extinguish any open flame 3 Open lid 4 If odor continues keep away from the appliance and immediately call your gas supplier or your fire department DANGER 1 Do not store or use gasoline or other flammable liquids or vapors in the vicinity of this or ...

Page 4: ...STALLATION 11 GAS AND ELECTRICAL CONNECTIONS 18 LIGHTING INSTRUCTIONS 19 USING YOUR SIDE BURNER 19 CLEANING AND MAINTENANCE 22 TROUBLESHOOTING 23 WIRING SCHEMATICS 27 PARTS LIST 27 SERVICE 27 WARRANTY TABLE OF CONTENTS BUILT IN MODELS Model No Description AEB121 NG LP 12 BUILT IN SINGLE SIDE BURNER AEB122 NG LP 12 BUILT IN DOUBLE SIDE BURNER AEB121 AEB122 MODEL NUMBERS ...

Page 5: ...LLATION section of this manual 5 The side burner shall be used only outdoors and shall not be used in buildings garages sheds breezeways or any enclosed areas Do not operate the side burner under unprotected combustible construction Use only in well ventilated areas See the INSTALLATION section of this manual 6 Do not use the side burner unless a leak check has been performed on all gas connection...

Page 6: ...the side burner are hot enough to cause severe burns 16 Always have an ABC type fire extinguisher accessible never attempt to extinguish a grease fire with water or other liquids 17 Avoid wearing loose fitting garments or long sleeves while cooking with the side burner They could ignite For personal safety wear proper apparel while cooking Some synthetic fabrics are highly flammable and should not...

Page 7: ...al All other warranty and non warranty service should be referred to and performed by a qualified technician 28 For proper lighting and performance of the burners keep the ports clean It is necessary to clean them periodically for optimum performance The burners will operate only in one position and must be mounted correctly for safe operation See BURNER ADJUSTMENT section of this manual 29 Clean ...

Page 8: ...tection Device The cylinder must be installed in the upright position Do not use a dented or rusty LP cylinder as it may be hazardous and should be checked by your LP supplier Never use a cylinder with a damaged valve Never move or alter the gas fittings Check the expiration date on the cylinder collar as well Do not refill an expired cylinder it must be replaced If you buy refilled exchange LP cy...

Page 9: ...e side burner free of debris Ensure that the burner cap is mounted correctly on the burner ring Do not operate the side burner without the burner cap in place see Fig 1 IGNITER BURNER PORTS SIMMER RING BURNER CAP Figure 1 INSTALLATION CLEARANCES NON COMBUSTIBLE TO NON COMBUSTIBLE CONSTRUCTION ABOVE THE COOKING SURFACE A minimum of 4 10 cm clearance from the rear of the appliance to non combustible...

Page 10: ...other materials capable of being ignited and burned Materials that are flame proofed or treated with flame retardant are still considered combustible VENTILATION OPENINGS A minimum of three 10 in 65 cm of ventilation openings must be provided for both left and right sides of your enclosure island as well as the back These openings are required to safely dissipate gas vapors if there is a leak in y...

Page 11: ... 2018 Hestan Commercial Corporation 10 EN INSTALLATION continued BUILT IN DIMENSIONS COMBUSTIBLE ...

Page 12: ...TED GAS SUPPLY Before proceeding ensure the appliance is fitted for Natural or Liquid Propane gas Connecting to an improper gas type will result in poor performance and increased risk of damage or injury Gas type and gas consumption BTU per hour for each burner type is located on inner right wall of the unit behind the control panel Installation of this cooking appliance must be made in accordance...

Page 13: ...pe specified by Hestan for this appliance TO CONNECT THE REGULATOR HOSE ASSEMBLY FOLLOW THE NEXT STEPS 1 Locate the regulator mounted underneath your side burner 2 Connect gas supply using a minimum 1 2 diameter flexible semi rigid stainless steel gas hose no more than 48 1 22m in length If you plan to inter connect the side burner with your Aspire Grill be sure to use the appropriate fittings and...

Page 14: ...n emergency gas shut off Your Aspire Side Burner for use with an LP Piped System is supplied with its own convertible regulator which MUST be installed If this regulator needs to be replaced use only the type specified by Hestan for this appliance To connect the regulator follow the next steps 1 Locate the regulator mounted underneath your Side Burner 2 Connect gas supply using a minimum 1 2 diame...

Page 15: ...sure TO CONNECT THE REGULATOR HOSE ASSEMBLY FOLLOW THESE STEPS 1 Locate the regulator and gas connection point in the rear right side of your side burner 2 Connect the 3 8 Flare compression flare fitting X 1 2 NPT female adapter as shown Then connect the regulator hose assembly to the adapter as shown Use appropriate thread sealant on all connections 3 Connect the regulator hose assembly to a stan...

Page 16: ...not use the side burner until all connections have been checked and do not leak IMPORTANT NOTE ALWAYS CHECK FOR LEAKS AFTER EVERY LP CYLINDER CHANGE If a leak is present or if there is evidence of excessive abrasion or wear or the hose is cut it must be replaced before using the side burner The hose and LP regulator are supplied as a complete assembly and must be replaced together Do not attempt t...

Page 17: ...TMENT Each side burner is tested and adjusted at the factory prior to shipment The proper orifice for the gas type and the air fuel adjustment was made at this time However variations in the local gas supply the elevation where you live converting from one gas type to another and other factors might make it necessary to adjust the burner flames The flames of the burners should be visually checked ...

Page 18: ...t blade screwdriver into the small screw to the left of the valve stem to begin the adjustment see Fig 2 The screw only has 2 3 complete revolutions of adjustment After this the screw may continue to turn but is actually coming out of the valve and could result in a gas leak DO NOT turn more than 3 revolutions 5 Turn counter clockwise very slowly to INCREASE the low flame The flame will take a few...

Page 19: ...ighting instructions Note The flame sensing technology of the spark igniter will repeatedly spark clicking sound until a flame is established If you experience nuisance sparking during normal operation of the burner see the TROUBLESHOOTING section of this manual MATCH LIGHTING INSTRUCTIONS If a burner will not light after several attempts it can be lit with a match When attempting to light a burne...

Page 20: ...ribed above On no account should steel wool pads be used unless they are made of stainless steel 3 Harsh abrasives and metallic scouring materials should not be used for cleaning stainless steel as they will leave scratch marks in the surface and damage the appearance of the appliance Likewise do not use wire brushes scrapers or contaminated scouring pads 4 For those areas with a directional grain...

Page 21: ...urface 1 Carefully remove any loose deposits with a wet sponge 2 Use a soft brush non abrasive or cloth and a mild household detergent solution to remove dust salt and other deposits Never use any solvent based cleaners stainless steel cleaners heavy degreasers oven cleaners etc on the painted surfaces They can permanently damage the paint 3 Rinse off with clean fresh water CARE MAINTENANCE OF SID...

Page 22: ...han seawater They have also been tested by exposure to highly acidic foods During and after these tests we found these materials were able to withstand exposure over prolonged periods of time However the above mentioned corrosive substances along with neglect can lead to a situation whereby conditions might combine to cause some damage to occur Therefore we suggest that you always keep your grill ...

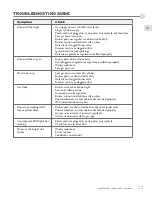
Page 23: ...as pressure Slow to heat up Low gas pressure or low LP cylinder Burner ports are obstructed or dirty Defective or clogged burner valve Incorrect orifice or clogged orifice Gas Odor Burner went out or did not light Loose or broken gas line Ruptured pressure regulator Burner cap not installed correctly on base Poor combustion air fuel mixture not adjusted properly Obstructed dirty burner ports Burne...

Page 24: ... 2018 Hestan Commercial Corporation 23 EN WIRING SCHEMATIC ELECTRICAL BOX SINGLE ...

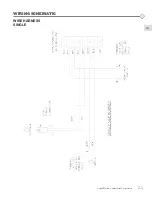
Page 25: ... 2018 Hestan Commercial Corporation 24 EN WIRING SCHEMATIC WIRE HARNESS SINGLE ...

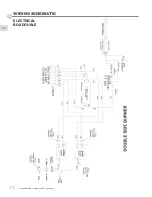
Page 26: ... 2018 Hestan Commercial Corporation 25 EN WIRING SCHEMATIC ELECTRICAL BOX DOUBLE ...

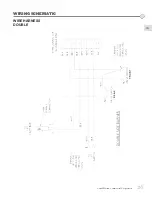
Page 27: ... 2018 Hestan Commercial Corporation 26 EN WIRING SCHEMATIC WIRE HARNESS DOUBLE ...

Page 28: ...s not extend to anyone beyond the original consumer purchaser Purchaser This Limited Warranty is valid only on Products purchased and received from an HCC authorized dealer in the fifty United States the District of Columbia and Canada This Limited Warranty applies only to Products in non commercial use and does not extend to Products used in commercial applications HOW TO OBTAIN WARRANTY SERVICE ...

Page 29: ...or a period of two 2 years from the original date of purchase This is limited to replacement of the defective parts with the Purchaser paying all other costs including labor shipping and handling as applicable WHAT THIS LIMITED WARRANTY DOES NOT COVER This Limited Warranty does not cover and HCC will not be responsible for and will not pay for damage to or defects in any Product not purchased from...

Page 30: ...LY BY THE NEGLIGENCE OF HCC THIS LIMITED WARRANTY STATES YOUR EXCLUSIVE REMEDY No oral or written representation or commitment given by anyone including but not limited to an employee representative or agent of HCC will create a warranty or in any way increase the scope of this express Limited One Year Warranty If there is any inconsistency between this Limited Warranty and any other agreement or ...

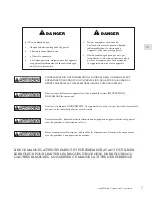
Page 31: ...les alimentations électriques de toute nature avant de procéder à une opération d entretien DANGER S il Y a une odeur de gaz 1 Coupez I admission de gaz de I appariel 2 2 Éteindre toute flamme nue 3 3 Ouvrir Ie couvercle 4 4 Si I odeur persiste éloiqnez vous de I appareil et appelez lmmédiatement Ie fournisseur de gaz ou Ie service d incendie DANGER 1 Ne pas entreposer ni utiliser de I essence ni ...

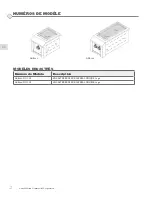
Page 32: ...estan Commercial Corporation 2 MODÈLES ENCASTRÉS Numéro de Modèle Description AEB121 NG LP ENCASTRÉ BRÛLEUR LATÉRAL UNIQUE 12 po AEB122 NG LP ENCASTRÉ BRÛLEUR LATÉRAL DOUBLE 12 po AEB121 AEB122 NUMÉROS DE MODÈLE ...

Page 33: ...r latéral sous un abri combustible non protégé Ne le faire que dans des endroits bien aérés Voir la section INSTALLATION de ce manuel 6 Ne pas utiliser le brûleur latéral si un contrôle d étanchéité n a pas été effectué sur tous les raccordements de gaz Voir la section RACCORDEMENTS DE GAZ de ce manuel 7 Si le brûleur latéral est installé par un installateur ou technicien professionnel ne pas oubl...

Page 34: ... on cuit Certains tissus synthétiques sont hautement inflammables Ne pas en porter quand on cuit 18 Ne jamais laisser des manicles des housses ni d autres matières inflammables toucher une grille de cuisson un brûleur ou une surface très chaude ni être à proximité de ces pièces tant que celles ci n ont pas refroidi suffisamment Les tissus peuvent prendre feu entraînant ainsi des blessures N utilis...

Page 35: ...ns le cadre de la garantie ou non doit être confié à un technicien qualifié et effectué par lui 28 Pour un allumage approprié et un bon rendement des brûleurs maintenir les orifices de combustion propres Il est nécessaire de les nettoyer régulièrement pour optimiser le rendement Les brûleurs ne fonctionnent que dans une seule position et doivent être montés correctement pour fonctionner en toute s...

Page 36: ...ue à des vices de matières ou de fabrication pendant la Période de garantie limitée La présente Garantie limitée n est pas transférable et n est offerte à personne d autre que l acheteur initial au détail Acheteur La présente garantie limitée n est valable que pour les Produits achetés chez et reçus d un revendeur agréé HCC dans tous les Etats Unis dans le District de Columbia et au Canada La prés...

Page 37: ... d utilisation non commerciale et de réparation pendant une période de deux 2 ans à compter de la date d achat initiale Cela se limite au remplacement des pièces défectueuses tous les autres frais y compris ceux de main d œuvre de transport et de manutention le cas échéant étant à la charge de l Acheteur ÉLÉMENTS NON COUVERTS PAR LA PRÉSENTE GARANTIE LIMITÉE La présente Garantie limitée ne couvre ...

Page 38: ...ENT PAR LA NÉGLIGENCE DE HCC LA PRÉSENTE GARANTIE LIMITÉE FORMULE VOTRE RECOURS EXCLUSIF Aucune déclaration ni aucun engagement verbal ou écrit de la part de qui que ce soit y compris sans s y limiter un employé représentant ou agent de HCC ne créera une garantie ni élargira en quoi que ce soit la portée de la présente Garantie limitée expresse d un an En cas de divergence entre la présente garant...

Page 39: ......

Page 40: ...ommercial Corporation 3375 E La Palma Ave Anaheim CA 92806 888 905 7463 RETAIN THIS MANUAL FOR FUTURE REFERENCE CONSERVEZ CE MANUEL POUR UNE RÉFÉRENCE FUTURE 2018 Hestan Commercial Corporation P N 015309 REV C ...

Reviews: