


If there are any questions please contact our HerzBlut customer service:
call +49 (0) 2393 9191-31 or e-mail at
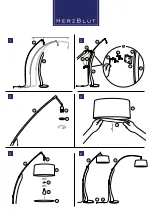
1. Take the individual luminaire parts out of
the packaging.
2. The lamp is adjustable in width.
Therefore, determine the projection
of the luminaire before installation.
The higher the metal lamp arm
A
is
mounted on the wooden lamp base
B
,
the further the lamp protrudes into the
room (fig. 1).
3. At the upper end of the lamp base
B
,
fix the lamp arm
A
in the desired
position with a clamping jaw
C
(fig. 2).
Use the enclosed screws
D
and the
allen key
E
. Note that the screws
D
must be fastened in the order 1, 2, 3, 4
according to fig. 2a. The screws
D
are
not completely countersunk immediately,
always crosswise one by one.
Position the other clamping jaw
C
in
the middle of the lamp base
B
and
proceed in the same way.
4. Screw the socket screw ring
F
from the
socket
G
(fig. 3).
5. Take the cover
I
out of the shade
H
(fig. 4).
6. Place the shade
H
on the threat of the
socket
G
(fig. 5).
7. Screw the socket screw ring
F
back
onto the threat of the socket
G
(fig. 5).
8. Screw the bulb
K
into the socket
G
(fig. 5). The bulb not included in the
scope of delivery.
9. Finally, put the cover
I
back into the
shade
H
.
10. Depending on how the lamp arm is
installed, the lamp protrudes more or
less into the room (fig. 6).
11. Put the plug
L
into the wall socket.
To switch the lamp on and off use the
foot switch
N
.
Instruction and installation manual