background image

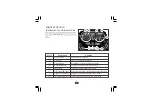
  (3) 

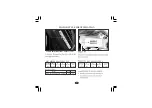
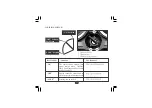
Gear shifting  

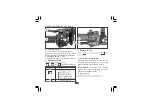
Maximum operating speed in each gear.

  (4) 

Neutral indicator 

Light glows when vehicle is in neutral

  (5) 

Fuel gauge 

Indicates approximate fuel quantity

  (6) 

Side stand indicator 

Light glows when the vehicle is parked on the side stand

  (7) 

High beam indicator 

Light glows when headlamp is in Hi Beam

  (8) 

Turn signal indicator  Flashes when turn signal switch is operated

Sl. No. 

      Description 

                            Function

  (2) 

Odometer 

Shows accumulated mileage

  (1) 

Speedometer 

Indicates driving speed 

3

5

8

4

headlamp.

6

7

2

1

PARTS FUNCTION

INSTRUMENTS AND INDICATORS

Summary of Contents for SPLENDOR PRO

Page 1: ... are also using non asbestos brake shoes and engine gasketswhichareenvironmentfriendlyinnature Letus make thisworldasafer healthierandmore environment friendly place Thank you for selecting a Hero MotoCorp Splendor Pro We wish you many miles of continued riding pleasureintheyearsahead This booklet is your guide to the basic operation and maintenance of your new Hero MotoCorp Splendor Pro Please ta...

Page 2: ...TIME OF ITS PRINTING APPROVAL AND THE ACCURACY OR CORRECTNESS OF THE SAME IS NOT UNDERTAKEN OR GUARANTEED Hero MotoCorp Limited RESERVES THE RIGHT TO MAKE CHANGES IN ITS CONTENTS AT ANY TIME WITHOUT NOTICE AND OR INCURRINGANYOBLIGATION WHATSOEVER NO ONE ISALLOWED TO REPRODUCE ANY PART OF THIS PUBLICATION WITHOUT OBTAINING PRIORWRITTENPERMISSION FROM Hero MotoCorp Limited NOTE ...

Page 3: ...TALYTIC CONVERTER 45 STOP LAMP SWITCH 47 HEADLAMP ADJUSTMENT 46 SIDE STAND ACCESSORIES AND MODIFICATIONS 7 STEERING LOCK 13 CLUTCH SWITCH 13 STARTER SWITCH 13 SIDE STAND INDICATOR SIDE STAND SWITCH 14 HELMET LOCK 14 ANTI THEFT TIPS 25 24 BRAKING PARKING SAFETY PRECAUTIONS 27 42 BRAKE WEAR INDICATORS 45 FUSE REPLACEMENT MAINTENANCE SCHEDULE ...

Page 4: ... XXXXA9 Vehicle Description Y Year of Mfg Z Assembly Plant X Month of Mfg YYYYY Serial Number M B L X X X X A 9 Y Z X Y Y Y Y Y XXXXEL Engine Description Y Year of Mfg Z Assembly Plant X Month of Mfg YYYYY Serial Number XXXXELYZXYYYYY XXXXELY ZXYYYYY MOTORCYCLE IDENTIFICATION Vehicle Identification Number VIN VIN VIN ...

Page 5: ...85 mm Saddle Height 0 95 litre at disassembly 0 75 litre at draining 9 0 1 0 6 0 7 mm IN 0 10 mm EX 0 10 mm 5 74 kW 7 8 Ps 7500 r min NGK CR7HSA BOSCH UR4AC Champion P RZ9HC Federal Mogul 97 2 cc 163 ml ITEM SPECIFICATIONS DIMENSIONS WEIGHT CAPACITIES ENGINE PRODUCT SPECIFICATION r min ...

Page 6: ...l Cast Wheel Trail length 80 mm Front Wheel Position lamp Side Stand Indicator MF Battery MF 4 12V 3 Ah 10 A 15 A 12V 35 35W Halogen Bulb MFR Electric start 12V 5 10W MFR 12V 3 0W 12V 1 7W Amber bulb with clear lens MFR 120 W Multi Focal Reflector Maintenance Free Head lamp High Low Tail Stop lamp Turn signal lamps 12V 3 0W x 2 Front Brake Rear Brake Drum Type Dia 130 mm 110 mm ITEM SPECIFICATIONS...

Page 7: ... of loose hanging clothes whilesolo pillionriding 11 Getyourmotorcycleservicedregularlyby theAuthorised Hero MotoCorp workshop 1 Always conduct simple pre ride inspections ref pageno21 8 Give way to others on the road and sig nalbeforeyoumakeaturn Do s 2 Always wear a helmet ISI marked with chinstrap securely fastened and insiston ahelmetfor your pillionrider 4 Ride defensively and at a steady spe...

Page 8: ... does not obscure any lamps reduce ground clearance limit suspension travel or steering travel affect your riding position or interfere with operating any controls Do not pull a trailer or sidecar with your motorcycle This motorcycle was not designed for these attachments and their use can seriously impair your motorcycle shandling We strongly advise you not to remove any original equipment or mod...

Page 9: ...hy you Genuine Spares Always insist on Hero MotoCorp genuine parts as spurious or incompatible spares and accessories can upset or deteriorate your motorcycle s runningcondition fuel efficiency Noise Pollution Noise beyond a certain decibel is pollution Whether it is from horns ordefectivemufflers excessivenoisewillcauseheadachesanddiscomfort Emission Pollution Get emission of your motorcycle chec...

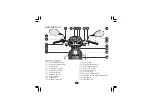
Page 10: ...l switch 5 Headlamp switch 10 Neutral indicator 9 Odometer 15 Front brake lever 13 Side stand indicator 17 Electric starter switch 16 Throttle grip 18 Ignition switch with steering lock 12 High beam indicator 14 Rear view mirror 11 Fuel gauge 19 Leg guard 20 Fuel tank lid 7 17 18 3 2 1 4 8 13 14 20 DESCRIPTION 5 6 9 10 11 15 16 ...

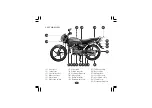
Page 11: ...tch 7 Side stand 9 Women pillion step 8 Pillion foot rest 10 Saree guard 11 Reflex reflector 12 Rear number plate 14 Rear carrier 13 Tail Stop lamp 15 Helmet lock 16 Left side cover 17 Air suction valve 18 Clutch lever 19 Front number plate 3 6 7 8 9 11 12 13 15 16 17 19 LEFT SIDE VIEW 4 5 10 1 18 ...

Page 12: ...rake pedal 3 Rider foot rest 4 Oil level dipstick 10 Starter motor 8 Headlamp 7 Front suspension 9 Front visor 6 Utility box 11 Batterycompartment inside 13 Rearturnsignallamp 14 Rear suspension 12 Seat 15 Exhaust muffler 5 4 6 7 11 12 14 13 3 10 8 9 15 ...

Page 13: ...6 Sidestandindicator Lightglowswhenthevehicleisparkedonthesidestand 7 Highbeamindicator Lightglows whenheadlampisinHiBeam 8 Turnsignalindicator Flashes whenturnsignalswitchisoperated Sl No Description Function 2 Odometer Shows accumulatedmileage 1 Speedometer Indicatesdrivingspeed 3 5 8 4 headlamp 6 7 2 1 PARTS FUNCTION INSTRUMENTS AND INDICATORS ...

Page 14: ... signal lamps Horn Tail Stop lamp Fuel Gauge and Pass Lamp willbefunctional Steering can be locked LOCK 3 1 2 Engine cannot be started and no electricalsystemwillbefunctional OFF Position Lock Open LOCK Position ON Position IGNITION SWITCH ...

Page 15: ...ch knobis pressed inthefollowingcondition 2 Headlampswitchis ON butonlowbeam 1 Headlampswitchis OFF LEFT HANDLEBAR CONTROLS P AS I N G S IMPORTANT To switch OFF the turn signal lamp after completing the turn gentlypush theknobinside Headlamp switch Dimmer switch Tail Stop lamp Passing switch Head lamp ON Turn signal lamp switch Fuel gauge lamp Speedometer lamp 3 4 5 ...

Page 16: ...agedingear STARTER SWITCH Ensure starter switch 1 is operated when the vehicle is in neutral gear If the vehicle is engaged in gear press the clutch lever before operating the starter switch Release starterswitchaftertheenginehasstarted CLUTCH SWITCH 2 Ignition key 1 1 Electric starter switch 2 13 Steering lock with Ignition switch put the key 2 to OFF position turn the handle bar towards left or ...

Page 17: ...and when the vehicle is parked on side stand Ignition Switch ON the switch enables the side stand indicator lamptoglowonthespeedometerpanel SIDE STAND INDICATOR For the safety of the customer a side stand indicator 1 is provided When the vehicle is parked on side stand Ignition Switch ON an indicator lamp glows inthespeedometerpanel 2 Side stand switch 1 Side stand indicator 2 14 1 ...

Page 18: ...ble after switching to RES The reservefuelsupply is1 4litres usable 3 2 1 15 At OFF fuel cannot flow from the tank to the carburetor Turn the valve OFF whenever the motorcycle is not in use The three way fuel valve is on the left side of the carburetor OFF FUELVALVE ON At ON fuel will flow from fuel tank to thecarburetor 1 OFF Position 2 ON Position 3 RES Position ...

Page 19: ... insert the ignition key 2 turn it anti clockwise and lift the lid 3 as shown in thepicture 2 Remove the cap by turning it anti clockwise 1 2 3 Do not operate the motorcycle with the fuel valve in the RES position after refilling You may run out of fuel with noreserve Do not keep the fuel valve between ON and OFF position while riding since this may drain reserve fuel fromtheTank 5 Petrol is extre...

Page 20: ...ore operating the motorcycle The oil level dipstick 1 is on the right crankcase cover for measuring oil level Oil level must be maintained between the upper 2 and lower 3 level marks on the oilleveldipstick Do top up if oil level reaches towards the lower level mark or every 3000 kms whichever is earlier 1 Oilleveldipstick 2 Upperlevelmark 3 Lowerlevelmark 1 BRAND Hero4Tplus GRADE SAE 10W30SLGrade...

Page 21: ...e motorcycle parked on its main stand on level ground and that there are no oil leaks Fill the crankcase through the filler hole with approximately 0 75 litre of therecommendedgradeoil 1 2 2 Sealingwasher After the oil has completely drained reinstall the drain plug with a new sealingwasher 2 Reinstall the oil level dipstick Stop the engine and let the engine oil settledown Recheck the oil level 7...

Page 22: ...2 75 19 48P The recommended Cold tyre pressures are Over inflation under inflation will affect theperformance 2 1 75 kgf cm 25 psi 2 2 00 kgf cm 28 psi 2 1 75 kgf cm 25 psi 2 2 50 kgf cm 36 psi TYRES 1 ...

Page 23: ...20 Also if you hit a pothole or hard object pull to the side of the road as soon as you safely can and carefully inspect the tyres for damage Check the tread wear indicator for tyre wear ...

Page 24: ... sure that all tubeconnectionsaresecuredproperly 17 16 19 20 Lamps and Horn check that headlamp tail stop lamp turn signal lampsandhorn functionproperly 13 Side Stand Indicator make sure that the side stand is up If it is in down position the side stand indicator page 14 will glow on the speedometer panel PRE RIDE INSPECTION ...

Page 25: ...forward or backward This may lead to damagetotheproductandisnotsafeaswell To start the engine in any gear position using the electric starter press the clutch lever and push thestarterswitch Kick starting will not be possible when the transmission gears are engaged Shift the transmissionintoneutralbeforekickstarting Never run the engine in a closed area the exhaust contains poisonous gases STARTIN...

Page 26: ...23 0 20 km hr 15 30 km hr 20 40 km hr 30 km hr and above Recommended Shifting Speed 1 2 3 4 N st 1 nd 2 rd 3 th 4 st 1 nd 2 rd 3 th 4 RIDING ...

Page 27: ... on loose surfaces the ability to stop themotorcyclereduces Independent use of only the front or rearbrakeincreasesstoppingdistance When descending a long steep slope use engine braking power by changing to lowergears withintermittentuseofboth brakes Continuous brake application can overheat the brakes and reduce their effectiveness All your actions should be smooth under these conditions sudden a...

Page 28: ...ss and phone number in this Owner s Manual and keepitinyourmotorcycleatalltimes Many times stolen motorcycles are identified by information in the Owner s Manuals that are still with them NAME _________________________ ADDRESS ______________________ ________________________________ PHONE NO _____________________ To open insert the key 1 rotate it clockwise pull the cover 2 and slide it sidewaystod...

Page 29: ...ID KIT The first aid kit 2 is stored in the utility box Some emergency first aid can be performedbymedicinecontainedinthekit 1 AnticepticCream 1No 2 SterilisedDressing 1No Kitcontainsthefollowingitems 4 ElasticBandage 1No 5 Gauze RolledBandage 1No 6 SterilisedElasticPlaster 1No 7 FirstAidBag 1No Pinspanner 1No Toolbag 1No Grip 1No Boxwrench16x14 1No No 2Driver 1No 2 1 Tool kit 2 First aid kit 1 ...

Page 30: ...st and is fully equipped to maintain and repairit Injury frommovingparts SAFETY PRECAUTIONS Let the engine and exhaust system coolbeforetouching Read the instruction before you begin and make sure you have the tools and skillsrequired To help prevent the motorcycle from falling over park it on a firm level surfaceonthemainstand Carbon monoxide poisoning from engineexhaust Make sure the engine is O...

Page 31: ...t 100 Next 100 Next 100 3000 6000 9000 12000 15000 I C L A at every 2000 kms I C L A at every 2000 kms We would strongly recommend the following schedule to keep your motorcycle in perfect running condition and healthy environment Motorcycle subjected to severe use or ridden in dustyareawillrequiremorefrequentservicing DearCustomer MAINTENANCE MAINTENANCE SCHEDULE ...

Page 32: ...rised Hero MotoCorp workshop for inspection cleaning lubrication and adjustmentofdrivechainatevery2000 kms More frequentcleaningmayberequiredwhen ridingindustyareas Inspect maintainspecifiedtorque NOTE Always wipe the water from the motorcycle after washing Use clean soft cloth or pressurised airfor completelydryingthewater 1st 60 Next 100 3000 3500 6000 6500 9000 9500 12000 12500 15000 15500 Next...

Page 33: ...t kerosene 2 4 1 1 K i c k S t a r t e r P e d a l 2 ClutchCable 3 Muffler 4 Rider foot rest 5 Right crankcase cover 7 Centrifugal filter cover 8 Centrifugal filter 6 Oilfilterscreen 3 5 Reinstall the centrifugal filter cover right crankcase cover kick starter pedal riderfootrestandmuffler Fill the crankcase with clean engine oil asperspecification Remove centrifugal filter cover 7 clean centrifug...

Page 34: ...park plugs NGK CR7HSA BOSCH UR4AC Champion P RZ9HC Federal Mogul number consult Authorised Hero MotoCorp workshop onthisifrequired spark plug wrench provided in the tool bag Cleananydirtaroundthesparkplugbase SPARK PLUG ...

Page 35: ...e air cleaner cover screws 5 andthecover 6 Press the mounting clamp 8 to release the air cleaner assembly from the housing and remove the air cleaner assembly 7 AIR CLEANER The air cleaner element is of Dry Paper Pleatedtypeit should be servicedatregular intervals page 28 When riding in dusty areas more frequent service may be necessary 7 8 2 3 Lug 4 Directionindicator 1 Sidecoverlock 2 Sidecover ...

Page 36: ...inlet air duct press gently to fix the mounting clamp in housing Ensure cover lug should take proper seat on the othersideofthemountingclamp 9 Air cleaner element 10 Element holder 11 Air nozzle Nowblowthedustfromthesurfaceofthe paperelementabout50mmawayfromit O with the air nozzle 11 at an angle of 45 andmovingitalongthepaperpleats Never wash the air cleaner element Only blow air for cleaning the...

Page 37: ...34 1 Slide the grommet 2 loosen the lock nut 3 andturntheadjuster 4 4 Adjuster 3 Locknut 2 Grommet A B 28 2 3 4 1 Freeplay2 6mm THROTTLE OPERATION VALVE CLEARANCE ...

Page 38: ...he T mark 3 on the flywheel coincides with the index mark 4 on the left crankcase cover In this position the piston will either be on the compression or exhauststroke If they are tight the valves are open O rotate the flywheel 360 anticlockwise and re align the T mark with the index mark This condition can be determined by moving the rocker arms If they are free it is an indication that the valves...

Page 39: ...rottleControlledIgnitionSystem TCIS Throttle position sensor switch 3 alters the ignition timing as per the throttle operation andensuresoptimumdrivingperformance 2 3 If air screw is tampered it affects the overall performancecharacteristicsofthevehicle Hero MotoCorpworkshop a slight drag on the feeler gauge After tightening the lock nut check again the clearance CARBURETOR park r min ...

Page 40: ...tained or the clutch does not work correctly visit your Authorized Hero MotoCorp workshop 3 4 2 To adjust the free play loosen the lock nut 3 Turn the adjusting nut 4 to obtain the specified free play Tighten thelocknutandchecktheadjustment 1 Free play 10 20 mm 2 Clutch lever adjusting nut ...

Page 41: ... chain to view chain lock plate 4 inside the hole Ensure that the chain lock plate open end 5 is installed in the opposite direction of the chainrotation 5 4 1 2 21 4 Chain lock plate 5 Open end 1 Drive chain 2 Hole cap 3 Drive chain slack 25 mm CHAIN park ...

Page 42: ...ex mark 5 with the corresponding scale graduations 6 on both the sides of the swing armequally If the drive chain slack is excessive when the rear axle is moved to the farthest limit of adjustment the drive chainisworn andmustbereplaced Tightentherearaxlenutandsleevenut Rearaxlenuttorque 5 4kgf m drive chain slack is obtained Turn the adjusting nut clockwise to decrease the slack or anticlockwise ...

Page 43: ...Hero MotoCorp workshop for inspection cleaning lubrication and adjustmentofdrivechainatevery2000kms NOTE Parkthemotorcycleonitsmainstand 3 2 2 Free play 10 20 mm Make sure that cut out on the adjusting nut is seated on the brake joint pin 4 after makingfinalfreeplayadjustment Rear brake pedal free play and stop lamp switch free play are affected when repositioning the rear wheel to adjust drive ch...

Page 44: ...be obtained by this method visit your Authorized Hero MotoCorp workshop 3 4 CUT OUT NOT SEATED 3 Adjusting nut 4 Brake joint pin 3 4 CUT OUT SEATED A Decrease freeplay Clockwise B Increase freeplay Anti Clockwise 3 Adjusting nut 4 Brake joint pin Park 2 Make sure that the cut out on the adjusting nut is seated on the brake joint pin 4 after thefinaladjustmenthasbeenmade 1 1 Rear brake pedal 2 Free...

Page 45: ...42 If proper adjustment cannot be obtained by this method visit your Authorised Hero MotoCorp workshop A B 3 4 4 Brake joint pin Front Brake Wear Indication ...

Page 46: ...your battery seems weak and or electrolyte is leaking causing hard starting or other electrical troubles contact your AuthorisedHeroMotoCorpworkshop 2 3 5 4 1 The battery 1 is located behind the right sidecover Specification MF Battery MF 4 12V 3 Ah MFstands forMaintenanceFree This symbol on the battery means that this product must not be treated as household waste NOTE Rear Brake Wear Indication ...

Page 47: ... to the battery terminals during installation Batteryremoval Batterystorage 1 Makesure theignitionswitchis OFF 1 If in case your motorcycle is not used for more then a month remove the battery fully charge and store in a cool and dry place possible to get the battery charged The battery has a tendency to discharge rapidly if optional electrical accessories are fitted onthemotorcycle 2 If the batte...

Page 48: ...ion Mounted on the clampnearbattery 4 Never use a fuse with a different rating from that specified It may lead to serious damage to the electrical system orafireduetoshortcircuit Battery gives off explosive gases Keep sparks flames cigarettesaway Do not attempt to start or ride the motorcycle without a charged battery it cancausefusingofthebulbsandpermanent damagetocertainelectricalcomponents Turn...

Page 49: ... the side stand assembly forfreemovement 1 Side stand spring 2 Check whether the side stand indicator 2 glows when vehicle is parked on sidestand 3 While the vehicle is removed from side stand the side stand indicator 2 shouldnotglow 4 If the side stand indicator 2 does not operate as described in steps 2 or 3 please visit your Authorised Hero MotoCorpworkshop 1 Ensure that adequate care should be...

Page 50: ...p adjustment is done by the headlamp adjusting screw 1 located belowheadlamp 1 there Checktherearshockabsorberbypushing harddownwardsonrearcarrierwhilethe motorcycle is not parked on stand The suspension action should be smooth and thereshouldbenooilleakage HEADLAMPADJUSTMENT Headlamp is factory pre set However in case of adjustment required please follow thestepsasgivenbelow headlamp 1 Adjusting ...

Page 51: ...stment tool Pin Spanner 1 availableinthetoolkit 1 Pin spanner A B 1 3 Disconnect the brake cable 3 from brake arm 4 and brake panel 5 by removing the front brake adjusting nut 6 5 Remove the axle and then remove the wheel 1 Raisethefrontwheelofftheground 2 Remove the speedometer cable 1 by pressing tab 2 pullingcableout 4 Removetheaxlenut 7 7 Axle nut 4 Brakearm 1 Speedometercable 5 Brake panel 6 ...

Page 52: ...ut theaxle 9 Removethewheel Adjust the brake page 41 42 and drivechain page38 to40 Brake stopper arm nut torque 2 2 kgf m Axle nut torque 5 4 kgf m brake pedal Disconnect the brake stopper arm 4 from the brake panel 5 byremovingsplitpin 6 andnut 7 Lock nut Brake stopper arm ...

Page 53: ...ter or air It can damage certain parts of motorcycle headlamp WASHING THE MOTORCYCLE in the exhaust to CO and H O water vapour 2 2 Our authorised dealership take all above mentioned precautions like recommended detergentsandusageofmufflercaps plugs duringwashtoensurequalityofwash ...

Page 54: ...is provided with the air suction valve Air Suction Valve 1 supplies fresh air from the air filter to the exhaust manifold to convert carbon monoxide to carbon dioxide This reduces the CO in the vehicle sexhaust AIR SUCTIONVALVE 1 AirSuctionValve 1 ...

Page 55: ...itch OK Fuse Weak Loose Replace Fuse ref page 45 Secure connections Consult Authorised Hero MotoCorp Workshop Consult Authorised Hero MotoCorp Workshop Consult Authorised Hero MotoCorp Workshop Check fuel valve position BASIC TROUBLESHOOTING Fuel System Electric Starter Not Working ...

Page 56: ...53 Check Air Cleaner Consult Authorised Hero MotoCorp Workshop Consult Authorised Hero MotoCorp Workshop Replace Spark Plug Adjust Spark Plug Gap 0 6 0 7 mm No Spark At Spark Plug ...

Page 57: ...54 Check Air Cleaner Consult Authorised Hero MotoCorp Workshop 4 Consult Authorised Hero MotoCorp Workshop Consult Authorised Hero MotoCorp Workshop ...

Page 58: ...55 ROAD SIGNS ...

Page 59: ...56 ...

Page 60: ...s only obligation liability is problem to repair or replace that part those parts which is are considered to be the cause of such problem provided however that such has not resulted due to misuse improper handling etc of problem the vehicle Any Splendor Pro vehicle needing repair should be brought along with owner s manual to Hero MotoCorp s authorized workshop for necessary inspection and carryin...

Page 61: ...f improper oil grease non genuine parts 10 If any maintenance repairs required due to bad road conditions or misuse of vehicle Splendor Pro 15 To proprietary items like Tyres Tubes Batteries etc as they are subjected to the warranty terms conditions of respective manufacturers and directly handled by them only Decision regarding warranty settlement shall be taken by Hero MotoCorp and the same shal...

Page 62: ...m the date of sale of the original battery as stated in the original warranty card 1 0 In case of tempering of the original wiring circuit in any manner whatsoever 11 If a battery which is not recommended is fitted on the vehicle then such battery will not carry any warranty 6 Recharging is not covered under the purview of this warranty and shall be billed as extra However FOC battery replacement ...

Page 63: ...e being regularly maintained at Hero MotoCorp Authorised Dealers Service Points in accordance with the maintenance schedule provided in the owner s manual Terms conditions a The emission warranty shall be applicable in India and shall remain valid for a period of 3 years or 30000 kms whichever occurs earlier from the date of vehicle purchase EMISSION WARRANTY b In case any defect is observed in an...

Page 64: ...WHAT ARE THE BENEFITS OF HERO MOTOCORP GENUINE SPARE PARTS 4Assures long life 4Value for money 4Ensures economy for a long time 4Peace of mind 4Safety of vehicle and rider 4Assured quality ...

Page 65: ... inferior 4Damages other parts of clutch like clutch center and outerclutch 4Affects fuel efficiency 4Poor acceleration 4Poor performance 4Improper sealing 4Engine knocking 4Leads to leakage and smoky exhaust 4Higher emission level 4Reduced life Cam Chain Kit Gasket Cylinder Head ...

Page 66: ...performance 4Affects fuel efficiency 4Discs Drum wearout resultinginsubsequent repaircost 4Noisy Operation 4Failure of chain can cause fatal accident 4Affects fuel efficiency 4Poor engine performance 4Frequent stalling of engine 4Rider safety an issue 4Higher emission level 4Poor braking effeciency Chain Sprocket Kit Brake Pads Shoes Spark Plug ...

Page 67: ... 2623774 2623775 E mail chandigarh heromotocorp com HeroMotoCorpLtd S C O 367 368 FirstFloor Sector 34A Chandigarh 160022 India HeroMotoCorpLtd KapoorTowers PlotNo 284 15 B RajpurRoad Dehradun 248001 India Tel 0135 2714661 2713662 2714663 E mail dehradun heromotocorp com NORTH ZONE Tel 911412389031 911412389156 E mail jaipur heromotocorp com HeroMotoCorpLtd No 209 210 GanpatiPlaza M I Road Jaipur ...

Page 68: ...NH 5 Vijayawada 520008 AndhraPradesh India Tel 91 866 2546859 2546860 E mail vijayawada heromotocorp com HeroMotoCorpLtd 3 6 289 3rdFloor KareemManzil Hyderguda Hyderabad 500029 India Tel 91 40 23223735 23223727 23223570 E mail hyderabad heromotocorp com SOUTH ZONE HeroMotoCorpLtd 9thFloorSeshachalamCentreNo 636 1 AnnaSalai Nandanam Chennai 600035 India Tel 91 44 24340974 24340977 24340978 E mail ...

Reviews: