background image


17 

Contacte con su proveedor para reemplazar el cristal, con las instrucciones y piezas 

necesarias para la reparación. 

Si reemplaza el cristal Vd. mismo, use guantes de trabajo y gafas de seguridad. 

El  procedimiento para el cambio de cristales y juntas de cristal es el siguiente:  

1.  Abra la puerta y tire de ella hacia arriba  y sáquela de la estufa, dejando los 

bulones de giro en el frente. (Tenga cuidado de guardar los bulones y las 
arandelas para volver a colocar la puerta).  

2.  Situé la puerta bocabajo horizontal sobre una superficie lisa. 

3.  Aplique aceite penetrante en los tornillos de las grapas del cristal. Saque los 

tornillos y levante las grapas y las fibras cerámicas que existen bajo ellas. 

4.  Levante cuidadosamente el cristal dañado de la puerta y arrójelo a la basura. 

5.  Si lo considera necesario sustituya el cordón de fibra cerámica. Arránquelo de su 

posición y limpie bien los restos del mismo. Aplique el cemento especial para 
juntas, y coloque el nuevo cordón de fibra cerámica con las dimensiones 
detalladas anteriormente. 

6.  Situé el cristal sobre la junta en su posición en la puerta. 

7.  Atornille de nuevo las grapas  de retención del cristal colocando bajo ellas las 

correspondientes fibras cerámicas. 

8.  Vuelva a instalar la puerta en su posición. 


D.- RECOGIDA Y ELIMINACIÓN DE CENIZAS.  

Las  cenizas  serán  recogidas  cuando  la  estufa  este  fría.  Use  un  guante  protector 

cuando  el  cenicero  esté  caliente.  Extreme  precauciones  cuando  maneje,  almacene  o  tire 
las cenizas. 

Para sacar las cenizas del hogar proceda de la siguiente manera: 

1.  Tamice  las  cenizas  a  través  de  la  parrilla  con  una  rasqueta  u  otro  instrumento 

adecuado. 

2.  Abra el compartimiento de cenizas,  como se explicó anteriormente,  y deslice el 

cenicero con cuidado hacia el exterior. 

3.  Vacíe las cenizas. Las cenizas deben ser arrojadas desde el cenicero hasta un 

recipiente metálico con una tapa hermética adecuada. No introduzca ningún otro 
objeto  o basura  en  el interior  del  recipiente  .  Sitúe  la  tapa  sobre  el  recipiente  y 
deje  que  las  cenizas  se  enfríen.  No  sitúe  el  recipiente  sobre    superficies 
combustibles o suelos de vinilo, pues el recipiente puede estar 

muy caliente

.  

4.  Mientras se deshace de las cenizas, sitúe cerrado el recipiente de cenizas en un 

suelo no combustible o sobre el terreno en el exterior de la vivienda, alejado de 
todo material combustible.  

5.  Si fuese necesario limpie el alojamiento del cenicero. 

6.  Reinserte el cenicero empujándole hasta el fondo en su posición. Asegúrese de 

que el cenicero está bien colocado en su sitio.  

De otra forma, las cenizas pueden ser eliminadas  con una pala a través de la puerta 

lateral o frontal.  

Las cenizas deben mantenerse en el recipiente cerrado hasta que todas las brasas 

estén completamente frías.  

NUNCA

  deben  situarse  las  cenizas  en  recipientes  de  madera  o  de  plástico,  o  en 

bolsas de papel o plástico, no importa en tiempo que hace que el fuego se ha apagado. Las 
brasas en el interior del lecho de cenizas mantienen calor durante mucho tiempo una vez 
eliminadas del hogar. 

Summary of Contents for SHELBURNE

Page 1: ...MANTENIMIENTO Y USO INSTRUCTIONS BOOK FOR INSTALLATION MAINTENANCE AND USE MANUEL D INSTRUCTIONS D INSTALLATION DE MAINTENANCE ET DE SERVICE INSTALLATIONS WARTUNGS UND BEDIENUNGSANWEISUNGEN LIVRO DE INSTRUÇÕES PARA A INSTALAÇÃO MANUTENÇÃO E USO ISTRUZIONI PER L INSTALLAZIONE L USO E LA MANUTENZIONE Fecha de edición 10 03 2011 CODIGO C00054 ...

Page 2: ...2 ...

Page 3: ...ÑA SHELBURNE Todas sus piezas están construidas en hierro fundido que garantizan una larga vida de servicio Tenemos la seguridad de que su nueva estufa habrá de proporcionarle múltiples satisfacciones que son el mayor aliciente de nuestro equipo Poseer una Estufa Hergóm es la manifestación de un sentido de calidad excepcional Por favor lea el manual en su totalidad Su propósito es familiarizarle c...

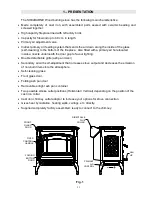
Page 4: ... desmontable Agitador de cenizas Aire secundario con autorregulación que aumenta el rendimiento de la estufa y disminuye la emisión de inquemados a la atmósfera Autolimpieza de cristal Puerta frontal con cristal Frontal de cenicero abatible Recipiente de cenicero estanco extraíble Dos posiciones posibles de la salida de humos Horizontal Vertical dependiendo en que posición se sitúe el collarín de ...

Page 5: ... del combustible empleado Con los años de uso Vd podrá cambiar la clase de combustible pero la chimenea una vez que está instalada en un sitio determinado no es tan fácil de modificar o cambiar de lugar Por lo cual la información siguiente le ayudará a decidir si puede usar la chimenea existente o no o si decide construir una nueva Esta información le ayudará a tomar una decisión correcta 1 Cómo f...

Page 6: ...venir el momento en el que se debe limpiar la chimenea La inspección visual es la manera más segura de cerciorarse si la chimenea de su estufa está limpia Por eso recomendamos que se realicen instalaciones en las que sea fácil el acceso a las mismas 3 Opciones Si va a construir una chimenea para su estufa HERGÓM tiene dos alternativas a Chimeneas de albañilería b Chimeneas de metal Los Estudios re...

Page 7: ...ecto de la horizontal lo que le permite a Vd escoger la dirección más adecuada horizontal o vertical sin más que girar el collarín de hierro fundido 180º Fig 5 Para conectar la chimenea a la estufa abocar interiormente el tubo según la figura adjunta ajustándolo a su forma cónica y sellando la unión con masilla refractaria para asegurar su estanqueidad También y dependiendo de sus preferencias pue...

Page 8: ... un trazado lo más vertical posible No conectar varios aparatos a la misma chimenea Fig 6 c Evitar que el conducto desemboque en zonas cercanas a construcciones debiendo sobrepasar en altura la cumbre más próxima si existe edificio colindante Fig 7 d Las paredes internas deben ser perfectamente lisas y libres de obstáculos En las uniones de tubos con chimeneas de obra evitar los estrangulamientos ...

Page 9: ...ig 9 f Para comprobar la estanqueidad de la chimenea se recomienda tapar la salida en el tejado e introducir papeles con paja húmeda por la parte inferior de la chimenea Fig 10 g Es muy importante que la chimenea sobrepase un metro la parte más alta de la casa Si se necesita aumentar el tiro se deberá elevar la altura de la chimenea Fig 11 ...

Page 10: ...forman la chimenea en el caso de tubos metálicos sencillos deben ser sellados con masilla refractaria Cada tubo debe encajar con el siguiente de forma que se evite que la creosota que pueda formarse salga al exterior k Las chimeneas exteriores metálicas deberán construirse con tubos dobles calorifugados especiales para combustibles sólidos ...

Page 11: ... aire primario permite regular la cantidad de aire que entra en el hogar de la estufa Tire del mando hacia el frente de la estufa para abrir la entrada de aire primario Empuje el mando hacia la trasera de la estufa para cerrar la entrada de aire primario 3 AUTO REGULACIÓN DEL AIRE SECUNDARIO La aportación de aire secundario se realiza a través de los tubos del deflector y se reparte proporcionalme...

Page 12: ... un alto grado de humedad Por consiguiente la leña verde enciende con dificultad y debe ser almacenada durante un año para poder usarla en su estufa Para la buena preparación de la madera verde se deberá partir y apilar de forma que permita el contacto con el aire seco durante un año Almacene la leña sobre tablas o bloques para mantenerla alejada del terreno y cubrir sólo la parte superior de la p...

Page 13: ...antenga la puerta cerrada mientras la estufa esté en funcionamiento Asegúrese que el cenicero está bien colocado e MANTENGA TODO EL TIEMPO LA VISTA SOBRE SU ESTUFA para mantener un fuego lento El primer fuego deberá calentar la estufa pero no debe quemar cuando se toque Como mucho algunos trozos de madera deberán añadirse al fuego para conseguir una temperatura adecuada en el primer encendido f Un...

Page 14: ... de humos cuando abra la puerta de la estufa completamente y no salgan a la estancia Así mismo recargar sobre un lecho de brasas calientes y rojas reduce el humo y cogerá con carga fresca altas temperaturas rápidamente 3 RANGOS DE COMBUSTIÓN COMBUSTION ALTA Cargar completamente el hogar con leña sobre el lecho de brasas calientes y rojas o sobre las llamas y abrir completamente el control de aire ...

Page 15: ...reosota 1 Mantener la estufa con el control de aire primario abierto completamente durante 30 minutos diariamente para quemar la creosota depositada en el interior de la estufa y del sistema de evacuación 2 Después de recargar leña mantenga la combustión con el control de aire primario abierto completamente durante 20 o 30 minutos Esta manera de operar asegura de antemano el funcionamiento de la c...

Page 16: ...cristal de la puerta roto No someta la puerta frontal a golpes ni portazos Si lo estima necesario puede limpiar el cristal de la puerta con un limpiador de cristales Hergóm el cual le suministrará su proveedor Nunca intente limpiar el cristal cuando la estufa esté funcionando o el cristal esté caliente La mayoría de las partículas depositadas pueden limpiarse siguiendo las instrucciones de manejo ...

Page 17: ...té caliente Extreme precauciones cuando maneje almacene o tire las cenizas Para sacar las cenizas del hogar proceda de la siguiente manera 1 Tamice las cenizas a través de la parrilla con una rasqueta u otro instrumento adecuado 2 Abra el compartimiento de cenizas como se explicó anteriormente y deslice el cenicero con cuidado hacia el exterior 3 Vacíe las cenizas Las cenizas deben ser arrojadas d...

Page 18: ... ajustarlas si es necesario 2 CUANDO LA TEMPORADA FINALIZA a Inspeccionar y limpiar la chimenea b Pasar la aspiradora por el interior de su estufa e inspeccionarla El hollín y los alquitranes creosota que se acumulan en las paredes de su estufa reducen el rendimiento c Inspeccionar las juntas de la puerta Éstas deberán reemplazarse cuando no realicen un cierre perfecto G CONECTOR Y CHIME NEA 1 INS...

Page 19: ...e recomendamos utilice su buen sentido común 1 No caliente excesivamente y durante un tiempo prolongado su estufa 2 Mantenga alejado cualquier material combustible muebles cortinas ropas etc a la distancia mínima de seguridad de 0 90 m 3 Las cenizas deberán vaciarse en un recipiente metálico y sacarse inmediatamente de la casa 4 No debe utilizar jamás combustibles líquidos para encender su estufa ...

Page 20: ...ES PARALELAS PAREDES OBLICUAS ESTUFA SHELBURNE 7 PROBLEMAS DE TIRO Lo que sigue es una lista de los problemas que son comunes a cualquier tipo de estufa Todos estos problemas son corregibles y a veces sólo requieren un pequeño reajuste para que la estufa vuelva a funcionar con normalidad Recuerde que el estado del tiempo afecta al funcionamiento de su estufa Si su estufa tiene escapes de humos al ...

Page 21: ...estufa con un rango de combustión adecuado Excesiva acumulación de cenizas Vacíe el cenicero con más frecuencia COMBUSTIÓN DESCONTROLADA O BAJA Puerta mal sellada o abierta Cierre bien la puerta o cambie los cordones de sellado Tiro excesivo Inspeccione la instalación Consiga un rango bajo de combustión o instale una válvula corta tiro Pasta refractaria selladora deteriorada Reselle la estufa con ...

Page 22: ...dario Sistema Venturi Peso 180 Kg Combustible LEÑA Tipo roble haya Para otras medidas consultar al Distribuidor o al Fabricante Valores Aproximados Ø150 Fig 16 INDUSTRIAS HERGÓM S A no se responsabiliza de los daños ocasionados originados por alteraciones de sus productos que no hayan sido autorizados por escrito ni por instalaciones defectuosas Así mismo se reserva el derecho de modificar sus fab...

Page 23: ...DRILLOS TRASERA SOPORTE LADRILLOS LATERAL GRAPA CRISTAL CHAPA CIERRE PUERTA FRONTAL LADRILLO REFRACTARIO 113X227X30 CRISTAL THERMOSHOCK CUELLO DEFLECTOR INOX TRENZA FIBRA CERAMICA 1 2 EJE CIERRE PUERTA FRONTAL TUBO AIRE SECUNDARIO Nº 1 CL00217I Q00093 J00104 J12 J14 J0102 CL00218I Q00092 CP00211 CP00212 CP00223 CP00224 Q00094 CL00213 CL00214 CL00216 HL00168 CP00222 CP00208 CP00209 CP00210 CP00219 ...

Page 24: ... its parts are made of cast iron to guarantee a long working life We are sure your new stove will give you satisfaction on many occasions which is the greatest attraction of our equipment Owning a Hergóm Stove is a sign of an exception sense of quality Please read all of the manual Its aim is to familiarise you with your stove indicating standards for its installation operating and maintenance tha...

Page 25: ...he door gap to favour lighting Double detachable grille ash pan mixer Secondary air with self adjustment that increases stove output and decreases the emission of non burnt items into the atmosphere Self cleaning glass Front glass door Folding ash pan door Removable airtight ash pan container Two possible smoke outlet positions Horizontal Vertical depending on the position of the cast iron collar ...

Page 26: ...l used After years of use you may change the type of fuel although once the chimney is installed in a particular spot it is not easy to modify it or change its place Therefore the following information will help you decide whether you can make us of the existing chimney or not or whether to decide to build a new one This information will help you to make the correct decision 1 How chimneys work Ba...

Page 27: ...ery difficult to predict the moment at which the chimney must be cleaned A visual inspection is the safest way of knowing whether the chimney of your stove is clean We therefore recommend installations to which access is easy 3 Options If you are going to build a chimney for your HERGÓM stove you have two alternatives a Brickwork chimneys b Metal chimneys Studies reflect that there is no great dif...

Page 28: ...zontal which will allow you to choose the most suitable direction either horizontal or vertical by merely turning the ca st iron collar 180º Fig 5 To connect the chimney to the stove lead the tube internally according to the attached figure adjusting it to its conical shape and sealing the joint using refractory filler to ensure its airtightness Depending on your preferences you can also connect y...

Page 29: ... and non combustible materials Do not mount cement asbestos tubes b Choose a route that is as vertical as possible Do not connect various appliances to the same chimney Fig 6 c Prevent the flue from ending in areas near to constructions and it must exceed the closest peak in height where there is a adjoining building Fig 7 d The inside walls must be perfectly smooth and free of obstacles At the jo...

Page 30: ... Fig 9 f To check the airtightness of the chimney cover the roof end and introduce paper with damp straw into the chimney Fig 10 g It is very important for the chimney to stand out by more than one metre from the highest part of the house If the draught is to be increased increase the height of the chimney Fig 11 ...

Page 31: ...e joints of the tubes forming the chimney in the event of using simple metal tubes must be sealed using refractory filler Each tube must fit into the next to prevent any creosote from reaching the outside k The exterior metal chimneys must be built with special double heat resistant tubes for solid fuel ...

Page 32: ...ated on the lower left hand side of your stove The primary air control allows for the amount of air entering the fireplace to be adjusted Pull the control towards the front of the stove to open the primary air inlet Push the control towards the back of the stove to close the primary air inlet 3 SECONDARY AIR SELF ADJUSTMENT Secondary air is provided through the deflector tubes and is distributed p...

Page 33: ...ained in wood also plays an important role in the working order of the stove Green woods contain a high level of humidity Therefore green wood is difficult to light and must be stored for one year before using in your stove To prepare green wood well it must be split and piled to allow for contact with dry air during one year Store the wood on planks or blocks to keep it off the ground and only co...

Page 34: ... to rise k Close the door and allow the fire to light Keep the door closed while the stove is working Ensure the ash pan is in place l KEEP AN EYE ON YOUR STOVE AT ALL TIMES to ensure a slow fire The first fire must heat the stove but must not burn when touched At most add only a few logs of wood to the fire to achieve the appropriate temperature the first time the stove is lit m Once the stove is...

Page 35: ...moke enters the room Likewise reloading on a bed of red hot coals reduces the smoke and will reach high temperatures quickly with fresh loads 3 COMBUSTION LEVELS HIGH COMBUSTION Load the fireplace fully with wood on a bed of red hot coals or on the flames and fully open the primary air control A high level is recommendable once or twice a day to heat the chimney and the stove well thus helping pre...

Page 36: ...prevent the formation of creosote 1 Keep the stove with the primary air control fully open for 30 minutes every day to burn the creosote deposited inside the stove and the evacuation system 2 After reloading the wood keep burning with the primary air control fully open for 20 or 30 minutes This form of operating ensures in advance the correct working order of the secondary combustion that when wor...

Page 37: ...r stove if the door glazing is broken Do not hit or slam shut the front door Where necessary the door glazing can be cleaned with a Hergóm glass cleaner which your supplier will provide Never try to clean the glass when the stove is working or when the glass is hot Most of the particles deposited can be cleaned following the cleaner handling instruction To clean difficult particles open the door p...

Page 38: ... when the ash pan is hot Take extreme care when handling storing or throwing away the ashes To remove the ashes from the fireplace proceed as follows 7 Sift the ashes through the grate with a scraper or other suitable instrument 8 Open the ash pan compartment as explained above and slide the ash pan out 9 Empty the ashes The ashes must be thrown from the ash pan into a metal container with a suita...

Page 39: ...E SEASON a Inspect and clean the chimney b Run the vacuum cleaner inside the stove and inspect it Any soot or tar creosote accumulating on the walls of your stove will reduce its performance e Inspect the door joints These must be replaced when the door does not shut perfectly G CONNECTOR AND CHIMNEY 1 INSPECTION Certain sections of special T shaped tubes make inspection and maintenance relatively...

Page 40: ...ible material furniture curtains clothing etc at a minimum safety distance of 0 90 m 3 The ashes must be emptied into a metal container and immediately removed from the house 4 Never use liquid fuel to light your stove Keep any type of inflammable liquid Petrol oil alcohol etc 5 Make periodic inspections of the chimney and clean it whenever necessary 6 Do not place the stove near to combustible wa...

Page 41: ...roblems can be corrected and sometimes only require a small readjustment for the stove to return to its normal working order Remember that time affects the operating of your stove If your stove leaks smoke inside the house the most likely is the following If your chimney is newly built a The draught is insufficient b The section or height is not appropriate c There is a bottleneck somewhere in the...

Page 42: ...ur stove Excessive accumulation of ashes Empty the ash pan more frequently UNCONTROLLED OR LOW COMBUSTION Badly sealed or open door Close the door well or change the seal beading Excessive draught Inspect the installation Achieve a low combustion level or install a draught cutting valve Deteriorated refractory sealing filler Reseal the stove with refractory cement Excessively long chimney Shorten ...

Page 43: ...i System Weight 180 Kg Fuel WOOD Oak beech etc For other measurements consult the Distributor or the Manufacturer Approximate Values Ø150 Fig 16 INDUSTRIAS HERGÓM S A is not responsible for any damage caused by any alterations to its products that have not been authorised in writing or for faulty installations It also reserves the right to modify its products without prior notice Responsibility fo...

Page 44: ...x5mm FRONT DOOR STRIKER PLATE SUPPORT SIDE FIREBRICK SUPPORT REAR FIREBRICK PRIMARY AIR PLENUM CASTING SECONDARY AIR PLENUM TOP CASTING SECONDARY AIR RISER CASTING HANDLE PRIMARY AIR CONTROL ASH DOOR BRACKET LEFT SECONDARY AIR PLENUM BOTTOM CAST HEATSHIELD TOP STAINLESS STEEL BOTTOM DOOR CASTING REAR PANEL GASKET ROPE 1 2 FIREBRICK 4 1 2 x 9 FIREBRICK 4 x 9 CRANK HANDLE 45 GASKET ROPE 1 4 LATCH FR...

Page 45: ...una lunga vita utile Siamo sicuri che la vostra nuova stufa vi darà molte soddisfazioni che rappresentano il maggiore incentivo per il nostro team Possedere una stufa Hergóm significa possedere un senso di qualità eccezionale Si prega di leggere attentamente tutto il manuale Lo scopo del manuale è infatti quello di aiutare a prendere dimestichezza con la stufa riportando le norme per l installazio...

Page 46: ...i un foro dell aria primaria situato in un ugello sotto il vano della porta per agevolare l accensione Griglia doppia smontabile agitatore della cenere Aria secondaria con auto regolazione che aumenta la resa della stufa e diminuisce l emissione di incombusti nell atmosfera Autopulizia del vetro Porta frontale con vetro Parte frontale del cassetto per la cenere ribaltabile Cassetto per la cenere a...

Page 47: ...na fumaria b Modalità di gestione della stessa c Qualità del combustibile impiegato È possibile cambiare il tipo di combustibile ma una volta installata la canna fumaria in una determinata ubicazione non è così facile modificarla o spostarla Per questa ragione le seguenti informazioni servono per decidere se è possibile usare la canna fumaria esistente oppure occorre costruirne una nuova Queste in...

Page 48: ...sso immediatamente Dato che l accumulo di creosoto dipende da molte variabili è molto difficile predire il momento in cui occorre pulire la canna fumaria L ispezione visiva è il modo più sicuro per accertare che la canna fumaria della stufa non presenti creosoto accumulato Si consiglia perciò di effettuare l installazione in modo tale da agevolare l accesso 3 Opzioni Se occorre costruire la canna ...

Page 49: ...ione più adatta orizzontale o verticale semplicemente girando l attacco in ghisa di 180º Fig 5 Per collegare la canna fumaria alla stufa inserire il tubo all interno come indicato nella figura accanto adattandolo alla forma conica e quindi sigillare l attacco con mastice refrattario per assicurarne la tenuta A seconda delle proprie esigenze è anche possibile collegare la stufa alla canna fumaria t...

Page 50: ... alla stessa canna fumaria Fig 6 c Evitare lo sbocco del tubo in zone vicine ad altre costruzioni in caso di edificio attiguo il tubo deve superare in altezza la sommità più vicina Fig 7 d Le pareti interne devono essere perfettamente lisce ed esenti da ostacoli Evitare strozzature nell attacco dei tubi con una canna fumaria in muratura Fig 8 Deviazione troppo poco inclinata Deviazione corretta Ac...

Page 51: ...sul tetto e di inserire della carta e della paglia umida dalla parte inferiore della canna fumaria e dare fuoco Fig 10 g È molto importante che la canna fumaria superi di un metro la parte più alta della casa Se fosse necessario aumentare il tiraggio occorre aumentare l altezza della canna fumaria Fig 11 Sbagliato Sbagliato Sbagliato Giusto Giusto Lastra di chiusura Carta e paglia umida Scarico fu...

Page 52: ...evitare che il creosoto eventualmente formatosi possa fuoriuscire all esterno k Le canne fumarie metalliche esterne devono essere costruite con tubi doppi con isolamento termico speciali per combustibili solidi 3 FUNZIONAMENTO Una volta installata e collegata alla canna fumaria la stufa SHELBURNE è pronta per accendere il fuoco ATTENZIONE IN QUESTA OPERAZIONE SI PRODUCE CALORE ALLONTANARE I BAMBIN...

Page 53: ...ore e si distribuisce proporzionalmente nella camera di combustione Quanto maggiore è la combustione maggiore è il riscaldamento e di conseguenza è maggiore il tiraggio e migliore è l apporto dell aria secondaria 4 CASSETTO PER LA CENERE Raccoglie le braci prodotte dal fuoco e consente di estrarre adeguatamente la cenere della stufa È sistemato sotto il vassoio Fare cadere la cenere attraverso la ...

Page 54: ...stufa e rispettare le distanze specificate per i materiali combustibili vedi pag 16 C ACCENSIONE DELLA STUFA Una volta compreso il funzionamento dei comandi della stufa e dopo aver scelto la legna più adatta si può accendere il fuoco È indispensabile che la prima accensione si realizzi lentamente La ghisa deve essere scaldata poco a poco il fuoco eccessivo nella stufa nuova può provocare fenditure...

Page 55: ... prima accensione la temperatura dei gas è bassa il creosoto si forma molto rapidamente Perciò il vetro della porta si sporca Non ci si deve preoccupare perché la prossima volta il fuoco caldo lo pulirà 2 ACCENSIONE NORMALE Prima di accendere il fuoco per il funzionamento normale se la stufa non è stata usata regolarmente per un certo tempo è consigliabile eseguire le operazioni indicate per la pr...

Page 56: ...o di combustione per periodi eccessivamente prolungati non è conveniente in quanto favorisce l accumulo di creosoto Il sistema di scarico deve ispezionato con frequenza se si mantiene costantemente basso il livello di combustione 4 ATTENZIONE AL FUOCO ECCESSIVO Il fuoco è eccessivo quando la stufa funziona a temperature superiori a quelle consigliate in precedenza nella sezione sui LIVELLI DI COMB...

Page 57: ...e essere ispezionato nella connessione della stufa e sull estremità superiore della canna fumaria Sulle superfici fredde il creosoto tende ad accumularsi rapidamente perciò è importante ispezionare la parte superiore della canna fumaria dato che è la zona più fredda al contrario dell attacco alla stufa Il creosoto accumulato deve essere eliminato con un apposita spazzola Si consiglia perciò prima ...

Page 58: ...integrità Per pulire il vetro non usare lamette né pagliette di ferro o altri materiali abrasivi Il vetro della porta è di ceramica appositamente fabbricato per l impiego nelle stufe a legna Per sostituirlo non usare altro vetro se non quello apposito di ceramica fabbricato per l uso nelle stufe a legna Per la sostituzione del vetro rivolgersi al proprio rivenditore di fiducia In caso di rottura i...

Page 59: ... si occupa dello smaltimento della cenere appoggiare il contenitore su una superficie non combustibile oppure all esterno dell abitazione lontano da qualsiasi materiale combustibile 35 Se necessario pulire il vano del cassetto per la cenere 36 Rimettere a posto il cassetto per la cenere spingendolo fino in fondo Accertarsi che il cassetto sia posizionato correttamente La cenere può anche essere ri...

Page 60: ...o la chiusura non è più perfetta G CONNETTORE E CANNA FUMARIA 1 ISPEZIONE Alcuni tratti speciali e a forma di T dei tubi fanno sì che l ispezione e la manutenzione siano relativamente facili Smontando il coperchio inferiore del tratto forma di T si può pulire dall alto l insieme dei tubi con un apposita spazzola a scovolo I residui che si staccano dall interno dei tubi si devono raccogliere in un ...

Page 61: ...e qualsiasi materiale combustibile mobili tende capi di vestiario ecc ad una distanza minima di sicurezza di 0 90 m 3 La cenere deve essere svuotata in un contenitore metallico ed essere portata immediatamente fuori dalla casa 4 Non usare mai combustibili liquidi per accendere la stufa Allontanare qualsiasi tipo di liquido infiammabile benzina petrolio alcool ecc 5 Ispezionare periodicamente la ca...

Page 62: ...to della stufa Occorre anche ricordare che il tempo incide sul funzionamento della stufa Se il fumo fuoriesce dalla stufa è probabile che la causa sia la seguente Se la canna fumaria è di nuova costruzione a Il tiraggio è insufficiente b La sezione o l altezza non è quella giusta c È presente qualche strozzatura nell insieme Se la canna fumaria è preesistente a La canna fumaria è parzialmente ostr...

Page 63: ...O BASSA Porta chiusa male o aperta Chiudere bene la porta o sostituire le guarnizioni di tenuta Tiraggio eccessivo Controllare l impianto Abbassare il livello di combustione o installare una valvola rompitiraggio Pasta refrattaria sigillante deteriorata Sigillare di nuovo la stufa con cemento refrattario Canna fumaria troppo lunga Accorciare la canna fumaria o installare una valvola rompitiraggio ...

Page 64: ...aria secondaria Sistema Venturi Peso 180 Kg Combustibile LEGNA tipo rovere faggio Per altre dimensioni interpellare il rivenditore o il costruttore valori approssimativi Ø150 Fig 16 INDUSTRIAS HERGÓM S A declina ogni responsabilità per i danni causati da alterazioni dei propri prodotti non autorizzate per iscritto o da un installazione difettosa Si riserva altresì il diritto di modificare i propri...

Page 65: ...MARIA SOPPORTO MATTONI PARTE POSTERIORE SUPPORTO MATTONI LATERALE GRAFFA VETRO LAMIERA CHIUSURA PORTA FRONTALE MATTONE REFRATTARIO 113X227X30 VETRO THERMOSHOCK DEFLETTORE INOX FIBRA CERAMICA INTRECCIATA ASSE CHIUSURA PORTA FRONTALE TUBO ARIA SECONDARIA N 1 CL00217I Q00093 J00104 J12 J14 J0102 CL00218I Q00092 CP00211 CP00212 CP00223 CP00224 Q00094 CL00213 CL00214 CL00216 HL00168 CP00222 CP00208 CP0...

Page 66: ...ateriais combustíveis Distância a materiais situados nos laterais da porta aberta 30cm e a materiais situados sobre a porta aberta 90cm 380ºC Temperatura de los gases medio Average gas temperature Température des gaz moyenne Temperatura media dei gas Temperatura média dos gases 0608 Fabricación Production produzione produção Nº Lea y siga las instrucciones de funcionamiento Utilice solo combustibl...

Page 67: ...132 ...

Page 68: ...133 ...

Page 69: ...134 ...

Page 70: ...135 ...

Page 71: ...136 INDUSTRIAS HERGÓM S A SOTO DE LA MARINA Cantabria Apartado de Correos 208 39080 Santander ESPAÑA Tel 942 587000 Fax 942 587001 Web http www hergom com E mail hergom hergom com ...

Reviews: