Hercules HDB79B Owner'S Manual & Safety Instructions Download Page 6

Page 6

For technical questions, please call 1-888-866-5797.

Item 57719 


SPECIFICATIONS

Battery

57367 Hercules 12V Li-ion  
(sold separately)

Charger

56561 Hercules 12V Li-ion  
(sold separately)

No Load Speed

௘±௘

SPM

Stroke Length

5/8"

SETUP–BEFORE USE

  Read the ENTIRE IMPORTANT 

SAFETY INFORMATION section at the 
beginning of this manual including 
all text under subheadings therein 
before set up or use of this product.

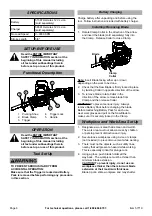
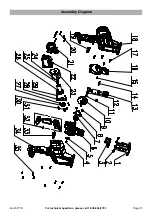
Functional Description

4

3

1

1.  Pivoting Shoe
2.  Blade Clamp
3.  Trigger

4.  Trigger Lock
5.  Handle

2

5

OPERATION

  Read the ENTIRE IMPORTANT 

SAFETY INFORMATION section at the 
beginning of this manual including 
all text under subheadings therein 
before set up or use of this product.

Tool Set Up

TO PREVENT SERIOUS INJURY FROM 
ACCIDENTAL OPERATION: 
Make sure that the Trigger is locked and Battery 
Pack is removed before performing any procedure 
in this section.

Battery Charging

Charge battery after unpacking and before using the 
tool.  Follow instructions included with battery charger.

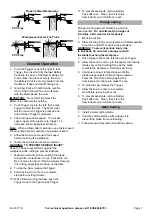
Installing / Removing Blade

1.  Rotate Clamp Collar in the direction of the arrow 

and insert the blade (sold separately) fully into 
the Clamp.  Release Collar to close Clamp.

Blade

Clamp 

Collar

Note:

 Insert Blade facing either up or down 

depending on the work to be done.
2.  Check that the Saw Blade is firmly locked in place 

by twisting Collar in opposite direction of the arrow.

3.  To remove blade, rotate Collar in the 

direction of the arrow, remove blade from 
Clamp and then release Collar.

WARNING!

 To prevent serious injury:  Always 

remove Battery Pack before changing the blade. 
Before reattaching Battery Pack for each use, 
wear work gloves and pull on the Saw Blade to 
make sure it is securely locked in the Clamp. 

Workpiece and Work Area Set Up

1.  Designate a work area that is clean and well lit.  

The work area must not allow access by children 
or pets to prevent distraction and injury.

2.  Secure loose workpieces using a vise or clamps 

(not included) to prevent movement while working.

3.  There must not be objects, such as utility lines, 

nearby that will present a hazard while working. 
This is especially critical for plunge cuts.

4.  Using a glove, push blade holder all the 

way back.  The workpiece must be thinner than 
minimum blade extension.  

CAUTION! To prevent injury, do not use on 
workpieces thicker than the minimum blade 
extension at their maximum thickness.


Blade tip can strike workpiece and may shatter.

Summary of Contents for HDB79B

Page 1: ...must read and understand Owner s Manual SAVE THIS MANUAL When unpacking make sure that the product is intact and undamaged If any parts are missing or broken please call 1 888 866 5797 as soon as possible Blade sold separately Reference 57719 Owner s Manual Safety Instructions REV 21c ...

Page 2: ...use a power tool while you are tired or under the influence of drugs alcohol or medication A moment of inattention while operating power tools may result in serious personal injury 2 Use personal protective equipment Always wear eye protection Protective equipment such as dust mask non skid safety shoes hard hat or hearing protection used for appropriate conditions will reduce personal injuries 3 ...

Page 3: ...grasping surfaces dry clean and free from oil and grease Slippery handles and grasping surfaces do not allow for safe handling and control of the tool in unexpected situations Battery Tool Use and Care 1 Prevent unintentional starting Ensure the switch is in the off position before connecting to battery pack picking up or carrying the power tool Carrying the power tool with your finger on the swit...

Page 4: ...clamps or another practical way to secure and support the workpiece to a stable platform Holding the workpiece by hand or against your body leaves it unstable and may lead to loss of control 3 Keep hands away from moving parts Never place your hands near the cutting area 4 Use extra caution when cutting overhead and pay particular attention to overhead wires which may be hidden from view Anticipat...

Page 5: ...ly SAVE THESE INSTRUCTIONS Grounding TO PREVENT ELECTRIC SHOCK AND DEATH FROM INCORRECT GROUNDING Check with a qualified electrician if you are in doubt as to whether the outlet is properly grounded Do not modify the power cord plug provided with the charger Do not use the charger if the power cord or plug is damaged If damaged have it repaired by a service facility before use If the plug will not...

Page 6: ... separately fully into the Clamp Release Collar to close Clamp Blade Clamp Collar Note Insert Blade facing either up or down depending on the work to be done 2 Check that the Saw Blade is firmly locked in place by twisting Collar in opposite direction of the arrow 3 To remove blade rotate Collar in the direction of the arrow remove blade from Clamp and then release Collar WARNING To prevent seriou...

Page 7: ...ut Do not press too hard If the Saw slows down as it is cutting apply less pressure on the Saw 8 To stop the Saw release the Trigger 9 Allow the Saw to come to a complete stop before setting it down 10 When finished using the Saw push the Trigger Lock to the right to lock Trigger 11 To prevent accidents remove Battery Pack after use Clean then store the Saw indoors out of children s reach Plunge C...

Page 8: ... before further use Cleaning Maintenance and Lubrication 1 BEFORE EACH USE inspect the general condition of the tool Check for leaking swollen or cracked battery pack loose hardware misalignment or binding of moving parts cracked or broken parts any other condition that may affect its safe operation 2 AFTER USE wipe external surfaces of the tool with clean cloth 3 Li Ion BATTERY MUST BE RECYCLED O...

Page 9: ... old Battery Pack properly or recycle Replace Battery Pack Performance decreases over time 1 Carbon brushes worn or damaged 2 Blade dull or damaged 1 Have qualified technician replace brushes 2 Keep blades sharp Replace as needed Excessive noise or rattling Internal damage or wear Carbon brushes or bearings for example Have technician service tool Overheating 1 Forcing tool to work too fast 2 Blad...

Page 10: ...Pin 1 1 12 Bearings Bushing 1 13 Reciprocating Rod 1 14 Cylindrical Pin 2 1 15 Cylindrical Pin 3 1 16 Gearbox Left 1 17 Hex Socket Pan Head Screw 4 18 Housing Left 1 Part Description Qty 19 End Cover 1 20 Hex Self Tapping Screw 6 21 Holder Left 1 22 Holder Right 1 23 Stator 1 24 Deep Groove Ball Bearing 1 25 Bearing Bushing 1 26 Rotor 1 27 Hex Socket Screw 4 28 Pressing Plate 2 1 29 Hex Socket Scr...

Page 11: ...Page 11 For technical questions please call 1 888 866 5797 Item 57719 Assembly Diagram ...

Page 12: ...acilities criminal activity improper installation normal wear and tear or to lack of maintenance We shall in no event be liable for death injuries to persons or property or for incidental contingent special or consequential damages arising from the use of our product Some states do not allow the exclusion or limitation of incidental or consequential damages so the above limitation of exclusion may...

Reviews: