background image

Page 7

For technical questions, please call 1-888-866-5797.

Item 57147 
        

Work Light Placement

CAUTION!

 Keep Work Light and cord out of walkways.

1. 

Freestanding:

 Place Work Light on a flat surface.

3. 

Wall Mount:


WARNING!

  Verify that installation surface has no 

hidden utility lines before drilling or driving screws.

WARNING!

  Do not install the 

Work Light directly into drywall.

a.  Select a suitable location for 

hanging the Work Light.

b.  Choose two adjacent studs.  If drywall is 

present, use a stud finder (sold separately) 
and mark locations of studs.

c.  Install a 2x4 across the studs.
d.  Measure the distance between the 

keyholes on the Work Light and mark 
mounting locations on the 2x4.

e.  Drill holes into the mounting locations, 

then drive screws into holes, leaving 

1/4″ of threads exposed.

f.  Place large openings on keyholes over 

screws.  Pull down gently to lock screws 
into upper parts of keyholes.

Note:

  For other types of walls, use appropriate 

hardware.

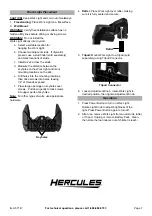
Keyholes

4. 

Rafter:

 Place Work Light over rafter, making 

sure it is fully seated and secure.

Rafter

5. 

Tripod:

 Mount Work Light to a tripod (sold 

separately) using Tripod Connector. 

Tripod Connector

6.  Loosen Adjustment Knob, rotate Work Light to 

desired position, then tighten Adjustment Knob.

Operation

1.  Press Power Button to turn on Work Light.  

Rotate Light Knob to adjust brightness of the 
light. Press Power Button again to turn off.

2.  After use, remove Work Light from wood studs, rafter,  

or Tripod.  Unplug or remove Battery Pack.  Clean, 
then store the tool indoors out of children’s reach.

Summary of Contents for HC101B

Page 1: ...NG To prevent serious injury User must read and understand Owner s Manual SAVE THIS MANUAL When unpacking make sure that the product is intact and undamaged If any parts are missing or broken please c...

Page 2: ...und Fault Circuit Interrupter GFCI protected supply Use of a GFCI reduces the risk of electric shock Personal Safety 1 Stay alert watch what you are doing and use common sense when operating a power t...

Page 3: ...cal help Liquid ejected from the battery may cause irritation or burns Service 1 Have your power tool serviced by a qualified repair person using only identical replacement parts This will ensure that...

Page 4: ...re cord and three prong grounding plug The plug must be connected to a properly grounded outlet If the tool should electrically malfunction or break down grounding provides a low resistance path to ca...

Page 5: ...heat and damp or wet areas TABLE A RECOMMENDED MINIMUM WIRE GAUGE FOR EXTENSION CORDS 120 240 VOLT NAMEPLATE AMPERES at full load EXTENSION CORD LENGTH 25 50 75 100 150 0 2 0 18 18 18 18 16 2 1 3 4 1...

Page 6: ...all text under subheadings therein before set up or use of this product Tool Set Up Battery Charging Charge battery before using this tool Follow instructions included with battery charger sold separ...

Page 7: ...ns on the 2x4 e Drill holes into the mounting locations then drive screws into holes leaving 1 4 of threads exposed f Place large openings on keyholes over screws Pull down gently to lock screws into...

Page 8: ...4 Disconnect battery pack and store battery pack charger and tool in dry indoor area out of reach of children and away from metal objects i e paperclips coins to prevent shorting Troubleshooting Probl...

Page 9: ...LY DIAGRAM IN THIS MANUAL AS A REFERENCE TOOL ONLY NEITHER THE MANUFACTURER OR DISTRIBUTOR MAKES ANY REPRESENTATION OR WARRANTY OF ANY KIND TO THE BUYER THAT HE OR SHE IS QUALIFIED TO MAKE ANY REPAIRS...

Page 10: ...eatsink 1 9 Ul AC DC Adapter 1 10 PCBA 1 11 Tripod Connector 1 12 Base 2 13 Contact Plate Holder 1 14 Right Housing 1 15 O Ring 2 16 Right Leg 1 Part Description Qty 17 Screw 4 18 Bolt M5 1 19 Adjustm...

Page 11: ...the exclusion or limitation of incidental or consequential damages so the above limitation of exclusion may not apply to you THIS WARRANTY IS EXPRESSLY IN LIEU OF ALL OTHER WARRANTIES EXPRESS OR IMPL...

Page 12: ...2020 by Harbor Freight Tools All rights reserved No portion of this manual or any artwork contained herein may be reproduced in any shape or form without the express written consent of Harbor Freight...

Reviews: