Hercules 4780547 Installation Manual Download Page 12

12/18 


6 - MIXING TRACKS 

Mixing tracks means to link up songs, 

one after another, without any gaps or 

silences between them.
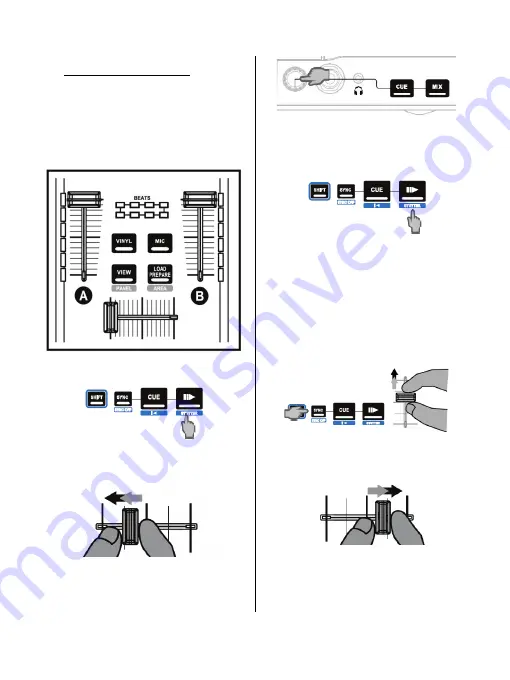
 

6.1

  You have loaded a track onto each 

deck (A and B). Position the volume 

faders as shown below. 


6.2

 You start off by playing the track on 

deck A.


6.3

  Set the crossfader to the side of the 

deck on which the track is playing (here, 
to the left). 


6.4

  Adjust the volume on your 

headphones using the headphones 

volume knob on the front panel of the 

controller. 


6.5

  Before the end of the track being 

played, start playing the track loaded on 

deck B. 


6.6 

To ensure a transition at the same 

tempo, synchronize the BPM (number of 

beats per minute) of the track that you are 
getting ready to play. Here, press the 

Sync


button on deck B 

(1)

, so that the BPM value 

of this track will match the BPM of the track 

that is about to finish (on deck A). Or set the 

same BPM as on Deck A using the pitch 
fader 

(2)


6.7

  To make the transition, progressively 

move the crossfader toward the deck on 

which the new track is being played 

(here, to the right). 


(1) 

(2) 

Summary of Contents for 4780547

Page 1: ...DJControl Jogvision Click on Drivers to download the drivers Click on Manual Help file to download the manuals and poster in PDF format Launch installation of the drivers that you have downloaded on...

Page 2: ...for great performances as a mobile DJ Featuring large jog wheels whose display diameter feel and weight match the platters of pro CD players Hercules DJControl Jogvision gives you the advantages of pr...

Page 3: ...10 10 11 Due to the number of reports of issues with regard to AMD processors Serato does not provide support to customers using Serato software applications on computers with AMD processors Hercules...

Page 4: ...in blue 5 SYNC Synchronization enabled on corresponding deck SYNC OFF Synchronization disabled 21 Crossfader 22 FX DRY WET Effects mode change amount of effect applied LOOP SIZE Loop mode change loop...

Page 5: ...phones outputs channels 3 4 32 CUE previewing listen on headphones to the track loaded on the deck selected with the CUE SELECT button 14 MIX listen on headphones to the same music being played out lo...

Page 6: ...When connecting headphones make sure that the volume level is suitable for listening with headphones start playing a music track before putting on the headphones and turn down the volume if it seems t...

Page 7: ...oth speakers are monitoring speakers used by some DJs allowing them to hear what the audience hears If you are mixing in a small space or if the speakers directed towards the audience are close to you...

Page 8: ...ced microphone with a 1 4 6 35 mm connector REAR PANEL Auxiliary input stereo 1 8 3 5 mm line level connector Use this input only if you want to stop mixing and play audio from a consumer audio source...

Page 9: ...s in 32 sections rotates at a standard playback speed of 33 RPM and its rotation speed reflects any changes made to the track s pitch The ring of white LEDs in 16 sections shows the current position i...

Page 10: ...or LOAD B buttons to enter exit the selected folder or load the selected file on the corresponding deck 4 1 Browse to the location where your music files are stored on your computer 4 2 After highlig...

Page 11: ...KING WITH HOTCUE POINTS 5 1 You are playing a track on deck A and want to monitor the next track on deck B 5 2 Press the Cue Cue select button on the front panel of the controller to ensure that you w...

Page 12: ...ume knob on the front panel of the controller 6 5 Before the end of the track being played start playing the track loaded on deck B 6 6 To ensure a transition at the same tempo synchronize the BPM num...

Page 13: ...d on deck A for example 7 3 At the point where you want to start scratching in the track place your hand on the jogwheelondeckA 7 4 and turn the jog wheel to the right and to the left until you hear t...

Page 14: ...an place up to 4 markers known as HotCue points press pad 1 to place HotCue 1 pad 2 to place HotCue 2 etc Once this is done when you are in CUES 1 4 mode simply press one of pads 1 to 4 to access the...

Page 15: ...to display the DJ FX menu 9 4 Press SHIFT FX button to load another effect on this button 10 WORKING WITH SAMPLES Playing a sample on a track that has been loaded and is being played 10 1 Press the M...

Page 16: ...button again to disable looping 11 2 Increasing or decreasing the length of the loop Press the LOOP X or LOOP X2 buttons to divide the length of the loop by half or double the loop s length respectiv...

Page 17: ...ximity sensor air control is enabled 12 2 Make sure that the AIR FX button for the corresponding deck is lit up Move your hand above the proximity sensor to modulate the low pass filter effect 12 3 Pr...

Page 18: ...o not expose the device to drips or splashes of water Never place any object filled with liquid a glass vase on your device No naked flame sources such as lighted candles should be placed on the devic...

Reviews: