

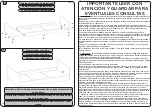


ITM/I21-
WARNING READ WITH
ATTENTION AND SAVE FOR
EVENTUAL CONSULTATIONS
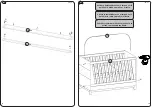
I) Warnings: Do not position or use the product near open
fl
ame and other sources of heat such
as electric heaters, gas heaters or other sources as the material is
fl
ammable.
II) Do not use the crib if any part is broken, torn or missing. Use only replacement parts recom-
mended by the manufacturer.
III) Do not leave any object in or near the crib that may serve as a foothold or risk of suffocation,
choking or strangulation, such as ropes, blinds / curtain cords, protectors, cushions, toys, wires
and cables of electrical appliances.
IV) Never use more than one mattress in the crib.
V) Small children may not play, unattended, in the vicinity of a crib.
VI) Caution: when the child is able to climb the crib, it can no longer be used by this child, as this
crib was built for use by children with motor ability to sit, kneel and / or get up alone but not yet
able to climb the crib.
VII) For cribs with more than one function, not subject to regulation: This product complies with
regulations for baby cribs, and its other functions are not subject to regulation.
VIII) This crib can not be altered, either in its structure or in its adornments, because risks to the
child’s safety can be generated.
IX) The length and width of the mattress used with the crib must comply with the speci
fi
cations
of this Manual.
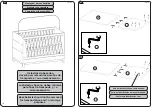
I) Guidelines: The Brazilian Society of Pediatrics advises to place the baby to sleep on his belly
up, as it reduces the risk of sudden death by 70%. We recommend talking to your child’s pedia-
trician for more information.
II) Only use the crib when fully assembled in accordance with the instructions in the Instruction
Manual and after making sure that your locking systems are properly engaged.
III) The crib must be placed on a horizontal
fl
oor.
IV) For cribs with adjustable base height: The lowest position is the safest and the base should
always be used in this position as soon as the baby is old enough to sit.
V) When there are detachable supporting devices to support the crib base above its lowest
position: Before the crib is used in its lowest position, the devices used to support the crib in the
highest positions should be removed.
VI) The mounting connections must always be tightened properly and
checked regularly, throughout the use of the crib, and retightened as necessary.
VII) If any part of the crib breaks or is defective, you should look for expert technical assistance
and no home repairs.
VIII) Guidelines for the thickness of the mattress, which may be given in the following ways:
a) The length and width of the mattress used with the crib shall be such that it is never possible
to form a space greater than 30 mm between the sides or ends and the mattress.
b) The thickness of the mattress shall be such that the inner height (from the mattress surface to
the upper edge of the cradle frame) is at least 480 mm in the lowest position of the cradle base
and at least 180 mm in the highest position of the cradle of the crib.
c) When a marking is used on the crib to indicate the maximum thickness of the mattress:The
marking on the crib indicates the maximum thickness of the mattress to be used with the crib.
IX) Recommendation on the minimum size of mattress to be used with the crib. For Crib Mini Bed
Alegria, it is recommended to use a mattress of 1300x700mm (minimum width of 695mm and
minimum length of 1295mm and maximum width of 705mm and maximum length 1305mm) with
a minimum density of 18 (D18) and maximum height of the 120mm mattress.
4
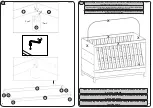
ITM/I21-
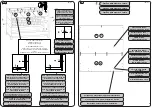
14
X
X
X
X
X
X
X
X
X
X
Para a montagem do Montessoriano, tirar as peças marcadas
com “X” e o restante das peças deverão ser
utilizadas.
Para el montaje del Montessoriano, sacar las piezas marca-
das con “X” y el resto de las piezas deberán ser
utilizadas.
To assemble the Montessoriano, remove the parts marked
with “X” and the rest of the pieces should be used.
17