2
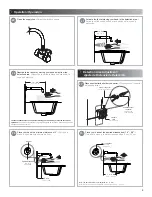
When placing the finished wall, is necessary to verify that the
plastic protector is leveled with the distance indicated as optimal
depth.
/ Es necesario que al colocar el acabado final, se
verifique que el protector de plástico quede a nivel con la
distancia indicada como profundidad óptima.
4” - 5”
(10 cm - 12,5 cm)
3"
(7,5 cm)
12”
(30,5 cm)
4”
10 cm
drain (drain piping)
desagüe (céspol)
supply line
línea de alimentación
PVC piping for sensor
wires (included)
tubería de PVC para
los cables del sensor (incluido)
finished wall
pared con acabado final
1/2" NPT
internal thread connector
conector de 1/2” NPT
cuerda interior
0,4”
1 cm min.
plastic lid
protector de plástico
NIVEL D
E
PARED
NIVEL M
AXIMO
CON
RECUBRIMIENTO
PERMISIBLE
supply line to faucet
línea de alimentación
para salida
PVC piping for
sensor wires (included)
tubería de PVC para
los cables del sensor (incluido)
1/2" NPT external
thread connector
conector de 1/2” NPT
cuerda exterior
Remove the plastic protector.
/ Retire el protector plástico.
plastic protector
protector de
plástico
escutcheon
chapetón
gasket
empaque
Note: Verify that when pressing the sensor it will not go inside. /
Nota: Verifique que al presionar el sensor no se introduzca.
water supply line (not included)
línea de alimentación
(no incluida)
etiqueta indicadora del
nivel de profundidad
label indicating depth level
2
Groove the wall according to the dimensions shown. /
Ranure
el muro con las medidas que se muestran.
3
4
5
Insert the gasket and screw the escutcheon. /
Inserte el
empaque y enrosque el chapetón.
6
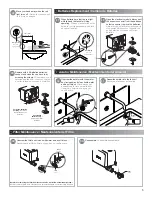
After inserting the sensor, if it´s too deep into the wall, make the following adjustments. /
Después de insertar el sensor, si este está dentro de la pared, realizar el siguiente ajuste.
locknut
contratuerca
sensor
holder
porta
sensor
sensor
washer
rondana
escutcheon
chapetón
gasket
empaque
Note:
Repeat the adjustment procedure if necessary.
Nota:
Repita el procedimiento de ajuste si es necesario.
7
8
9
Uunscrew the set screw with the 3/32"
allen wrench (included) and unscrew
the nipple and the connector. /
Desenrosque el opresor con la llave
allen 3/32" (incluida) y desenrosque el
niple y el conector.
Screw the nipple with a ½” allen wrench
(not included) and then screw the
connector. /
Enrosque el niple con la
llave allen de
½”
(no incluida) y
posteriormente enrosque el conector.
Screw the faucet to the connector and
tighten the nut. /
Enrosque la salida al
conector y apriete la tuerca.
connector
conector
nipple
niple
connector
conector
nipple
niple
nut
tuerca
connector
conector
nut
tuerca
faucet
salida
4”
10 cm
4”
10 cm
1.
Unscrew the escutcheon.
/
Desenrosque el chapetón.
2.
Screw or unscrew, accordingly, the
locknut using needle nose pliers.
/
Enrosque o desenrosque, según sea
el caso, la contratuerca con unas
pinzas de punta.
3.
Reassemble. /
Arme nuevamente.
4.
Verify that when pressing the
sensor it will not go inside. /
Verifique que al presionar el
sensor no se introduzca.


