


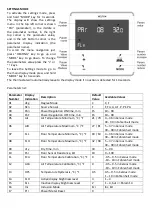


SETTINGS MODE
To activate the settings mode, press
and hold “MODE” key for 3 seconds.
The display will show the settings
menu. In the top left corner is shown
“PAr” (parameter), in the middle is
the parameter number, in the right
top corner is the parameter value,
and in the left bottom corner is the
parameter display indication (the
parameter name).
To scroll the menu navigation just
press “HEATING” key to go up and
“MODE” key to go down. To change
the parameters value press the “+” or
“-” keys.
To leave the Settings mode to go to
the main display mode press and hold
“MODE” key for 3 seconds.
The thermostat will automatically leave to the display mode if no action is detected for 10 seconds.
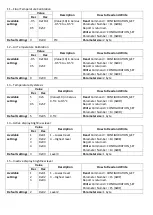
Parameters list:
Parameter
Number
Display
Indication
Description
Default
Value
Available Values
01
dEg
Degree Mode
C
C, F
02
SEn
Source Sensor
F
F, FA, A, AF, P, PF, PA
03
Pon
Power Regulation ON time, min
15
10 – 90
04
PoF
Power Regulation OFF time, min
15
10 – 90
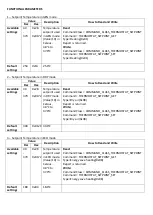
05
AIL
Air Temperature Minimum, °C / °F
21 / 70
4 – 36 in Celsius mode
39 - 99 in Fahrenheit mode
06
AIH
Air Temperature Maximum, °C / °F
27 / 81
5 – 37 in Celsius mode
39 – 99 in Fahrenheit mode
07
FLL
Floor Temperature Minimum, °C / °F
18 / 64
4 – 36 in Celsius mode
39 – 99 in Fahrenheit mode
08
FLH
Floor Temperature Maximum, °C / °F
32 / 90
5 – 37 in Celsius mode
39 – 99 in Fahrenheit mode
09
dry
Dry Time, min
30
5 – 90
10
FSr
Floor Sensor Resistance, kΩ
10
9 – 100
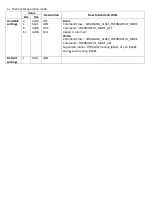
11
FCA
Floor Temperature Calibration, °C / °F
0
-9.5 – 9.5 in Celsius mode
-19 – 19 in Fahrenheit mode
12
ACA
Air Temperature Calibration, °C / °F
0
-9.5 – 9.5 in Celsius mode
-19 – 19 in Fahrenheit mode
13
HYS
Temperature Hysteresis, °C / °F
0.5
0.5 – 9.5 in Celsius mode
1 – 19 in Fahrenheit mode
14
brH
Active display brightness level
3
1 – 4
15
brL
Inactive display brightness level
2
1 – 4, but <= Param 14
16
Inc
Inclusion Mode
Ecl
Inc, Ecl
17
Prr
Power Meter Reset
0


