Helios HELIOS X3000 User Manual Download Page 13


Using the AV cables supplied, insert the yellow cable into the video socket on your TV / 
Display and player. Insert the white cable into the left channel and the red cable into the 
right channel audio socket output on the player. Then connected the white (left) and red 
(right) audio cables to your TV / display. 
 
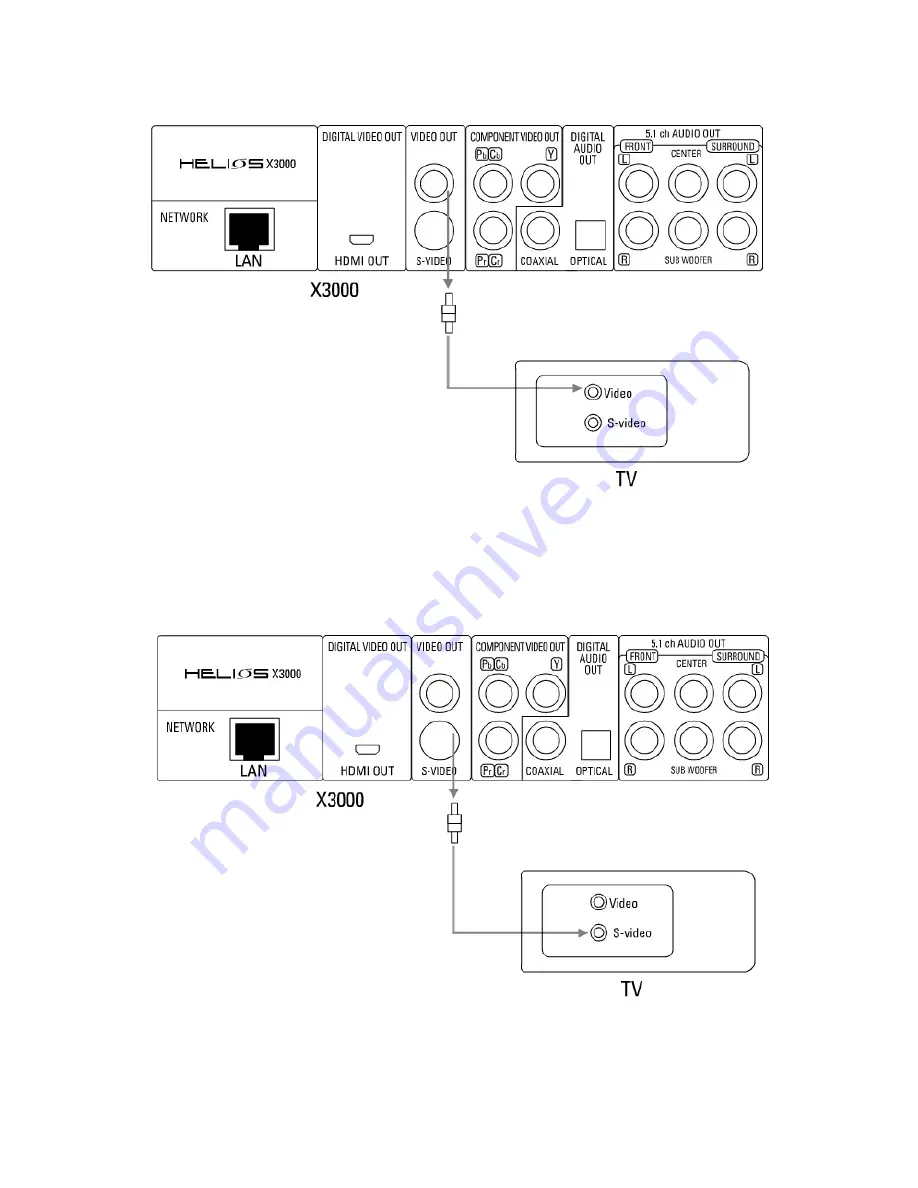
E. S-Video connection 


If there is an s-video input socket on your TV than you connect and the player using an 
S-Video cable. 
Use the supplied audio cable to connect the player to the TV 

Summary of Contents for HELIOS X3000

Page 1: ...User Manual HELIOS X3000 HD Upscaling Multimedia DVD Player ...

Page 2: ... notice that it takes some time for this player to start up as it loads different software It takes about 10 seconds for the player to fully turn itself on Once on please note that it takes a little bit of time to switch from feature to feature The following pages provide you with detailed information on everything you need to know about your HELIOS X3000 If you have any query that is left unanswe...

Page 3: ...etwork wired Network Wireless Install NeoLink Server Software 9 Operating the Network Media Player Setting system browser mode DVD VCD CD setup and playback Playing from a USB storage device Playing content over a network Playing content from Internet Entering text using the remote control Changing the front panel display Playing DRM content on your HELIOS Creating and using web bookmarks on your ...

Page 4: ...is device to moisture and do not place water filled objects close to or on top of it Usage Notice Before plugging in this device make sure your power supply voltage matches the product The working voltage of this player is marked on the rear panel To avoid damage to the audio system switch the volume of connected devices such as speakers or amplifiers to minimum before turning the player on off Un...

Page 5: ...icture media file playback Built in 10 100M LAN and 54M 802 11G WIFI HELIOS Media Portal Online radio television and news broadcasts Streams video audio from network computer running HELIOS NeoLink software or third party UPnP compatible server software s Windows Media Connect Nero Digital Software Built in web browser supports HTML RSS feed Internet music and Internet Video Supports USB 2 0 Mass ...

Page 6: ... via NeoLink server and Windows Media Connect Supported Audio Formats NB All figures below are peak values Music files encoded in CBR and VBR are both supported Format Bit rate Sampling rate MP3 64k 192kbps 32k 44 1k 48kHz WMA excluding WMA9Pro 64k 192kbps 44 1k 48kHz Ogg Vorbis 64k 192kbps AAC 64k 192kbps 32k 44 1k 48kHz PCM WAVE 32k 44 1k 48kHz Copyright protected WMA discs cannot be played dire...

Page 7: ...rk the picture quality will be poor Always try to minimize exposing the player to a dusty dirty environment How to handle Discs Do not touch the play back side of the disc Hold the disc by the edges so that fingertips will not get on the surface Do not stick paper or tape on the disc After playing store the disc in its case Do not expose the disc to direct sunlight or sources of heat For example d...

Page 8: ...k elapsed time player s status 5 When connect to Neolink this status bar will show if the player is playing movie music or photo When playing internet contents it will show INTER logo 5 Rear panel 1 LAN RJ45 connector 2 HDMI digital video output 3 S video output 4 Composite video output 5 Component video output 6 Coaxial digital audio output 7 Optical digital audio output 8 2 channel left and righ...

Page 9: ...10 Subwoofer channel audio output 11 Surround speaker left and right audio outputs 12 External antenna connector 13 Power cable slot ...

Page 10: ... Switches audio tracks 10 Mute Press once to mute Press twice to undo mute 11 Volume increase 12 Volume decrease 13 Up cursor 14 Left cursor 15 Right cursor 16 Down cursor 17 OK Enter 18 Return go back to previous menu page 19 DVD Menu 20 Fast backward 21 Play 22 Fast forward 23 Zoom 24 Previous Skip backward 25 Pause 26 Next Skip forward 27 Angle switches play angles 28 Repeat Switches between re...

Page 11: ...to ensure optimum results Make one of the following connections depending on your equipment TV computer monitor projector etc Note If your display device only supports standard definition video input PAL or NTSC then you can connect your TV with the Helios X3000 via composite video cable S video cable or component cable A Digital HDMI or DVI connection The following resolutions are available via H...

Page 12: ...omponent connection The following resolutions are available via component connection PAL NTSC 480p 576p 720p 1080i 720p 50hz 1080i 50hz and 1080p Insert one end of the component video Y Cb Cr into the red blue green socket of the component video output located on the rear of the player Insert the other end of the cable into the component video input socket located on your TV display Use the suppli...

Page 13: ... channel and the red cable into the right channel audio socket output on the player Then connected the white left and red right audio cables to your TV display E S Video connection If there is an s video input socket on your TV than you connect and the player using an S Video cable Use the supplied audio cable to connect the player to the TV ...

Page 14: ... HELIOS X3000 to your audio equipment amplifier AV receiver etc A Connecting to a 2 channel audio amplifier Connect the video output of the player to the video input of your TV system using the corresponding cable Connect the audio cable s FL and FR to the sound input of the L R socket on the amplifier B Connecting to a Digital audio receiver ...

Page 15: ...put C Connecting to a 5 1 channel amplifier Connect the video output of the player to the video input of your TV system using the corresponding cable Connect the 5 1 audio output terminals of the player to the amplifier using the respective connections L and R of mixed FRONT L and R of SURROUND CENTER and SUBWOOFER Ensure that all 6 speakers are connected to the corresponding outputs of the amplif...

Page 16: ... with built in switch or HUB Please use Cat 5 cable to connect the player to the switch or HUB Direct connection to a computer To connect directly to another computer you will need a cat 5 crossover cable Using the cross over cable you can directly the player to a computer s NIC ...

Page 17: ...N to open the LAN settings sub menu 13 If your network has a router or a DHCP server you can simply select automatic allowing the player to connect to your network automatically If you do not use the automatic function you will have to manually setup the IP DNS and Gateway addresses according to your network configuration B Wireless network connection ...

Page 18: ...reless settings you need to switch the preferred network to wireless the default is wired and then reboot the player After rebooting go to wireless settings again to setup the parameters to your wireless AP Access Point Wireless connection to an Ad Hoc network If your wireless network does not use a wireless router switch or you only have 1 wireless computer with no wireless infrastructure you wil...

Page 19: ...hes the player through each of the different output options for NTSC PAL and High Definition Pause for a moment after you press the TV mode button to see if the current output works with your display 3 Click Setup button on the remote control to enter the setup menu 4 Under system Î Video settings menu you can select the correct video mode 5 After selecting the right video mode click Save to save ...

Page 20: ...s 1 Turn on the player and your display device then wait for the player to fully boot up 2 Click the Setup button on the remote control to enter the setup menu 3 In System Î System Language menu Then select your desired language 4 Scroll down to Save and press ENTER on the remote control To get audio using your HDMI connection The HELIOS X3000 digital HDMI output can output either a DVI video only...

Page 21: ...t for details 1 Turn on the player the display device and audio equipment 2 Click the Setup button on the remote control to enter the setup menu 3 In system Î Audio settings and Audio Mode menus you can select the different audio output mode 4 If you have optical coaxial audio connection and use your AV receiver to decode the Dolby Digital DTS 5 1 channel sound you need set Audio Setting to Raw Fo...

Page 22: ...rent IP address then you need to check the cable connection and the DHCP setting of your network Or you may need to set the network settings manually See the appendix section to check the IP address of a computer on the LAN B To setup a network connection without DHCP server If you want to connect to the network without a DHCP server you will need to perform a manual setup 1 Turn on the HELIOS X30...

Page 23: ... your wireless LAN settings How to install NeoLink server software on your computer The HELIOS X3000 is able to access computers on your LAN WLAN and play content therein To do so however you will need to install the NeoLink Server software on your computer s The server software can be downloaded from the link below http www neodigits com download NeoLink zip When installing the software ensure th...

Page 24: ...he home page displayed on your TV To play content from a computer on the network simply use the cursor on the remote control to select the server on the list and press enter Then use the NeoLink browser to select the content you wish to play Note Through NeoLink s Online Media option you can also access all online content that is bookmarked on your media server web pages Web Radio TV RSS feeds pod...

Page 25: ...he HD Mode then select Save to reboot and validate changes DVD VCD CD setup and playback a Inserting discs To open the tray press the EJECT button on the remote control or on the front panel of the player It will take a few seconds for the tray to open after the EJECT button has been pressed NB Press the eject button more than once may result in the disc tray closing again b Close the tray Press t...

Page 26: ...first file in the folder and click Play The HELIOS X3000 offers you a unique way of fast forwarding a video file in quick selection mode To fast forward 10 of the video file content you simply have to press button number 1 on your remote control To fast forward 20 of the video file content press button number 2 on the remote control and so on This feature is in addition to the standard forward rew...

Page 27: ...yed are web radio IPTV podcasts web pages including RSS feeds of you selection To access internet you have three options 1 HELIOS Media portal On the player s home page there will be an icon for HELIOS Media portal The media portal is a web page hosted by NeoDigits Clicking on the media portal icon will open this page where you can browse a catalogue of online media from various sources This page ...

Page 28: ... audio playback pressing Clear repeatedly on your remote control lets you go through different display options on your player s front panel The following options are available A Elapsed Time default B Time Remaining C File Track Chapter number D Off no data displayed Playing DRM content on your HELIOS To play DRM Digital Rights Management enabled content you will first need a valid certificate aut...

Page 29: ... to share To do this open NeoLink Go to Edit Î Preferences From Preferences go to Service Î Web bookmark Then select which browser bookmarks you want to share Now I can go to my HELIOS and look see my local forecast whenever I like From the home page on my HELIOS player I open the NeoLink Page of my server and go to Online Media To go to my web bookmarks I go through the list of links until I find...

Page 30: ...ing access to you media library To control which UPnP devices computers have access to your NeoLink library you have two options A Password In the NeoLink Preferences go to System and then click the Security tab Here you can create a password which will need to be entered each time a device wants to access your NeoLink server B MAC Address Control As an alternative to passwords you can use MAC add...

Page 31: ...he X3000 To access the setup press Setup on the remote control When change an option go to Save Î Enter You may be asked to reboot to enable the changes Or Press Cancel to ignore any changes To restore all settings to their default values select Restore Factory Settings Î Enter System ...

Page 32: ...les Off Internet Security select internet security system SSL2 SSL3 or TLSV1 SSL2 SSL3 Video Setting select the video output and resolution Video Zoom Select the default zoom level used by the player Fit to Screen Full Screen Actual Size Audio Setting For digital audio you can select the player to output a Raw signal or PCM format Audio Mode For audio mode you can select Stereo or 5 1 channel surr...

Page 33: ...control password Setup or change the parental password of the player TV Type Select the TV shape to suit your display 4 3 Letterbox 4 3 Pan Scan or 16 9 LAN Settings MAC Address Displays the MAC address of the player This can not be changed IP address Enter an IP address for the player Subnet Mask Enter a subnet mask address value Primary DNS Enter a primary DNS number value Secondary DNS Enter a ...

Page 34: ...be ignored Available A list of available wireless networks Select a network from the list then press Select SSID Set the SSID to be used by the player Connection Select the type of wireless network Infrastructure or Ad Hoc Security Select the security method that your wireless network uses WEP 64Bit WEP 128 Bit WPA TKIP WPA AES or Disabled Time Settings Primary NTP Server Set the address of the Ne...

Page 35: ...ograms XP or Programs NT and 2000 2 Select Accessories then Command Prompt 2000 and XP or Command Prompt NT 3 At the command prompt enter ipconfig all 4 You will see your computer s Host name DNS servers Physical address IP address Subnet mask Default gateway and WINS servers information 5 To close the command prompt enter exit b For Windows 95 98 and Me 1 Click the Start button and select Run 2 T...

Page 36: ...s supported 3 If using the player with a HDMI TV please ensure the Connected to DVI TV is checked Picture distorted or loss of color 1 Check all video cable connections 2 The Video output settings of the player are not matched with the input settings of the TV Display Double check both player and DVD settings 3 Damaged or poor quality media No Disc Invalid Disc displayed This can happen with a dir...

Page 37: ...rk wireless 1 Poor signal strength Try relocating your wireless HUB router closer to your player 2 Wireless antenna not securely attached 3 Wireless access point incorrect Refer to Windows documentation about creating wireless networks Can not browse internet 1 Check your internet connection try connecting to the internet from a computer on the network 2 Network problem see above Can not read medi...

Page 38: ...t a support ticket on www neodigits com esupport or you can email us at esupport neodigits com All questions will be answered within 48 hours excluding Saturday Sunday and public holidays If you have any suggestions about this product feel free to contact us at info neodigits com ...

Reviews: