...REAKTOR ESC PROGRAMMING CONTINUED...
11
1/10th SCALE 4x4
BRUSHLESS POWERED
MONSTER TRUCK
competition racing. Using a setting this low with a LiPo battery may cause excessive “wear and tear” on your batteries, shorten-
ing their lifespan.
5. 3.2V/Cell: This setting is recommended as the default for running average grade LiPo batteries. If your batteries are relatively old
it is recommended to use setting 6 instead.
6. 3.4V/Cell: This setting can be used with any LiPo battery and will provide the “safest” discharge level for your batteries however
some lower quality batteries do not sustain their voltage under heavy load and will cause premature LVC activation. Starting
here is a good choice if you are unsure or just want to be extra cautious.
Item 4: Start Mode/Punch (Higher value is more aggressive):
The Reaktor ESC has 4 “punch” profi les that allow you to tune the initial power output of the ESC to suit your driving, vehicle, and
the surface. You will typically want a lower punch setting when the surface has less traction. To get the optimal performance out of
LiPo batteries, on high traction sufaces, setting 4 is recommended.
1. Level 1 (70%): This setting will provide the smoothest throttle feel and least wheel spin.
2. Level 2 (80%)
3.
Level 3 (90%)
: This is the highest setting that should be used with high performance NiMH batteries such as those included
with your vehicle.
4. Level 4 (100%): This setting is recommended for use with LiPo batteries only and allows you to get the maximum acceleration
from your power system. Choosing a setting higher than #3 for use with NiMH batteries will cause inconsistent operation of your
ESC, including possible momentary power loss.
Item 5: Maximum Brake Force:
The Reaktor ESC has 4 maximum brake force settings allwowing you to tune your brakes for different driving surfaces. This setting
works in conjunction with the brake EPA setting on your transmitter which can still be used to fi ne tune the braking force, however
this setting affects the initial brake force also. Since your vehicle is using a high performance brushless motor which has great brak-
ing effi ciency already, we have reduced the setting to #3. On some surfaces you may still fi nd this setting to be too high and fi nd
that under heavy braking with 4wd vehicles the rear tires may come off the ground. This is a very unstable situation and should be
avoided at all costs. If this happnes, reduce the maximum braking force to a lower setting. If however you are unable to stop and the
lack of deceleration is not due to wheel slipping, you can increase the braking force.
WARNING: Be sure to check your maximum brake settings by driving from full throttle to full hard brake in an open area.
If the rear tires come off the ground causing a front fl ip, the vehicle will tumble out of control and could cause personal or
property damage.
1. 25%: This is the lowest setting and should only be used when driving with slow motors and on loose (low traction) surfaces.
2. 50%: It is not recommended to go below this setting on asphault surfaces as the stopping power may not be enough to safely
slow your vehicle.
3.
75%
: This is the default setting we feel will provide you the best starting point for many different levels of tration on various sur-
faces. Remember it is extremely important to only drive a vehicle as fast as you can safely stop it. If the vehicle hits something
or someone it can cuase serious injury.
4. 100%: This setting is only recommended if you are running a slotted type motor, running this with a slotless style motor com-
bined with a 4wd vehicle will likely cause front fl ips thus a loss of control of your vehicle.
Reset to Factory Defaults:
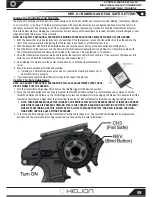
At any time when the throttle is located in neutral zone (except in the throttle calibration or programming mode), hold the “SET” key
for over 3 seconds, the red LED and green LED will fl ash at the same time , which means each programmable item has be reset to
its default value.
Audible/Visual Programming Alerts:
In dirty conditions or with various installations scenarios, visibility of the LED’s may be obstructed. To assist with setting the ESC
parameters you will also be able to hear audible beeps from the motor that will indicate the value of fl ashes the LED is transmitting.
To help interpret the beeps and fl ashes we use a long time fl ash and long “Beep---” tone to represent number “5”, so it is easy to
identify the higher quantity of fl ashes/beeps. This applies to both the programming parameter selection and also the value of each
programmable item.
• For example, if the LED fl ashes as the following:
› “A long time fl ash” (Motor sounds “B---”) = the No. 5 item
› “A long time fl ash + a short time fl ash” (Motor sounds “B---B”) = the No. 6 item
› “A long time fl ash + 2 short times fl ash” (Motor sounds “B---BB”) = the No. 7 item
› “A long time fl ash + 3 short times fl ash” (Motor sounds “B---BBB”) = the No. 8 item
› “A long time fl ash + 4 short times fl ash” (Motor sounds “B---BBBB”) = the No. 9 item.
Summary of Contents for Invictus 10MT
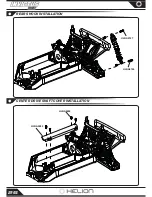
Page 18: ...REAR BUMPER ASSEMBLY REAR BUMPER INSTALLATION 18 HLNA0259 HLNA0145 HLNA0259 HLNA0281 HLNA0124 ...
Page 35: ...NOTES 35 1 10th SCALE 4x4 BRUSHLESS POWERED MONSTER TRUCK ...
Page 36: ... NOTES 36 ...
Page 40: ...1 10th SCALE 4x4 BRUSHLESS POWERED MONSTER TRUCK 000091 001 REV A HLNA0289 POWERED BY ...


