background image

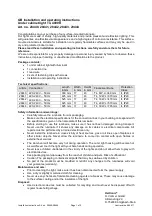
Installation instructions Art. no. 28440-28444

Page 2 of 2

Last revision 06.2011

Installation:

The under cabinet light is suitable for mounting on normal, flame-proofed surfaces. Only for
use in inside rooms. Do not install the light near heat sources, gas or oil lines or open sources
of flame.

Several surface mounted/under cabinet lights up to a total capacity of 100 W can be
connected with each other. Please use the lead wire provided in the scope of delivery for this
purpose, or plug in the lamps one after the other.

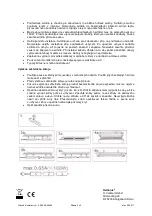
Decide on the location where installation has to take place. The lights are suitable for surface
mounting or under cabinet mounting. Mount the brackets for surface mounting or under
cabinet mounting. Make sure that the base and the fastening material are suitable and the
weight of the lights can be supported permanently and reliably. Press the light into the holder
after fastening the brackets so that you can hear it locking into position. Now insert the supply
line into the connection at the light. Make sure when you are laying the cable that the cable
and the plug are free from tensions and twisting forces. Do not bend the cable.

Switching on and off is done by using the toggle switch on the light casing.

Connection is made to the mains after the installation work has been completed.

The type name plate must not be removed.

Changing the illuminant:

Use only illuminants listed in the technical specifications. The use of other illuminants may
cause the light to overheat.

Disconnect the power supply before changing the illuminant.

If you are replacing the illuminant immediately after the light has failed, wait until the light has
cooled off sufficiently.

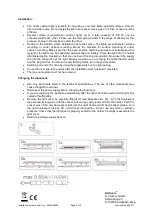
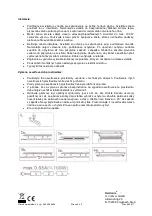
Remove the light cover by carefully lifting it off (see illustration 4a, 4b) . Turn the fluorescent
tube around its long axis until the socket pins can be easily removed from the holder. Push the
socket pins of the new fluorescent tube into the right hand and left hand socket guides. Turn
the new fluorescent tube by 90° until it locks into position. Do not use any force or extreme
pressure. Check that the illuminant is properly seated in the holder. Carefully reassemble the
light cover.

Switch the voltage supply back on.

Heitronic

®

H. Vollmer GmbH
Allmendring 29
D-75203 Königsbach-Stein

Summary of Contents for 28440

Page 1: ...43 T4 20W L 570 mm II IP20 28444 220 240 V 50 Hz 825 mm 17 43 T4 30W L 765 mm II IP20 Sicherheits und Warnhinweise Bevor Sie die Leuchte in Betrieb nehmen versichern Sie sich dass diese auf dem Transportweg nicht beschädigt wurde Bei Beschädigung am Kabel oder elektrischen Teilen darf die Leuchte nicht betrieben werden Nehmen Sie niemals selbst Reparaturen an defekten Teilen vor Reparaturen müssen...

Page 2: ...cken Sie nun die Zuleitung in den Anschluss an der Leuchte Bei der Verlegung der Kabel bitte darauf achten dass die Kabel und Stecker frei von Zug und Drehkräften sind Kabel nicht knicken Das Ein bzw Ausschalten erfolgt am Kippschalter an dem Leuchtengehäuse Nach Beendigung der Montagearbeiten erfolgt die Verbindung mit dem Stromnetz Das Typenschild darf nicht entfernt werden Leuchtmittelwechsel V...

Page 3: ... remove the luminaire from its packaging Make sure the electrical specifications for the connection lines in your building correspond with the specifications given on the nameplate of this luminaire Before starting to use this luminaire make sure it has not been damaged during transport Never use the luminaire if it shows any damage on its cables or electrical components All repairs must be perfor...

Page 4: ... when you are laying the cable that the cable and the plug are free from tensions and twisting forces Do not bend the cable Switching on and off is done by using the toggle switch on the light casing Connection is made to the mains after the installation work has been completed The type name plate must not be removed Changing the illuminant Use only illuminants listed in the technical specificatio...

Page 5: ...allage Vérifiez sur votre tableau électrique que les valeurs de branchement pour l alimentation de ce luminaire correspondent aux données indiquées sur sa plaque signalétique Avant de mettre en service le luminaire assurez vous qu il n a pas été endommagé durant le transport Si le câble ou les pièces électriques sont endommagés il n est pas permis d utiliser ce luminaire Seul un électricien est au...

Page 6: ...e les câbles et fiches soient exempts de forces de traction et de rotation Ne pas flamber les cdâbles L enclenchement déclenchement est assuré par l interrupteur à bascule monté sur le boîtier de lampe Le raccordement au réseau est effectué au terme des travaux de montage La plaque signalétique ne doit pas être enlevée Remplacement des ampoules Utilisez uniquement les ampoules indiquées dans les c...

Page 7: ...e lamp voorzichtig uit de verpakking Controleer of de aansluitwaarden van de stroomtoevoer door uw huisinstallatie overeenkomen met de gegevens op het typeplaatje van deze lamp Controleer eerst of de lamp tijdens het transport beschadigd werd voordat u ze in gebruik neemt Als de kabel of elektrische delen beschadigd zijn mag de lamp niet gebruikt worden Reparaties mogen uitsluitend door een elektr...

Page 8: ...imelschakelaar aan de behuizing kunt u de lamp aan en uitschakelen Nadat de montagewerkzaamheden zijn afgerond lamp op het stroomnet aansluiten Naamplaatje niet verwijderen Vervangen van de lamp Gebruik uitsluitend lampen zoals ze in de technische gegevens aangegeven zijn Het gebruik van andere lampen kan oververhitting tot gevolg hebben Voordat u een lamp gaat vervangen moet u de stroomtoevoer on...

Page 9: ...ga con attenzione la lampada dall imballo Si assicuri che i valori di collegamento del Suo impianto domestico per l alimentazione alla lampada siano conformi ai dati riportati sulla targhetta di questa lampada Prima di mettere in funzione la lampada si assicuri che questa non sia stata danneggiata durante il trasporto In caso di danni al cavo o a componenti elettrici non utilizzare la lampada Le r...

Page 10: ...fare attenzione a che sia lui che la spina non siano sottoposti a forze di trazione o torsione Non piegare il cavo in due La lampada si spegne e si accende mediante l interruttore ribaltabile collocato sul suo alloggiamento Completati i lavori di montaggio collegare la lampada con la rete elettrica Il cartellino del tipo non deve essere eliminato Cambio lampadina Utilizzi solo le lampadine indicat...

Page 11: ...okyny Opatrně vyjměte svítidlo z balení Ujistěte se že přípojné hodnoty Vaší domovní elektroinstalace souhlasí s údaji uvedenými na typovém štítku tohoto svítidla Před uvedením svítidla do provozu se ujistěte že nebylo při přepravě poškozeno Je li poškozen kabel nebo elektrické části nesmí být svítidlo používáno Opravy smí provádět pouze odborní elektrikáři Nemontujte toto svítidlo v bezprostřední...

Page 12: ...vované tahovým silám a kroucení Kabely neohýbejte a neprolamujte Zapínaní a vypínaní proveďte kolébkovým spínačem který se nachází na tělesu svítidla Po ukončení montážních prácí následuje spojeni s elektrickou sítí Typový štítek není radno odstraňovat Výměna světelného zdroje Použijte pouze světelný zdroj uvedený v technických údajích Použití jiných světelných zdrojů může vést k přehřátí Před vým...

Page 13: ...parmaturen ur förpackningen Försäkra Dig om att alla anslutningsvärden för strömtillförsel i Ditt hus stämmer överens med angivna data på denna armaturs typskylt Innan lamparmaturen tas i bruk måste man försäkra sig om att den inte har blivit skadad under transporten Om kabeln eller elektriska delar är skadade får lamparmaturen inte användas Reparationer får uteslutande utföras av en behörig elekt...

Page 14: ...rnas placering skall kontrolleras att kablar och kontakter inte utsätts för drag eller vridningar Kablarna får inte vikas Lampan slås till och från via tippbrytaren på lampans hölje Efter avslutat montage ansluts lampan till elnätet Typskylten får inte borttas Byte av glödlampa Använd endast glödlampor motsvarande uppgift under tekniska data Användning av andra glödlampor kan medföra överhettning ...

Page 15: ...ontrolujte či pripojovacie hodnoty vnútornej inštalácie ktorá zabezpečuje prívod prúdu do svietidla súhlasia s údajmi na typovom štítku svietidla Než svietidlo uvediete do prevádzky skontrolujte či nebolo poškodené počas prepravy Pri poškodení kábla alebo elektrických dielov nie je dovolené svietidlo prevádzkovať Opravy smú byť vykonávané výhradne odbornými elektrotechnickými pracovníkmi Svietidlá...

Page 16: ...eniu Káble neohýnajte a nelámte Zapínanie a vypínanie vykonáte kolískovým spínačom ktorý sa nachádza na telese svietidla Po ukončení montážnych prác nasleduje spojenie s elektrickou sieťou Typový štítok nesmiete odoberať Výmena osvetľovacích prostriedkov Používajte iba osvetľovacie prostriedky uvedené v technických údajoch Používanie iných osvetľovacích prostriedkov môže viesť k prehriatiu Pred vý...

Page 17: ...atenţie corpul de iluminat din ambalaj Asiguraţi vă că valorile de alimentare electrică din instalaţia din locuinţa dv coincid cu datele de pe plăcuţa de identificare a corpului de iluminat Înainte de a pune în funcţiune corpul de iluminat asiguraţi vă că acesta nu a fost deteriorat în timpul transportului În cazul deteriorării cablului sau a componentelor electrice nu mai este permisă utilizarea ...

Page 18: ...pii Aveti in vedere la montarea cablurilor ca acestea sa nu fie solicitate la intindere sau torsiuni Nu indoiti cablurile Aprinderea respectiv stingerea se face de la intrerupatorul de pe carcasa lampii Dupa terminarea montajului se face conectarea la reteaua de curent Este interzisa inlaturarea placutei indicatoare Înlocuirea lămpii Utilizaţi numai lămpi de tipul indicat în datele tehnice Utiliza...

Reviews: