background image


12  

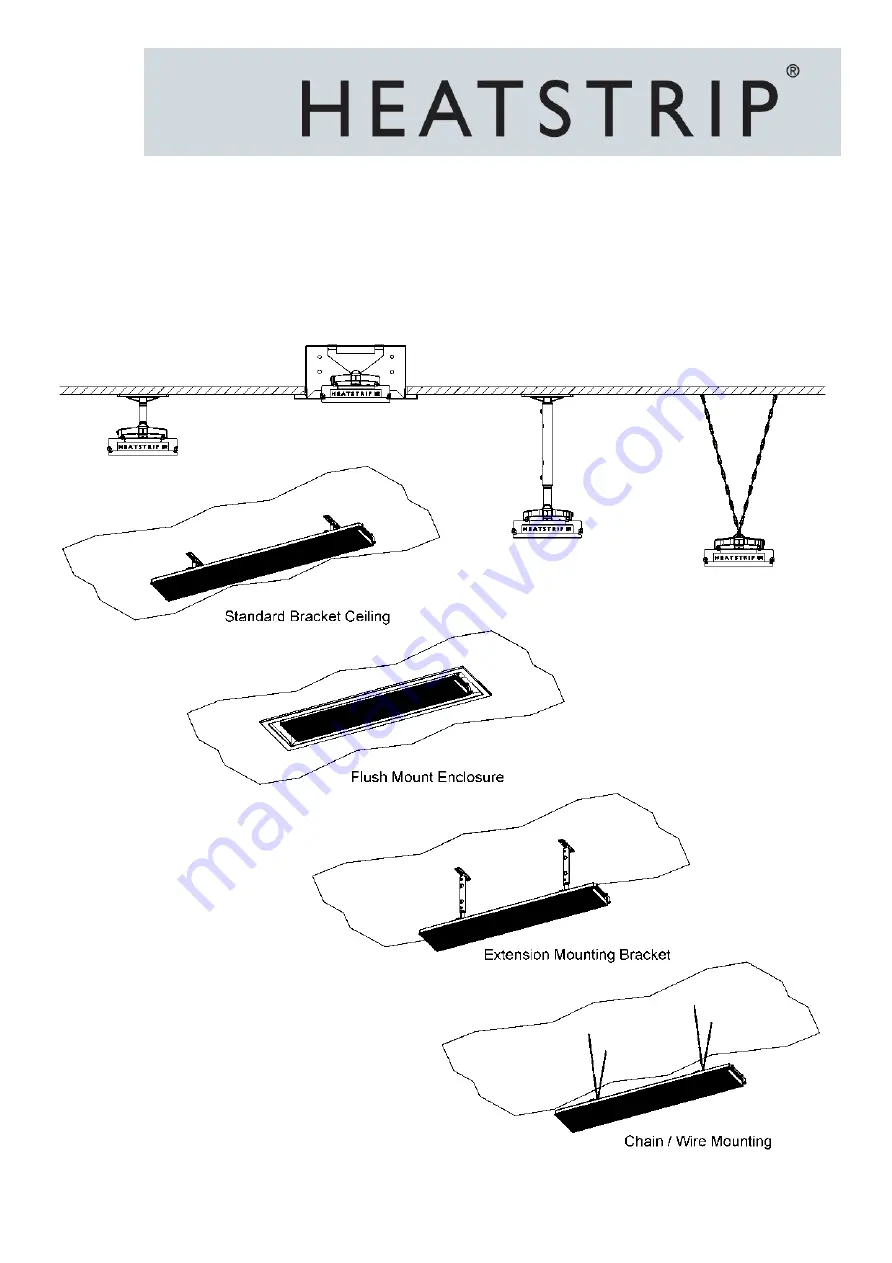
Mounting options 


Installing  the  HEATSTRIP

®

  Classic  is  simple  and  easy  using  the  standard  mounting  brackets  supplied.  For  other  irregular 

locations there are range of mounting options available  - refer to diagrams below  
 

The  HEATSTRIP

®

  Classic  can  be  mounted directly to the ceiling,  angled downwards  on  a  wall,  fitted  flush  with  the ceiling, 

suspended on chains or poles, attached to beams or poles, mounted end-to-end, or 2 units side-by-side together. Refer to the 

following pages for more detailed information on each mounting option. 

Summary of Contents for thh1800a

Page 1: ...Ph 03 9562 3455 E sales thermofilm com au www heatstrip com au HEATSTRIP Classic THH A Classic THH A Product Manual ...

Page 2: ...of 2 3m to 2 5m and maximum mounting height of 2 7m HEATSTRIP Max THX THXDCR models is an ultra high temperature heater used for uncovered or open indoor or outdoor areas with an ideal mounting height of 2 3 m to 2 7m and up to a maximum 3 5m for protected indoor applications HEATSTRIP Intense THY THYW models is an instant high temperature heater perfect for any exposed outdoor or indoor areas wit...

Page 3: ... when in use blending elegantly into your décor Ceiling wall and umbrella mounting options ensure that your valuable floor and table space is not wasted Efficient cost effective electric heating The innovative design of the HEATSTRIP enables comfortable and even heat dispersion from the heater surface with minimal operating costs Design flexibility Four HEATSTRIP models are available ensuring the ...

Page 4: ...240 Volts Nominal at 50 60 Hertz Single Phase CONNECTION 3 Core Cable 2 5mm2 APPROVALS AUSTRALIA NZ MOUNTING HEIGHT MINIMUM RECOMMENDED MAXIMUM 2 1 m 2 3 m to 2 5 m 2 7 m in a fully enclosed outdoor area For higher ceiling heights units can be lowered using optional bracket kits or refer to the Heatstrip Max range MOUNTING OPTIONS Suitable for ceiling wall beam fixed umbrella and recess mounting A...

Page 5: ...le and average running time of 9 hours 25 00 9 hours 2 78 per hour 2 Electricity rate of 20 0 cents kWh 3 All calculations are excluding GST 1 8kW x 0 20 cents 0 36 or 36 cents per hour 2 4kW x 0 20 cents 0 48 or 48 cents per hour 3 2kW x 0 20 cents 0 64 or 64 cents per hour Calculations of yearly running cost are based on 180 hours usage 180 hours x 2 78 500 40 yearly running cost for outdoor gas...

Page 6: ...ore practical and efficient to spot heat high use areas Spot heating will reduce both the initial capital cost as well as the ongoing running costs Spot heating will allow the area to be zoned meaning only the areas that are being used are heated such as tables in a restaurant or outdoor alfresco area Option 1 and 2 show a comparison between heating an entire area or spot heating over a table The ...

Page 7: ... under the heater and the temperature decreases as you move away from the heater It highlights the importance of maintaining recommended mounting heights and if possible positioning the heater directly above the area to be heated Note that the temperature is the same for all 4 models regardless of the wattage However as the size increases and the length of the unit increases the radiant footprint ...

Page 8: ... For indoor spot heating a minimum heating capacity of 400W m2 is recommended The table below outlines the coverage of each HEATSTRIP Classic model based on 3 different scenarios with di rect overhead mounting For example for an outdoor area that is protected from prevailing winds by walls café blinds etc Model THH 1500A will cover 3m2 and Model THH2400A will cover 4 8m2 For angled wall mounting a...

Page 9: ...n easy selection guide for the approximate model and quantity of heaters required to heat common resi dential table settings Selections are based on HEATSTRIP Classic being mounted at 2 4m from the floor in a fully enclosed undercover outdoor area 1 x THH1800A 1 x THH3200A 1 x THH3200A 2 x THH1800A 2 x THH1800A 2 x THH2400A 4 x THH1800A 2 x THH3200A ...

Page 10: ...ccessories to reduce the height of the heater to 2 3m 2 5 m This will increase the effectiveness of your HEATSTRIP Refer to the Mounting Accessory section for more information Electrical connections GPO s should not be located at the back of the heater They should be located outside the physical footprint of the units to minimize heat build up behind the units If the heater is to be mounted on an ...

Page 11: ...s when they are occupied by persons not capable of leaving the room on their own unless constant supervision is provided Angled Wall Installation Ceiling Installation Angled Ceiling Installation Lights fans and sprinklers must NOT be below heater Surface Below Heater Lights fans and sprinklers must NOT be below heater Surface Below Heater Lights fans and sprinklers must NOT be below heater Surface...

Page 12: ...e of mounting options available refer to diagrams below The HEATSTRIP Classic can be mounted directly to the ceiling angled downwards on a wall fitted flush with the ceiling suspended on chains or poles attached to beams or poles mounted end to end or 2 units side by side together Refer to the following pages for more detailed information on each mounting option ...

Page 13: ...ting brackets These adjustable brackets allow direct ceiling or wall mount and come with preset angle options of parallel 22 5 and 45 PART No PACKAGED DIMENSIONS mm WEIGHT kg MATERIAL ZBRAK 113S 125 x 150 x 40 0 2 ALLOY MODEL X MINIMUM DISTANCE mm THH1800A 710 THH2400A 1000 THH3200A 1470 ...

Page 14: ...models and are supplied as a one piece unit suitable for mounting individual heaters Flush mounting can be used with plaster or timber lined ceiling materials An ideal mounting height is 2 3m 2 5m with a maximum ceiling height of 2 7m in an outdoor enclosed environment Maximum mounting heights should be strictly followed otherwise the performance of the units may be reduced The facia of the enclos...

Page 15: ...to hard to mount applications where wall mounting is preferable to direct overhead mounting applications include heating over tables lounges work stations etc These kits are suitable for all HEATSTRIP Elegance Classic models Instructions Fix the wall bracket in the desired location using 6 x 8 mm fasten ers that will be more than adequate to safely support the bracket and the HEATSTRIP unit When b...

Page 16: ...options as part of the kit are 150mm 300mm 600mm 900mm and 1200mm The extension mount brackets utilise components from the standard bracket kit which is supplied with each heater screws to ceiling are not included PART No DIMENSIONS mm WEIGHT kg MATERIALS NOTES THHAC 005 300 x 20 x 20 0 21 ALLOY Kit Includes 2 x 300mm Extension Poles THHAC 006 600 x 20 x 20 0 38 ALLOY Kit Includes 2 x 600mm Extens...

Page 17: ...ct rainfall All models can be connected to the horizontal umbrellas struts using the Pole Beam mounting kit THHAC 001 Quick reference guide for spot heating common permanent umbrella structure 12 m2 umbrella area 4 x THH 1800A 16 m2 umbrella area 6 x THH 1800A This is a guide only For more detailed information please contact the umbrel la manufacturer your nearest HEATSTRIP retailer or Thermofilm ...

Page 18: ...eater needs to be installed as per the installation instructions paying special attention to the minimum clearances The heater needs to be mounted on a rigid bracket or fixing The heater must not be mounted immediately below or in front of a socket outlet In case of a heater fault or damaged supply lead the appliance should be returned to the point of purchase for return to Thermofilm for repair M...

Page 19: ...ireless timer operation Design Features The TT MTR PLUG provides an easy means of remotely turning on appliances that are normally permanently connected to a standard wall socket An easily selected 1 hour 2 hour and 4 hour timer func tion accessible on both the wall unit and remote Programmable remote control unit capable of controlling multiple units Specifications Remote battery CR2025 3V Lithiu...

Page 20: ...s alfresco areas restaurant dining assembly line production etc When continuous heat is not required The timer also reduces the likelihood of heaters being inadvertently left turned on Depending on the ambient temperature there may be a requirement to control the heat output of the heater The controller has 3 settings they are High Medium and Low The controller allows a combination of the multiple...

Page 21: ...controller is to be mounted indoors it needs to be away from wet conditions Ensure the connections are properly connected The controller needs to be installed according to your local wiring guidelines and regulations Do not allow any cables furnishings flammable materials or other items to obstruct the vents of the controller Never block the air vents of the controller Never block the air vents of...

Page 22: ...ent air circulation in order to provide continuous operation on the high power load setting The vents must always remain clear never block or cover the vents An ideal controller installation will provide significant space around the back of the controller Installing into restricted spaces such as brick walls may result in overheating if adequate ventilation is not provided ...

Page 23: ...A must not be exceeded For direct wiring to the controller the maximum is generally on heater unit unless the combined maxi mum current is less than 16A For example 2x THH1800A can be connected directly to the controller Below are example circuits indicating potential installation configurations Always check with your electrician and ensure all wiring is in accordance with local regulations Heater...

Page 24: ...orized representative of Thermofilm Thermofilm does not participate in any site related costs or labour expenses incidental to replacement of parts repairing removing installing servicing transportation or handling of parts to complete products and assumes no liability on parts repaired or replaced without written authorisation Thermofilm shall not be liable for any default or delay in performance...

Reviews: