Use the wall bracket to secure the heater by fitting the last screw into
the upper hole.
Remove the fixing board from inside the heater.
Thread the supply cable through the hole in the rear of the case.
Make connections to the supply terminals according to the colour code
(Please see Electrical Connection). Ensure that there are no strands or
whiskers protruding from the terminals
Secure the cable under the fixing board, ensure that the cable is griped
firmly but take care not to over tighten the screws.
Select the desired mode of operation using the switch i.e. I= 1kW fixed
heat, II=1kW fixed heat + 1kW variable thermostat controlled set the
thermostat to the mid position. Close and secure the front cover.
Restore the power and switch on.
Adjustment
The adjustment of the internal thermostat must be carried out by a
competent person.
Switch off the main power and remove the fuse from the double pole
fused spur.
Remove the two screws on the front of the case and remove the front
cover.
Select the desired mode of operation using the switch i.e. I= 1kW fixed
heat, II=1kW fixed heat+ 1kW variable thermostat controlled
Turn the thermostat control clockwise to increase the room temperature
and anti-clockwise to decrease.
Close the front over and secure using the two screws, replace the fuse
and switch on the power supply.
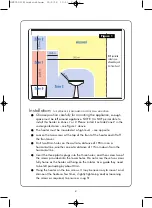
A
C
B
B
M
Miinniim
muum
m m
moouunnttiinngg ddiissttaanncceess
AA –
– 228800m
mm
m
minimum of space required above the heater
BB –
– 225500m
mm
m
minimum space on either side of the heater
CC –
– 11880000m
mm
m
minimum height from the floor
5
HS2000X(R)instructions 15/8/14 10:33 Page 5

