Heat & Glo LifeStyle GEM42 Installer'S Manual Download Page 20

20

Heat & Glo  •  GEM42  •  371-900  Rev. N  •  2/05

V

= VENT  TERMINAL

X

= AIR SUPPLY INLET

= AREA WHERE TERMINAL IS NOT PERMITTED

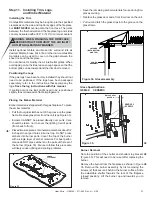
     Figure 21.  Vent Termination Minimum Clearances

A

= 12" ....................... clearances above grade, veran-

da, porch, deck or balcony

B

= 12" ....................... clearances to window or door

that may be opened, or to per-
manently closed window.

D*

= 18" ....................... vertical clearance to unventilat-

ed soffit or to ventilated soffit lo-
cated above the terminal

    *30” ...................... for vinyl clad soffits and below

electrical service

F

=  9" ........................ clearance to outside corner

G

= 6" ......................... clearance to inside corner

H

= 3 ft. (Canada) ...... not to be installed above a gas

meter/regulator assembly within
3 feet (90cm) horizontally from the
center-line of the regulator

I

= 3 ft. (U.S.A.)

6 ft. (Canada) ...... clearance to gas service regu-

lator vent outlet

J

= 9" (U.S.A.)

12" (Canada) ........ clearance to non-mechanical air

supply inlet to building or the
combustion air inlet to any other
appliance

K

= 3 ft. (U.S.A.)

6 ft. (Canada) ......... clearance to a mechanical

air supply inlet

L** = 7 ft. ......................... clearance above paved

sidewalk or a paved driveway
located on 

public

 property

M*** = 18" ......................... clearance under veranda,

porch, dec, balcony or over-
hang

42” ......................... vinyl

N

= 6” ........................... non-vinyl sidewalls

12” ......................... vinyl sidewalls

P

= 8 ft.

CAUTION: 

IF EXTERIOR WALLS ARE FINISHED WITH VINYL SIDING, IT IS SUGGESTED THAT A VINYL PROTECTOR KIT BE

INSTALLED.

  **

a vent shall not terminate directly above a sidewalk or paved
driveway which is located between two single family dwellings
and serves both dwellings.

 *** only permitted if veranda, porch, deck or balcony is fully open on

a minimum of 2 sides beneath the floor, meets Note 2.

NOTE 1

: On private property where termination is less than 7 feet

above a sidewalk, driveway, deck, porch, veranda or balcony, use of
a listed cap shield is suggested.

NOTE 2

: Termination in an alcove space (spaces open only on one side

and with an overhang) are permitted with the dimensions specified for
vinyl or non-vinyl siding and soffits. 

1

. There must be 3 feet minimum

between termination caps. 

2. 

 All mechanical air intakes within 10 feet

of a termination cap must be a minimum of 3 feet below the termination
cap. 

3.

 All gravity air intakes within 3 feet of a termination cap must be

a minimum of 1 foot below the termination cap.

(See Note 1)

(See Note 1)

(See Note 2)

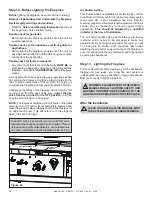
S =  6" .......................... clearance from sides of elec-

trical service

T = 12" ......................... clearance above electrical

service

______________________________________________________________________

______________________________________________________________________

______________________________________________________________________

______________________________________________________________________


Q

MIN

     R

MAX

  1 cap

  3 feet

   2 x Q 

ACTUAL

  2 caps

  6 feet

   1 x Q 

ACTUAL

  3 caps

  9 feet

2/3 x Q 

ACTUAL

  4 caps

12 feet

1/2 x Q 

ACTUAL

Q

MIN

 = # termination caps x 3        R

MAX

 = (2 / # termination caps) x Q

ACTUAL

(See Note 5)

(See Note 5)

Electrical

Service

V

S

V

S

V

T

D*

V

NOTE 3

: Local codes or regulations may require different

clearances.

NOTE 4: 

Termination caps may be hot. Consider their proximity to

doors or other traffic areas.

NOTE 5: 

Location of the vent termination must not interfere with

access to the electrical service.

WARNING: In the U.S:

 Vent system termination is 

NOT

 permitted

in screened porches. You must follow side wall, overhang and
ground clearances as stated in the instructions.

In Canada:

 Vent system termination is 

NOT

 permitted in screened

porches. Vent system termination is permitted in porch areas
with two or more sides open. You must follow all side walls,
overhang and ground clearances as stated in the instructions.

Heat & Glo assumes no responsibility for the improper perfor-
mance of the fireplace when the venting system does not meet
these requirements.

D

E

B

L

v

v

v

v

v

v

v

v

B

B

A

H

M

X

J or K

I

A

G

F

U.S.

(3 FT)

B

M

N

P

R

Q

Summary of Contents for GEM42

Page 1: ...ac tured mobile home wherenotprohibited by local codes 2 This appliance is only for use with the type of gas indicated on the rating plate This appliance is not convertible for use with other gases un...

Page 2: ...front READ and UNDERSTAND all instructions carefully before starting the installation FAILURE TO FOLLOW these installation instructions may result in a possible fire hazard and will void the warranty...

Page 3: ...rovals 13 B Installing Vent Components 17 C Vent Termination 19 Step 4 Positioning Leveling and Securing the Fireplace 21 Step 5 Installing the Optional Heat Out or Heat Zone Kits 22 Step 6 The Gas Co...

Page 4: ...llowing page La liste des num ros de pi ce se trouve la page suivante 5 Log set assembly 6 8 7 9 4 2 3 12 10 11 NG LP Exploded Parts Diagram GN PL Vue clat e des pi ces Service Parts GEM42 Beginning M...

Page 5: ...e de ventilateur GFK 160A Mineral Wool Laine min rale 050 721 Fiberglass Rope Corde de fibre de verre 060 455 Golden Embers Braises dor es GE 93 Vermiculite Embers Vermiculite Braises MYSTIC EMBERS Te...

Page 6: ...G Module de veilleuse GN 370 510A 7 Pilot Assembly LP Module de veilleuse PL 370 511A 8 Pilot Bracket Parenth se Pilote 370 165 9 Ground Strap Courroie de Raison Terre 385 512 10 Valve Bracket Parenth...

Page 7: ...odes or in the absence of local codes with the National Electric Code ANSI NFPA No 70 in the United States or to the CSAC22 1 Canadian Electric Code in Canada These models may be installed in a bedroo...

Page 8: ...aximum safety and benefit Failure to follow these instructions will void the owner s warranty and may present a fire hazard The Heat Glo Warranty will be voided by and Heat Glo disclaims any responsib...

Page 9: ...ATES AND LABELS GAS CONTROLS GAS LINE ACCESS ELECTRICAL ACCESS HEAT ZONE KNOCKOUTS HEAT OUT KNOCKOUT ORIFICE ACCESS PANEL 3 76 2mm 47 9 16 1208 1mm 40 17 32 1029 5mm 35 9 32 896 2mm 2 50 8mm 4 1 2 114...

Page 10: ...ruction Constructing the Fireplace Chase A chase is a vertical box like structure built to enclose the gas fireplace and or its vent system Vertical vents that run on the outside of a building may be...

Page 11: ...D WALL COVERING DETAILS BEFORE FRAMING Shows center of 10 x 12 vent framing holes for top and rear venting The center of the hole is one 1 inch 25 4mm above the center of the horizontal vent pipe F A...

Page 12: ...AT EACH JOINT Figure 4 DVP Series Direct Vent Component Specifications 5 inch inner pipe 8 inch outer pipe DVP90ST 12 9 16 11 1 4 7 1 4 1 1 4 TYP 1 2 TYP 8 9 16 DVP36 DVP48 48 24 36 4 6 DVP4 DVP6 12...

Page 13: ...d with each vent termination kit and should be used in conjunction with this Installers Guide Theflameandemberappearancemayvarybasedonthetype of fuel burned and the venting configuration used Identify...

Page 14: ...restrictor installation Insert each restric tor in one of the 3 exhaust collars as shown Figure 8 Flue Restrictor 1 3 4 2 1 1 2 DIAMETER Figure 7 FLUE RESTRICTOR 15 30 30 40 NG 1 3 4 1 1 2 LP 2 1 3 4...

Page 15: ...m 8 5 MIN 2 59m 24 MAX 7 28m V 40 MAX 12 2m V H 64 MAX 19 5m H 24 MAX 7 28m Figure 11 Venting with One 90 Elbow NOTE Must have an 18 minimum vertical vent before attaching a 90o elbow to the unit H V...

Page 16: ...82m 3 5 MIN 1 06m 9 MAX 2 73m 4 5 MIN 1 37m 12 MAX 3 64m NOTE H H1 24 MAX 7 28m V V1 H H1 64 MAX 19 5m V FT H H1 FT 2 MIN 609m 3 MAX 912m 2 5 MIN 762m 6 MAX 1 82m 3 5 MIN 1 06m 9 MAX 2 73m 4 5 MIN 1...

Page 17: ...Figure 14 Fiberglass Rope Ring FIBERGLASS ROPE RING FIRST VENT COMPONENT OUTER WRAP 2 Continue Adding Vent Components Continue adding vent components snap locking locking each succeeding component int...

Page 18: ...opening 10 12 INTERIOR WALL SHIELD For Vertical Runs One ceiling firestop is REQUIRED at the hole in each ceiling through which the vent passes To install firestops for vertical runs that pass through...

Page 19: ...NING THE TERMINATION CAPMUST BE POSITIONED SO THAT THEARROW IS POINT ING UP For trapezoidal cap termination kits Using screws secure the cap to the exterior wall through the flanges in the cap Figure...

Page 20: ...n one side and with an overhang are permitted with the dimensions specified for vinyl or non vinyl siding and soffits 1 There must be 3 feet minimum between termination caps 2 All mechanical air intak...

Page 21: ...OVERHANG VERTICAL WALL TERMINATION CAP 12 X ROOF PITCH IS X 12 LOWEST DISCHARGE OPENING H MIN MINIMUM HEIGHT FROM ROOF TO LOWEST DISCHARGE OPENING 2 FT MIN 20 INCH MIN To seal the roof hole and to div...

Page 22: ...Figure 24 REAR COLLAR BOTTOM KNOCKOUT HEAT OUT KNOCKOUT HEAT ZONE KNOCKOUTS Heat Zone Kit 1 Remove the knockout from the top of the fireplace and discard it see Figure 24 2 Center the duct collar arou...

Page 23: ...d gas access hole can be plugged with non combustible insulation to pre vent cold air infiltration Open the fireplace lower grille insert the gas supply line throughthegaslinehole andconnectittotheshu...

Page 24: ...y back up Appliance Requirements This appliance requires that 110 120 VAC be wired to the factory installed junction box Maintain correct polarity when wiring the junction box WARNING DO NOT CONNECT 1...

Page 25: ...0 F MINIMUM SEALANT MATE RIAL MUST BE USED THESE JOINTS ARE NOT RE QUIRED TO BE SEALED ONLY NON COMBUSTIBLE MATERIAL USING 300 F MINIMUM ADHESIVE IF NEEDED CAN BE APPLIED AS FACING TO THE FIRE PLACE S...

Page 26: ...oor See Figure 31 to construct the facing template The fireplace requires a concrete board or other non combustible material extending from the header to the floor and extending from fram ing stud to...

Page 27: ...with this gas fireplace To place the ember material Pull the four glass latches out of the groove on the glass frame Remove glass door from the unit see Figure 33 Embers CANNOT be placed directly over...

Page 28: ...ass and run the fireplace for an additional 8 hours This will help to cure the products used in the paint and logs Figure 36 Air Shutter Setting This fireplace has an adjustable air shutter which cont...

Page 29: ...By Qualified service technician Task Make a visual check of the straight flame sensor rod see Figure 25 Use emery cloth to carefully remove any existing film or white deposits Checking Flame Patterns...

Reviews: