


7
6
How to Connect Your Desktop & Ultra Desktop Amp
How to Connect your Desktop & Ultra Desktop Amp
Desktop Power Supply
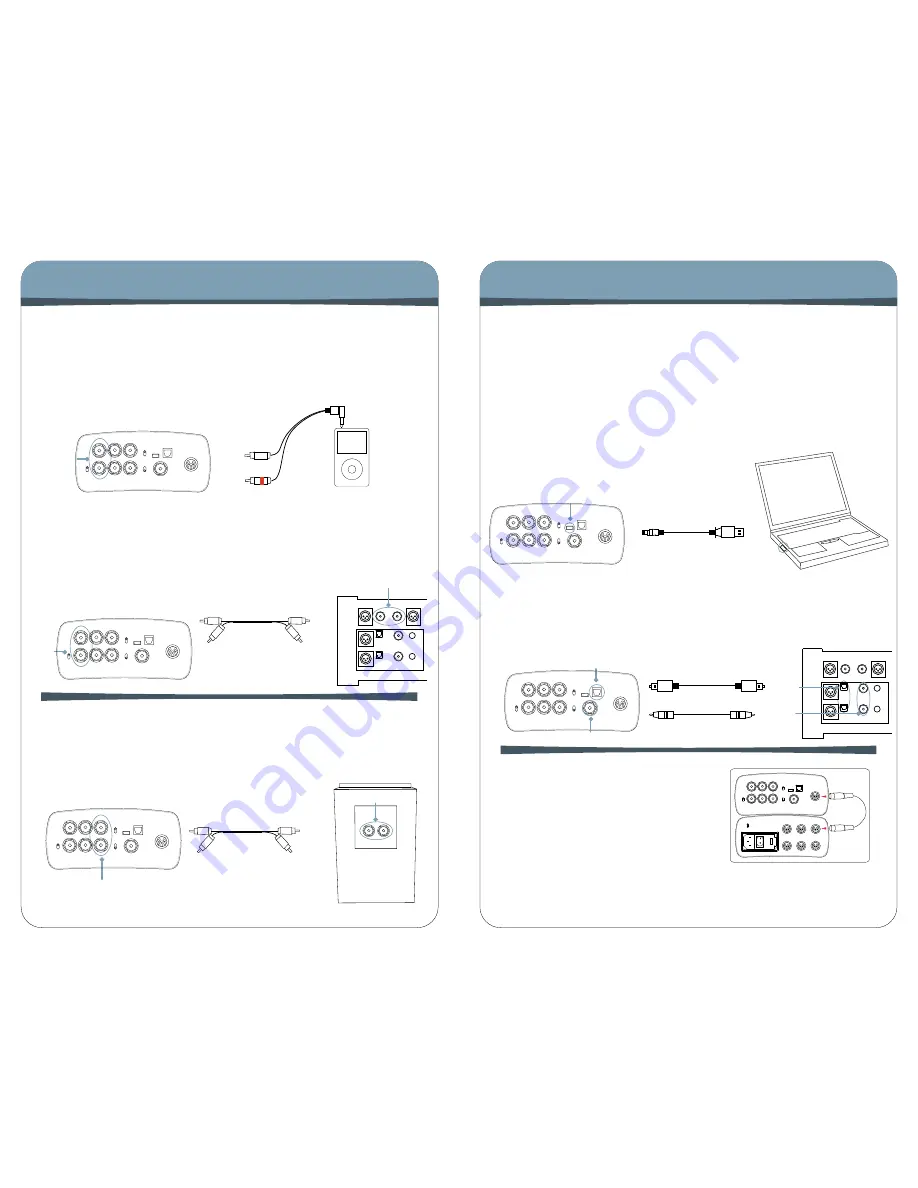
Connecting the Desktop Power Supply
The Desktop Power Supply is a power supply upgrade
available for purchase on our website. To connect the
Desktop Power Supply, you will need a power cable
with 5 pin terminations on either side(included with
DPS purchase.) Connect the +/- 15VDC power input
on the Desktop Amp to one of the power outputs on
the back of the Desktop Power Supply. Plug the pow-
er cord into the power entry module. To learn more
about the Desktop Power Supply see page 9.
115V
#2 To a home CD player or other Analog Sources via RCA outputs
#1 To a portable player via Headphone jack or line out.
If your source has RCA outputs, an RCA to RCA interconnect cable will connect the Desktop.
Plug the RCA inputs into the back of the Desktop Amp, and connect the other end to the line
output of your analog source. If your source only has a line out output or a headphone jack,
then go up to #1. If your CD player has digital outputs, skip to the next page.
- Switch the Source Selector Switch to analog.
All hard drive players provide a headphone jack.* An RCA to Mini Cable will allow you to
connect the headphone jack/line out of your player into the RCA inputs on the Desktop.
Choose analog input set 1 or 2, and connect the RCA inputs. Be sure to note that as al-
ways, red or ‘R’, designates right channel. Switch the Source Selector Switch to analog.
*Use line out if your player has it. Line out bypasses the player’s volume control completely; use the
amp’s instead.
RCA Inputs
Interconnect Cable
RCA Mini Cable
Headphone Jack
RCA
Inputs
RCA Outputs
#4 With DAC*: To your Computer or other digital source via USB,
coaxial, or optical output
The most convenient and common way to get a high quality signal out of your computer is
with USB output. (If you have optical or coaxial outputs on your machine, then skip to the
next section.) Simply plug a USB cable into your computer, and plug the smaller end into
the back of the amp. In most cases your computer will instantly recognize the amplifier,
but you may need to restart your music management program. If your computer does
not recognize the device, restart; if it still is not recognized, you may need to go into your
control panel/audio devices or system preferences/sound output and select ‘USB Audio
Codec’ as your default audio device.
- Switch the Source Selector Switch to ‘digital’.
- Switch the Digital Input Selector Switch to‘USB’.
To A CD or other player with Optical/Coaxial outputs:
Connecting to your Computer:
You will need an appropriate coaxial or optical cable, visit headphone.com to purchase
a cable. Plug one end into your source and connect the other end into the appropriate
input on the back of the amp.
- Switch the Source Selector Switch to ‘digital’.
- Switch the Digital Input Selector Switch to ‘coaxial’ or ‘optical’.
*Didn’t choose the DAC option with your Desktop Amp? You can send yours in to be upgraded
with our Upgrade program. See headphone.com for details.
Optical Cable
USB Cable
USB
USB Input
Optical Input
optical
RCA
Outputs
Interconnect Cable
RCA Inputs
Most self-powered speakers have RCA inputs, in which case you will use an interconnect
cable
to attach to the Desktop Amp. Attach the RCA cables to the RCA outputs on the rear of
the Desktop Amp. Plug the other end into the back of your speakers.
Switch the Rear Output Switch to ‘on’ to listen to your speakers, or switch it to ‘off’ to listen
to your headphones.
#3 Using Self Powered Speakers with the Desktop
coaxial
Coaxial Input
Coaxial Cable


