background image


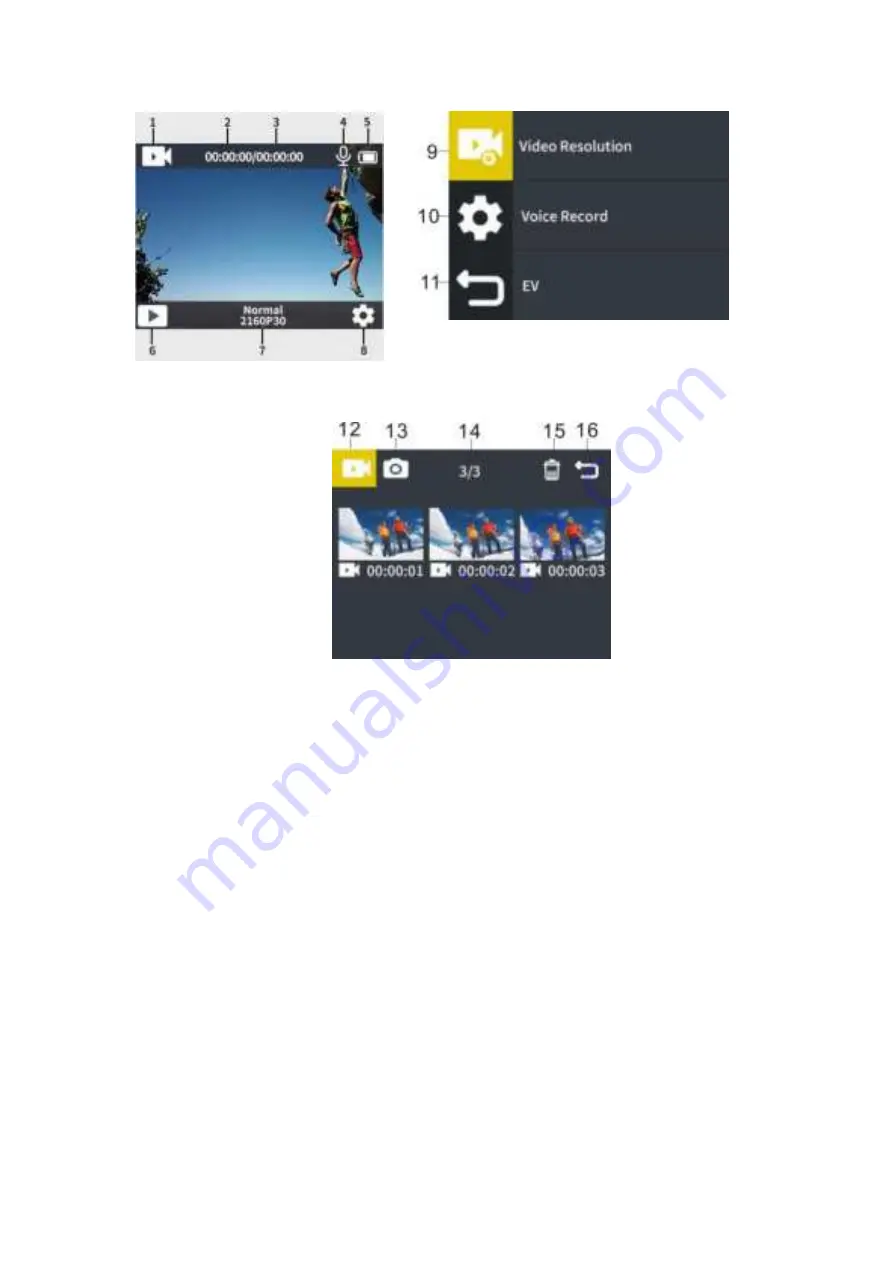
                            Picture 1                                                            Picture 2                                                                           


1.Recording  Mode        2.Recording  Time      3.Available  Recording  Time        4.Voice  Recording 

State 

5.Battery  capacity        6.  Playback  (touch  the  screen  to  enter  the  playback  interface)              7. 

Resolution display (touch the screen to enter the video mode adjustment)          8. Menu settings 

(touch the screen to enter the video and system menu settings)      9. Video Settings Menu      10. 

System  Settings  Menu        11.  Exit      12.  Video  Playback  Directory      13.  Photo  Playback 

Directory      14. Number of Playback Files      15. Delete        16. Exit     


6.2 Photo Mode 

Summary of Contents for FS01A

Page 1: ...FS01A ...

Page 2: ...ple times will degrade its performance The memory card is a precision electronic device Do not bend the memory card and avoid falling or being stressed Do not place the memory card in a strong electric or magnetic environment such as near a speaker or television receiver Do not use or leave the memory card in an overheated or under cooled environment Keep the memory card clean and avoid touching a...

Page 3: ...d the use time Available to shoot photos or recording videos while charging HD wide angle lens Support up to 32G memory card Supports a variety of video recording formats 4K30FPS 1080P 720P Multiple shooting modes support single shot or automatic shooting Super mini appearance many colors available 3 Pictures Diagram ...

Page 4: ...ophone 6 USB 10 Screen 14 TF card 3 Mode Button 7 Power on off button 11 Charging Indicator 15 Tripod mount 4 Speaker 8 Dual Screen 12 Working Indicator 4 Indicator Working Indicator 1 LED flashing during recording 2 LED turns off when turn off ...

Page 5: ...e recording menu recording loop recording slow recording Wifi Choose button when using together with power button in the setup menu short press to confirm 3 Long press to enter setup menu in the shoot menu Single shot continuous shooting delayed shooting wifi etc when using together with power button in the setup menu short press to confirm 4 Long press to enter File play preview list choose when ...

Page 6: ... to enter the playback interface 7 Resolution display touch the screen to enter the video mode adjustment 8 Menu settings touch the screen to enter the video and system menu settings 9 Video Settings Menu 10 System Settings Menu 11 Exit 12 Video Playback Directory 13 Photo Playback Directory 14 Number of Playback Files 15 Delete 16 Exit 6 2 Photo Mode ...

Page 7: ...fter turning on the camera long press the video confirmation button to display the interface of Pictures 2 click the middle place at the bottom pop out pictures2 interface click the shortcut menu icon to perform shortcut operation press M key to exit or click on the upper right corner X of picture 2 to exit Picture 1 Picture 2 6 3 2 After turning on the camera slide the screen left and right in th...

Page 8: ...xit or touch the screen to click X in the upper right corner of picture 2 Picture 1 Picture 2 Button function operation diagram Basic function operation 1 Playback recording settings photo settings Shortly press the M key after power on it will show the following mode cycle picture Press the OK button to confirm or touch the screen or click the icon in the lower left corner of the video preview in...

Page 9: ...ection button to select the deleted item press the ok button to confirm the deletion a 2 How to delete by using touch screen in the video playback review interface click icon and then choose the file click and pop out delete interface click delete b Picture file delete b 1 Delete file steps by buttons short press M key to switch the mode menu to playback Press ok button to enter video replay view ...

Page 10: ... interface pops up click delete Video playback preview interface Picture playback preview interface Delte Interface 3 Short press power button to turn on Wi Fi and short press again to turn off Wi Fi The Wi Fi name is different for each item and all password is 1234567890 Below picture is only for reference ...

Page 11: ...computer cannot detect the removable disk WIFI APP Connection Before using the wifi function please install the iSmart DV APP program on your smartphone or tablet Remarks For Android smart phone please search for iSmart DV on Google Play and install to use it For IOS smart phone Please downloaded from app store by searching iSmart DV Connection steps 1 After tuning on short press the power button ...

Page 12: ...Android IOS Note You can search iSmart DV and download the app from app store for IOS and Google play for Android 10 Specification ...

Page 13: ...H 264 Port Micro USB2 0 HDMI Storage MAX to 32G Micro SDHC Power 5V 1A Mic Support Speaker Built in Battery Capacity 1350mAh Real 1000mAh Recording Time 4K About 85Min Charging Time About 2 4hours WIFI WIFI 2 4G Language English Simplified Chinese Traditional Chinese German French Italian Spanish Portuguese Polish Dutch Russian Japanese Operation System Windows XP 7 8 SP3 Vista and Mac 10 5 or abo...

Page 14: ... and can radiate radio frequency energy and if not installed and used in accordance with the instructions may cause harmful interference to radio communications However there is no guarantee that interference will not occur in a particular installation If this equipment does cause harmful interference to radio or television reception which can be determined by turning the equipment off and on the ...

Reviews: