3
Vedpak 177_Version 2_061013
171850 - 171853
171909 - 171914
NOTE:
After installation, frequently inspect the lightbar and mounting feet to ensure that all fasteners and
brackets are tight.
Installation includes centering the lightbar on the vehicle’s roof, leveling the lightbar, and scribing and drilling
holes for mounting the lightbar permanently to the roof.
1. Place lightbar on the vehicle roof at the desired location. The lightbar is usually
centered on the door center post (B-pillar).
2. Adjust both mounting feet in or out as necessary until the foot pads rest near the edge of the roof or
gutter where the roof is the most rigid. Make sure the lightbar and the mounting feet are centered left to
right on the vehicle.
3. Level the lightbar by shifting the lightbar slightly forward or back.
4. Using the mounting feet as .....a template, mark two drilling holes on each end of the vehicle roof.
5. Carefully remove the lightbar and turn it upside down, and ensure that the mounting feet do not shift
place.
6. Tighten the nuts that secure the mounting feet to the lightbar.
7. Drill four holes at the previously marked drilling positions.
WARNING: DO NOT DRILL THROUGH the roof support structure that spans the
distance between the
driver’s and passenger’s side. Drilling through this will weaken the roof of the vehicle.
NOTE:
Before drilling holes, ensure that the holes will go through sheet metal and not the upholstery.
And ensure that no damages are caused to the vehicle components
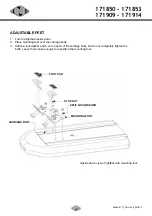
8. Place lightbar on the vehicle roof and align the mounting holes with the mounting feet. Secure mounting
feet to vehicle roof with carriage bolts. Installation includes centering the lightbar on the vehicle’s roof,
leveling the lightbar,and scribing and drilling holes for mounting the lightbar permanently to the roof.
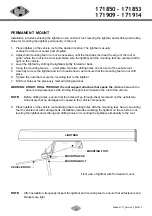
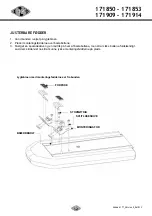
PERMANENT MOUNT
LIGHTBAR
MOUNTING FOOT
MOUNTING PAD
MOUNTING BOLT
VEHICLE ROOF
Front view of lightbar with Permanent mount


