© 2011 Hawking Technologies, Inc. All rights reserved.
Hi-Gain
TM
Outdoor Wireless-300N Multifunction Access Point
www.hawkingtech.com
Technical Support: 1.888.202.3344
E-mail: [email protected]
©2012 Hawking Technology, Inc. All right reserved. Mac is a registered trademark of Apple Computer, Inc. Windows is a registered trademark of Microsoft Corporation. No affiliation is implied or expressed.
Quick Installation Cont’d
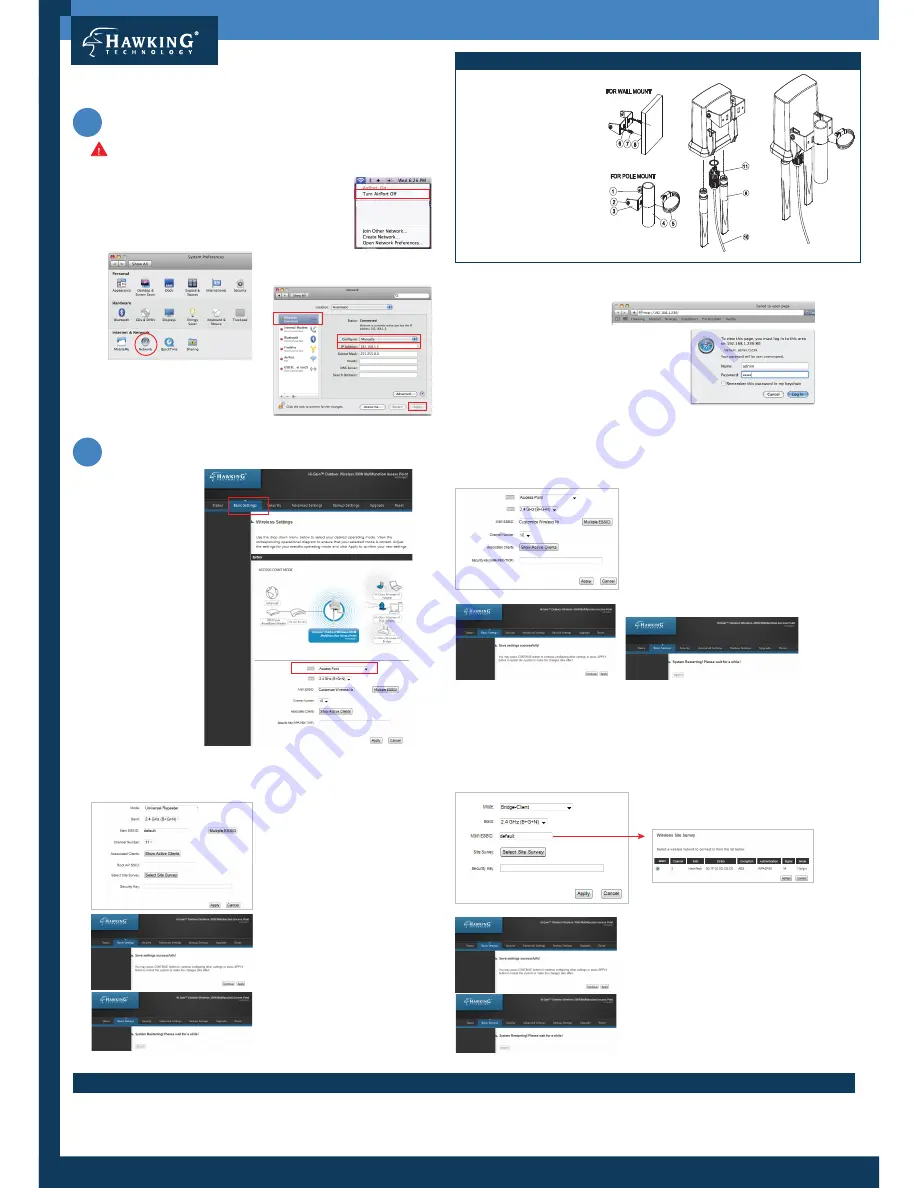
Mounting and Assembly Instruction
1.Square Nut (2 pcs)
2.M5-12 Screw (2 pcs)
3.M Shape Mounting (1 pc)
4.Pole (not included)
5.Hose Clamp 2 (1 pc)
6.Wall Screw (2 pcs)
7.Wall Anchor ( 2pcs)
8.Wall (not included)
9.Omni-Directional Antenna (2 pcs)
10. RJ-45 Connector (1 pc)
11.Water Proof Gasket Kit for RJ-45 (1 pc)
Note: Do Not mount your Access Point until you have
completed the initial configuration.
2
Select the Operation Mode
Post Configuration:Hardware Setup & Positioning the HOWABN1
Click on the ‘
Basic
Settings
’ tab at the top of
the page.
From the Drop Down
Menu, select an operation
mode.
2C.
Bridge-Client Mode
In this mode, the HOWABN1 consolidates all your Ethernet devices, such us a wired
computer, TV or Game Console and connects them to your wireless network.
Select ‘Bridge-Client’ from the drop down menu.
Click Site Survey. Select the network you wish to
repeat. Click on “Select Site Survey.”
Type in your wireless key if necessary.
Select a wireless network to connect to from your
list. Choose your network and click “Connect”
After you finish with setting, please click ‘Apply’
button to restart the wireless access point and for
the changes to take effect.
After it is done, please disconnect the HOWABN1
from your network and hook it up to your ethernet
devices you wish to bridge.
Version 2012.05.01
Select ‘Universal Repeater’ from the drop
down menu. Click Site Survey. Select the
network you wish to repeat. Type in your
wireless key if necessary.
Please click ‘Apply’.
The following message will be displayed.
Click ‘Apply’ button to restart the wireless
access point and for the changes to take
effect. After it is done, please disconnect
the HOWABN1 from your network and it
will automatically repeat the signal
wirelessly.
2B.
Universal Repeater Mode
In this mode, the HOWABN1 can act as a wireless repeater. It will use the Bridging
function to connect to the wireless source and the Access Point function to
rebroadcast the signal.
2A.
Access Point Mode
In this mode, the HOWABN1 converts a standard wired network to a wireless network.
The message ‘Save settings successfully’ will be displayed. Click ‘Apply’ button to restart the
wireless access point and for the settings to take effect.
Select ‘Access Point Mode’ from the drop down
menu. In the ‘Main ESSID’ field, enter a name for
your Wireless Network. (This name will be used to
identify this specific wireless Hi-Gain Outdoor
Wireless-N Access Point. You can input up to 32
alphanumerical characters. PLEASE NOTE THAT
ESSID IS CASE SENSITIVE.)
It is recommended to Enter Security Key to protect
your network from unwanted users. Click ‘Apply’,
and the following message will be displayed.
With the initial configuration complete, you may now mount your Access Point in your desired location. Mounting Instructions are located on top of this page. Please follow the operational
diagram to correctly connect and position your Access Point. For more information, please refer to the User Manual or Website.
If you are installing your HOWABN1 with a Windows computer, please refer to the opposite side.
d.) Open up your web browser (i.e.
Safari, Firefox, etc.) and type
‘
192.168.1.230
’ in the address bar.
When the access window appears,
enter the username ‘
admin
’ and the
password ‘
1234
’. Then select the
‘
Log In
’ button.
1
Configure the HOWABN1 with a Mac computer
a. Connect your computer to the network using an ethernet
cable. If your computer is Wi-Fi enabled, you’ll need to turn
off the Wi-Fi connection from your computer until you are
done configuring the HOWABN1.
!
You must complete the ‘Pre-Configuration: Hardware Setup’ before this step.
Please refer to the opposite page for pre-configuration.
c.) Select the ‘
Ethernet
’ option. Find the
‘
Configure
’ drop down menu and select
‘
Manually
’. In the IP address, enter
‘
192.168.1.5
’, and select ‘
Apply
’.
b. Open your System Preferences and select the “Network”
option.
HawkTech
WLAN


