background image

English

10

OPERATION

Assembly

1.  Assemble the base around the cord and align with the posts on the bottom of 

the fan. It will drop into position when correctly aligned. 

Note: 

The plug will not fit through the hole in the base. 

2.  Use the screws provided to secure the two base halves together (2 screws), 

and then secure the base to the fan unit (4 screws).

3.  Use the provided cable grip and screws to fix the cable in position to prevent it 

from becoming trapped under the base.

Use

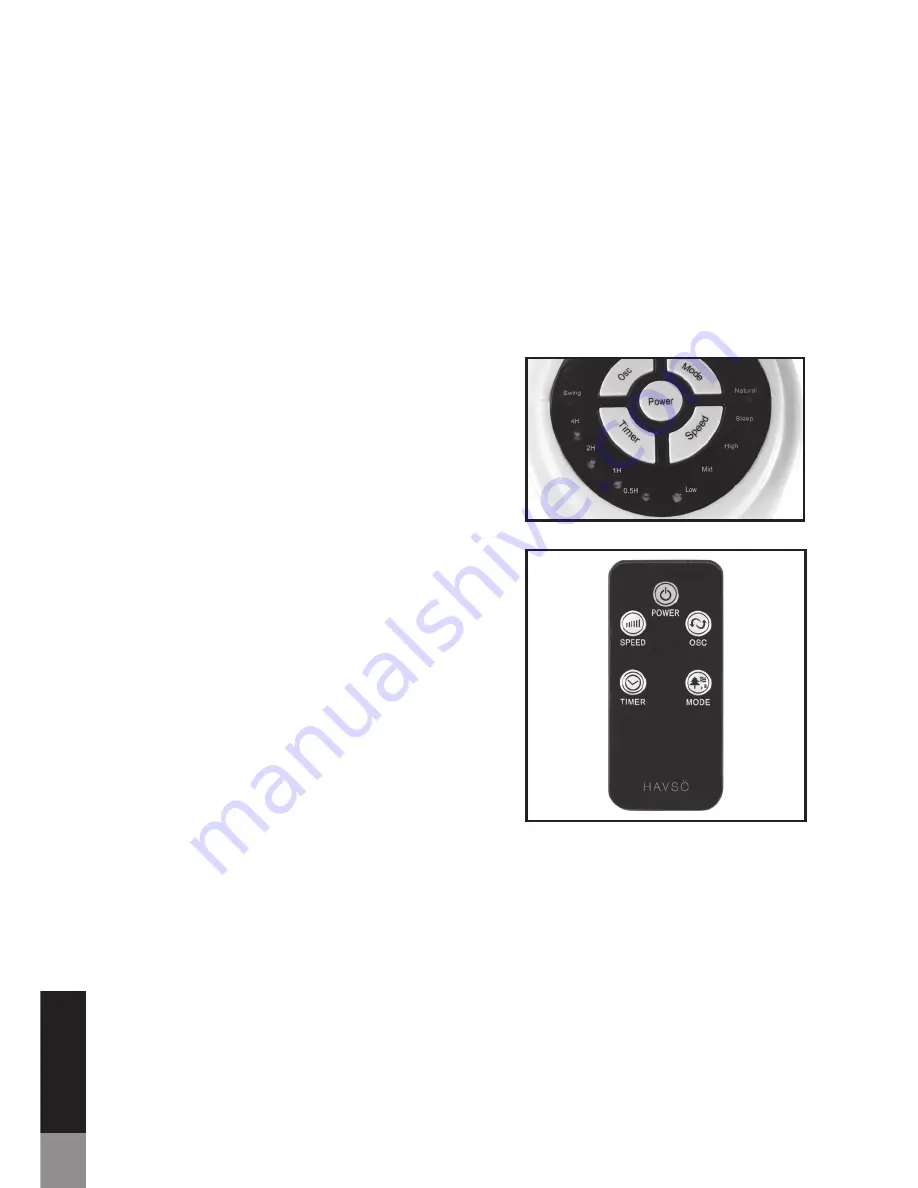
1.  Connect the power plug to a suitable 

outlet.

2.  Start the fan by using the ON/OFF button.
3.  Select the desired speed pressing the 

Speed button until the desired speed 
LED is lit.

4.  Turn swing on or off by pressing the 

SWING button.

5.  Pressing the MODE button will select 

either natural or sleep.

6.  Press TIMER to set a time for when the 

fan shall automatically turn off. The button 
will change time from 0.5 hours to 7.5 
hours, with 0.5 hour increments.

Remote control


The remote control can be used to adjust 
all these features remotely by pressing 
the corresponding buttons on the remote.

Maintenance


Before cleaning turn the fan off and unplug it from the power supply.


To clean the fan, use a soft cloth to wipe off any dust. If the fan is very dirty 
use a damp cloth and wipe dry. Do not use any cleaning detergents, sprays or 
other chemicals, as they will damage the fan.


Store the fan in the original packaging in a ventilated, dry area.


The motor bearings are permanently sealed and do not require additional 
lubrication.

Summary of Contents for Ebba 3.0

Page 1: ...Ebba 3 0 TOWER FAN USER MANUAL Svenska English...

Page 2: ......

Page 3: ...Svenska S kerhetsf reskrifter 4 5 Anv ndning 6 Specifikationer 7 vrig information 7 English Safety precautions 8 9 Operation 10 Specifications 11 Other information 11...

Page 4: ...n det leda till elchock personskador eller skador p egendom Om str msladden r skadad m ste den ers ttas av tillverkaren dess serviceagent eller liknande kvalificerad servicepersonal f r att undvika fa...

Page 5: ...dvika verhettning Anv nd inte fl kten tillsammans med en separat timer fj rrstyrningsprogram eller annan produkt som kan st nga av eller p fl kten Barn under tta r b r bara f st nga av och s tta p fl...

Page 6: ...n genom att trycka p SWING knappen 5 Genom att trycka p MODE knappen v ljer du mellan funktionerna NATURAL och SLEEP 6 Tryck p TIMER f r att st lla in n r du vill att fl kten automatiskt ska st nga av...

Page 7: ...oduktens f rpackning inneb r att materialet r tervinningsbart Lag och s kerhet Detta m rke finns p produkten och i manualen f r att visa att den uppfyller de europeiska s kerhets och elektromagnetiska...

Page 8: ...ng dropped or damaged in any way Doing so may cause electric shock personal injuries and property damage may occur If the supply cord is damaged it must be replaced by the manufacturer its service age...

Page 9: ...vice that switches the appliance on automatically since a risk of fire exists if the appliance is covered or positioned incorrectly Children under 8 years old should only be allowed to switch the appl...

Page 10: ...is lit 4 Turn swing on or off by pressing the SWING button 5 Pressing the MODE button will select either natural or sleep 6 Press TIMER to set a time for when the fan shall automatically turn off The...

Page 11: ...tion This symbol on the products packaging means that the material is recyclable Law and safety This product has been manufactured according to current regulations for electromagnetic fields EMF which...

Page 12: ...Made in P R C by Bergsala SDA AB P O Box 10204 434 23 Kungsbacka Sweden...

Reviews: