


19
SETUP & OPERATION
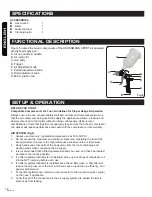
ASSEMBLY & PREPARATION
1. After unpacking the product, inspect carefully for any damage that may have
occurred during transit. Make sure to tighten fittings, bolts, etc., before putting unit
into service.
2. Thoroughly mix and thin paint in accordance with the paint manufacturer’s
instructions. Most materials will spray readily if thinned properly.
3. Strain material through filter, cheese cloth or a paint strainer before pouring into
spray container.
4. Fill the container about ¾ full and start the air compressor.
5. After connecting spray gun to air supply, please make sure that the fluid cap,
container and air hose have been connected tightly to reduce risks of leaks.
6. Set up a piece of cardboard or other scrap material to use as a target and adjust
for best spray pattern.
7. Test the consistency of the material by making a few strokes on a cardboard
target. If material still appears too thick, add a small amount of thinner. THIN
WITH CARE! Do not exceed paint manufacturer’s thinning recommendations.
ADJUSTMENTS
WARNING!
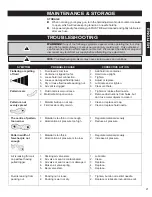
The desired pattern, volume of fluid output, and fine atomization can
easily be obtained by regulating the pattern adjusting knob, material (PAINT)
adjusting knob and air adjusting knob.
Pattern adjustment:
Turning the pattern adjusting knob to the right until tight will
make a round spray pattern round, or turning it left will make an elliptic spray
pattern.
Material (paint) adjustment:
Turning the paint adjusting knob clockwise will
decrease the volume of fluid output and turning it counter-clockwise will increase the
fluid output.
Air volume adjustment:
Turning the air adjusting valve clockwise will decrease the
air volume and turning it counter-clockwise will increase the air volume.
!
WARNING!
DO NOT EXCEED maximum pressure of air-powered gravity-feed
spray gun or any other parts in the compressor system.
!
!
WARNING!
Never aim or spray at yourself or anybody else, which could cause
serious injury.
Fig.7
Air volume
adjustment
Pattern
adjustment
Material
adjustment
ENGLISH
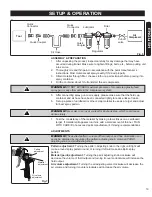
Fig.6
Quick
Connector
Tool
Quick Coupler
Air Hose
Quick
Coupler
Quick
Connector
Lubricator
Filter
Regulator
Cut-off
valve
Air
Compressor