

Page 13
Page 14
Page 15
Page 16
Page 17
Page 18
Page 19
Page 20
Page 21
Page 22
Page 23
Page 24
The items that need to be set for each event are:
●
Source selection:
leave set at WinTV to bring up the WinTV at the
requested time and on the requested channel. Select Reminder to
just pop-up a text file as reminder.
●
Time to Begin Program:
set to the desired start time. The default
time is about 3 minutes from the current time. Click on the hour to
set the hour, the minute to set the minute to start the program.
N
ote: It is always possible that your TV show will be transmit-
ted in advance or late, and it takes about 10 seconds to launch
the WinTV and set up for recording. Please set the Time to Begin
Progam few minutes before the time your TV show should starts.
●
Program Duration:
set the duration of this event, using the arrows
(steps of 30 minutes) or directly the keyboard. This will update the
Time to End Program
window.
●
Date to Begin
: today's date is the default. Change this if you want to
schedule on another date.
●
Program Period
: One Time Only, Every day or Weekly are the choic-
es. If you select the Weekly option, select the day you would have
the show recorded too.
●
Date to End
: If you have selected the Every Day or Weekly option,
you can specify the date at which it will stop this task.
●
Channel selection:
choose one of your scanned channels.
●
Recording options:
click on Record to File to record your show.
Leave this button unchecked to watch TV at the requested time. You
can also name your file to record.
Once these are set, click
Set Program
. You can add more Events,
clicking
Set Program
after each event is set. When you are finished
click
Close
.
The WinTV program does not have to be running for the Schedular to
work, but your PC needs to be either turned on, in Standby or in
Hibernate Mode, but you should not be logged off. If WinTV is not
running, it takes about 10 seconds to start WinTV and to start the
recording of TV.
To uninstall the Driver and Software
To uninstall the software simply run
hcwclear
from the installation
CD-ROM and select the last 2 options
'remove all WinTV drivers and
applications (total removal)'
and
'search all INF files'
. If you now sel-
ect
OK
a black screen will briefly appear and once it has disappeared
the software will be removed. If you now re-start the computer you
will be at Step 3 on page 3 of this document and can now re-install
the software.
Only some channels are found during DVB-T channel
scan
Check if there are transmitter works on your local transmitter here:
www.bbc.co.uk/reception/transmitters/today.shtml
as this could
effect the reception of certain channel.
Adding a TV channel manually
If the scan did not succeed, you can add a channel manually by enter-
ing the LCN number for your local transmitter. Enter your post code in
this link: www.wolfbane.com/cgi-bin/tvd.exe? to be presented with
information on your local transmitters.
N
ote: Your local transmitter should be the closest transmitter
with a H in the 'Pol' column. You need to write down the LCN
numbers.
Troubleshooting
Radio Interference Statement:
WinTV have been tested and found to comply with the limits for a
Class B digital device, pursuant to part 15 of the FCC Rules. These
limits are designed to provide reasonable protection against harmful
interference in a residential installation. This equipment generates,
uses, and can radiate radio frequency energy and cause harmful
interference to radio communications. However, there is no guarantee
that interference will not occur in a particular installation. If this equip-
ment does cause harmful interference to radio or television reception,
which can be determined by turning the equipment off and on, the
user is encouraged to try to correct the interference by one or more
of the following measures:
●
reorient or relocate the receiving antenna.
●
increase the separation between the equipment and receiver.
●
connect the equipment into an outlet on a circuit different from that
to which the receiver is connected.
●
consult the dealer or an experienced radio/TV technician for help.
FCC ID
: H90WINTV
CAUTION
: Changes or modifications not expressly approved by the
party responsible for compliance to the FCC Rules could void the
user's authority to operate the equipment.
CE Statement
: This equipment has been tested and complies with
EN 55013, EN 55020 and IEC 801-3 part 3 standards.
The device may not be disposed of with household rubbish. This
appliance is labeled in accordance with European Directive
2002/96/EG concerning used electrical and electronic appliances
(Waste Electrical and Electronic Equipment - WEEE). The guideline
determines the framework for the return and recycling of used appli-
ances as applicable throughout the EU. To return your used device,
please use the return and collection systems available to you.
Waste Electrical and Electronic Equipment
(WEEE)
The WinTV’s remote control software is installed automatically during
the installation of the WinTV applications. The installation will add the
shortcut “AutoStart IR” to the Start-up group. If this is not the case,
you can manually install the WinTV’s remote control software from
the installation CD-ROM / IR32 folder. Double click on IR32.exe.
1.
Insert the batteries into the the
Infrared Remote control
.
2.
Ensure the IR icon is on the start bar -
IR.exe
is loaded when
Windows starts only if your WinTV is connected.
N
ote: If you don’t see the WinTV Remote icon in the system
tray or if you need to reset the remote control application,
select “Restart IR” from the Start / All programs / Hauppauge
WinTV directory. You should restart the IR program each time you
plug your WinTV – except if it was plugged before Windows start-
ed.
Checking the function of the IR Remote
Make sure you see the black remote icon in the system tray (the area
next to the clock in the taskbar).
Point the Remote transmitter at the Remote control receiver (the little
eye on your WinTV Stick) and press the “Go” button. This should
open the “WinTV Remote” menu. Press the “OK” button to start
WINTV.EXE or use the “Up” and “Down” arrows on the remote to
select another option.
N
ote: The WinTV application only responds to the remote con-
trol if it is the active window. If the WinTV application is not
the active Window, press the TV button on the remote to bring the
WinTV window into the foreground.
N
ote: If you have a Windows Media Center PC and you do not
have a Media Center Remote you can use the Hauppauge
Remote instead (the remote is not Media Center certified and some
functionality may not be available).
N
ote: The credit card sized remote can be stored in a laptop's
PCMCIA bay while not in use.
7. Installing the Remote Control
(on some models)
Remote Control Buttons during a Recording
N
ote: Most WinTV functions and remote buttons are disabled
when recording
Record button:
Set the duration of the recording, by steps of 15 min-
utes up to 2 hours, then by steps of 30 minutes up to 4 hours. Clicking
again will disable recording duration. This information is displayed in
the Pause/Record tray.
Stop button:
Stop recording and close the Pause/Record tray (as the
Back/Exit button)
Pause button:
Freeze the video. Press the Play or Pause button again
to unfreeze the video. The Pause button has no effect on the record-
ing itself. While the video is frozen, the recording is continued in the
background, there is no Rewind, Forward, Skip, Replay function.
Remote Control Buttons when Pausing TV or Playing a
Video
N
ote: You cannot change channels when Pausing TV
Record button:
Stop current action and start a recording
Stop button:
Stop playing or Exit pause mode and close the
Pause/Record tray (as the Back/Exit button)
Play button:
Play the recorded TV or TV from the pause buffer (if
Pause/Record tray opened). Play and Pause button have alternatively the
same function.
<< (Rewind):
Play backwards at 8x speed. Clicking again will play
paused TV or recorded TV at 1x
>> (Forward):
Play forward at 2x speed. Clicking again will play for-
ward at 8x, then back to 1x
Pause button:
Start Pause-Mode (TimeShift). Press Play or Pause
again to continue watching from where you left off
>I (Skip):
Skips ahead in the Pause buffer by 10 seconds per click.
Holding the Skip button will auto-repeat, and advances the video
about 10 minutes per 15 seconds the button is depressed
I< (Replay):
Skips backward in the Pause buffer by 10 seconds per
click. Holding the Replay button will auto-repeat, and advances the
video about 10 minutes per 15 seconds the button is depressed
Quick Jump 0 to 9 buttons:
When playing a video, you can quickly
skip through the video by pressing the 0-9 buttons. When you press
one of these buttons, you will skip to, for example, 10% of the video
file when you press '1', 20% of the video file when you press '2' and so
forth (% of the length of the file).
During Pause-Mode, any key skips ahead in the Pause buffer to -2 sec-
onds.
When watching live TV
Go:
Open the “WinTV Remote”
menu, allowing you to start the
WinTV application
Power:
Exit the WinTV applica-
tion
TV:
Bring WinTV to the fore-
ground (if not currently active) /
Full screen TV mode on/off
Arrows & OK:
Select and confirm
options in the WinTV Remote
menu or the Windows task list.
Back/Exit:
Stop a recording / Exit
pause mode and close the
Pause/Record tray (as the Stop
button)
Menu:
Brings up the Windows
task list. Use the left and right
arrows to change to other
Windows tasks, and click OK.
Menu is an always active button.
Vol+ and Vol-:
Control the audio volume
Mute:
Audio on/off
Ch+ and Ch- buttons:
Select the next/previous channel
Prev.Ch:
Swap to last viewed channel
Record button:
Open the Pause/Record tray & start a recording. See
section Remote Control Buttons during a Recording
Stop button:
Stop a recording / Exit pause mode and close the
Pause/Record tray (as the Back/Exit button)
Play button:
Open the Pause/Record tray & play back the last record-
ing. If you didn’t record any TV shows recently, it will open the
MyVideos folder. See section Remote Control Buttons during Pause
TV or Playback
<< (Rewind):
Swap between Title and No-Title mode
>>:
Turn to Full screen TV mode
Pause button:
Open the Pause/Record tray & pause live TV (pause
mode). Clicking again will play from the point where the button was
originally pushed
0-9:
Direct access to channel number
Text (*):
Start VTPlus teletext application (if installed)
Remote Control Buttons
TV display has problems (e.g. no picture but with
sound or blurred image)
With the WinTV application closed click on the WinTV program group
(Start / Programs / Hauppauge WinTV) there is a utility called “Primary”.
Within Primary, select a different option from the main list of four items
(Allow VMR/Allow Overlay/Force Primary/DIB Draw), close the applica-
tion using the X in the top right hand corner then restart the TV program.
Repeat this process for all four options to determine the best option for
your computer.
“Error code 10” during installation
This is caused by a failure to load the WinTV-NOVA drivers. Uninstall
the software (as above) and then follow the instructions from page 3.
If this still give you an error message move the WinTV-NOVA to a dif-
ferent USB port and re-install the drivers again.
Under Windows XP Media Center application, I get the
error message “Decoder Error”
This message is normally caused by missing or incorrectly installed MCE
compatible DVD Decoder software. Please insure you have the latest MCE
compatible DVD Decoder from one of the following recommended ven-
dors: Cyberlink, Nvidia, Intervideo.
What is 7 Day EPG for WinTV
Certain digital DVB-T channels, along with their TV programmes, con-
tain a TV channel guide. This guide is a listing of the programs being
shown for the next 7 days, and includes the TV programme name,
programme start times and length. The 7 Day EPG for WinTV extracts
TV guide data from a DVB-T channel which contains this data. It cre-
ates a database on your computer.
When the Hauppauge 7 Day EPG opens up with its chart of times and
TV programs, it reads the EPG database and formats the 7 Day EPG
guide window. If you would like to record one of these TV pro-
grammes listed in the 7 Day EPG for WinTV window, you simply click
the "Record" button and at the correct time your TV show will be
recorded on your PC.
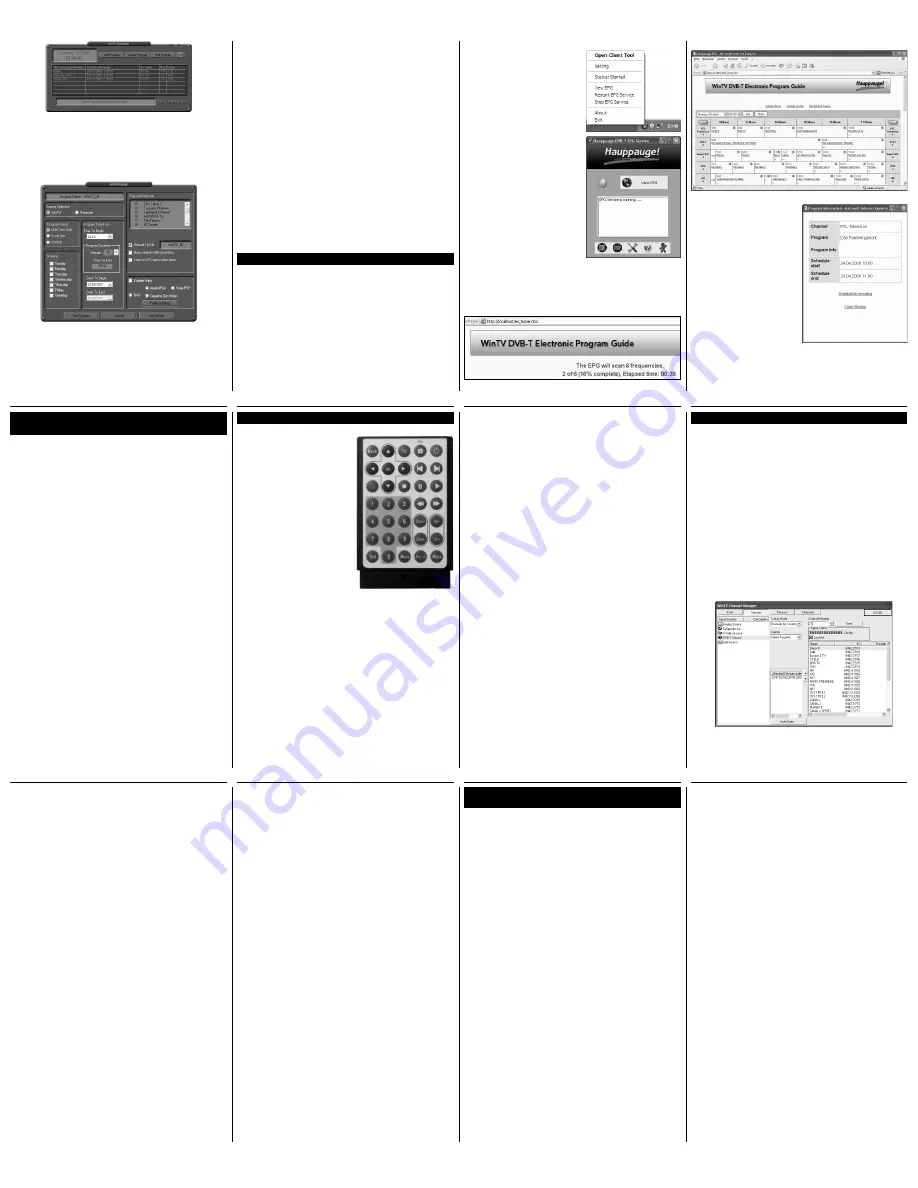
6. The 7 Day EPG
2.
Select
Open Client Tool
to see the
EPG Service window: It shows the
status of the EPG service.
The buttons below the window give
you the following controls:
• Start/stop the EPG Service
• Modify the current settings
• Open the EPG help file
• Exit the EPG application
To view the EPG guide click '
View
EPG
' See Step 4 for more informa-
tion.
3. Viewing the EPG information
From the EPG application window, click 'View EPG' this will open a
web page showing the EPG information, initially the application will
need to scan and update the EPG information. The amount of time it
takes to read the data is related to the number of channels in your
DVB-T transmission area. The more channels, the longer it takes to
read all of the data, this may take several minutes:
Once the scanning is complete you will be able to see the EPG guide:
4. Scheduling a recording
To schedule a recording, simply
click on the Program title, this will
give you more information about
that program, from there you can
click on '
Schedule for recording
',
When you click a "record" button,
the 7 Day EPG schedules a task to
record your TV show from a DVB-T
channel. The scheduled task is
added to
Windows Scheduled
Tasks
.
N
ote: You need to have a
user name and password
on your PC in order for the
scheduled recordings to record
through Windows Sheduled
Tasks.
The scheduled recordings can be viewed and modified through the
WinTV-Scheduler.
The format of the file name is [Programme title]_[Time]_[Date].mpg
In the
WinTV Channel Manager
, click on
Sources
then
DVB-T Source
,
enter the LCN numbers into the space under
Channel Number
and
click on the
Tune
button. The channel number will then be scanned
and any channels found will be listed in the channel list below.
How to use 7 Day EPG for WinTV
1.
You should see an icon of a globe
close to the Windows clock. Right
click on this icon to give a list of
options.
WinTV-Scheduler works by using the Windows Task Scheduler to
launch WinTV at the chosen time. WinTV-Scheduler sets up a com-
mand line in Task Scheduler to run WinTV, specifying a TV channel
and a length of time to record.
N
ote: You cannot access the Wing settings until you have pur-
chased the optional transcoder software, for more informations
see www.hauppauge.com/wing. Please refer to the Wing manual
for information on using the Wing settings.


