OPERATION
Form No. NLXM-1213
8
INSTALLATION
English
General
Use the following information to operate a NLX Series Narrow
Display Light.
Read all safety messages in the IMPORTANT SAFETY
INFORMATION SECTION before operating this equipment.
Standard and approved manufacturing oils may smoke up
to 30 minutes during initial startup. This is a temporary
condition. Operate unit without food product until smoke
dissipates.
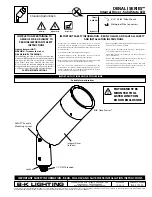
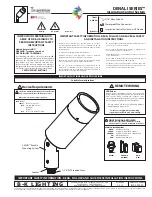
Startup
1. Move the Lights I/O (on/off) switch to the “I” (on) position.
The xenon display lights will illuminate.
Shutdown
1. Move the Lights I/O (on/off) switch to the “O” (off) position.
2. Perform the “Daily Cleaning” procedure in the
MAINTENANCE section of this manual.
CAUTION
WARNING
NLX Series Standard Control Box
Lights I/O
(On/Off) Switch
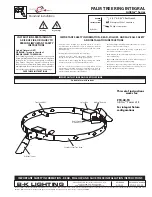
5. Make the electrical connections between the unit and the
control box. Refer to the wiring diagram included with the
unit.
6. Make the electrical connections between the control box
and the power supply. Refer to the wiring diagram included
with the unit.
7. Install the control box in the cutout. Make sure the wiring
on the back of control box is not pinched during installation.
8. Fasten the control box to the vertical surface using four
screws (not supplied).
9. Position the front cover on the control box and secure in
position using the four front cover screws.
Installing the Control Box
Front Cover
Front Cover Screw
Control Box
Control Box
Cutout
Control Box
Cutout