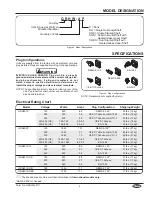


OPERATION
Form No. GRHWm-0111
9
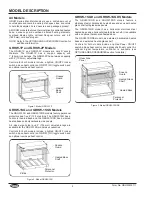
GRHW-1SGD and GRHW-1SGDS
1. move the Power On/Off switch to the “On” position.
• The overhead lights will turn on, the overhead heating
element will turn on, the heated glass shelf will energize,
and the base heating element will energize.
2. Turn the base heat control to the desired temperature
setting.
3. Turn the glass shelf heat control to the desired setting.
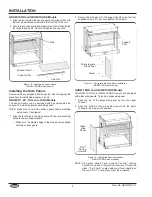
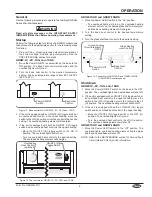
Figure 15. Controls for GRHW-1SGD and GRHW-1SGDS
(GRHW-1SDS controls shown)
Shutdown
GRHW-1P, -2P, -1SG, and -1SGS
1. move the Power ON/OFF switch on the base to the OFF
position. The overhead lights and heated base will shut off.
2. If the unit is equipped with an ON/OFF (I/O) toggle switch or
an overhead heat control in the upper housing, move the
switch to the OFF (O) position or turn the control to the off
(O) position. The overhead heating element will shut off.
3. If the unit is equipped with both an ON/OFF (I/O) toggle
switch and an overhead heat control in the upper housing:
• move the ON/OFF (I/O) toggle switch to the OFF (O)
position. The overhead lights will turn on.
• Turn the overhead heat control to the off (O) position.
The overhead heating element will shut off.
GRHW-1SGD and GRHW-1SGDS
1. move the Power On/Off switch to the “Off” position. The
overhead lights, overhead heating element, heated glass
shelf, and heated base will shut off.
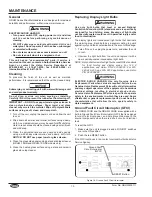
NOTE: Refer to the MAINTENANCE section for Ground Fault
Circuit Interrupt (GFCI) switch information.
Glass Shelf
Heat Control
Ground Fault
Circuit Interrupter
(GFCI)
Base Heat
Control
Power On/Off
Switch
General
Use the following procedures to operate the Glo-Ray® GRHW
Series mini-merchandisers.
Read all safety messages in the IMPORTANT SAFETY
INFORMATION section before operating this equipment.
Startup
Perform the following step for startup of all GRHW models and
then proceed to the appropriate section for the remaining steps
for startup.
1. Plug unit into a properly grounded electrical receptacle of
the correct voltage, size and plug configuration. See the
SPECIFICaTIONS section for details.
GRHW-1P, -2P, -1SG, and -1SGS
1. move the Power ON/OFF rocker switch on the base to the
ON position. The base heat control will energize and the
overhead lights will turn on.
2. Turn the base heat control to the desired temperature
setting. The base temperature range is from 82°F to 200°F
(28°C to 93°C).
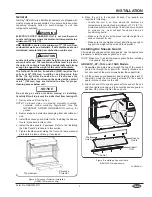
Figure 13. Base controls for GRHW-1P, -2P, -1SG, and -1SGS
3. If the unit is equipped with an ON/OFF (I/O) toggle switch or
an overhead heat control in the upper housing, move the
switch to the ON (I) position or turn the control to the desired
setting. The overhead heating element will energize.
4. If the unit is equipped with both an ON/OFF (I/O) toggle
switch and an overhead heat control in the upper housing:
• move the ON/OFF (I/O) toggle switch to the ON (I)
position. The overhead lights will turn on.
• Turn the overhead heat control to the desired setting.
The overhead heating element will energize.
Figure 14. Top controls for GRHW-1P, -2P, -1SG, and -1SGS
WARNING
ON/OFF (I/O)
Toggle Switch
Overhead
Heat Control
(optional)
Power ON/OFF
Switch
Base Heat
Control
Summary of Contents for Glo-Ray GRHW-1SGD Series
Page 15: ...NOTES Form No GRHWm 0111 15...